Planner Styles
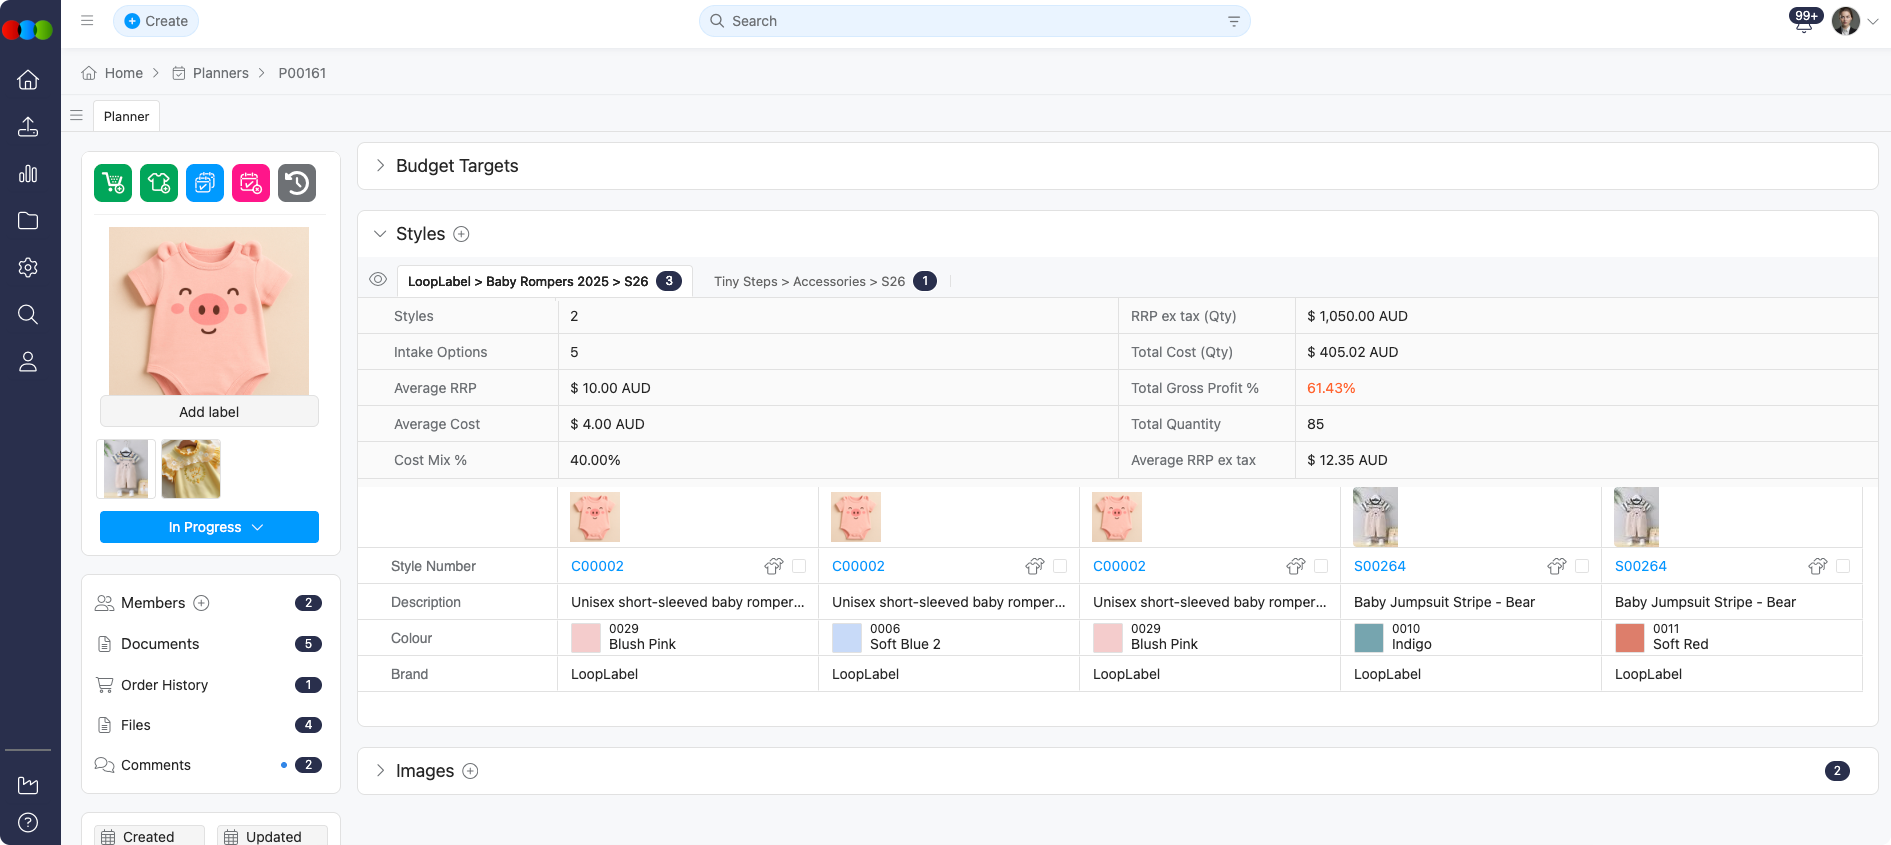
This section provides a compact, actionable view of styles where you can manage images, pricing, quantities, labels, market forecasts, and seasons to plan assortments efficiently. It supports bulk actions, inline editing, and grouping by attributes to speed up workflows and ensure consistency across colour variants. Use the view options to customise displayed fields and quickly switch between image-focused and detail-focused layouts.
For each colourway, Planner > Styles shows the Colourway Image from Style > Colours & Pricing when one is uploaded for that colour. If there is no colourway image, the card uses the style preview image together with the Colour Swatch, so you still see a clear visual for every option while planning.
Quick Check - Before You Start
- Know whether you use Fixed Group or Dynamic Group; Fixed Group tabs may depend on Site Settings > Planner > Groups.
- On Fixed Group tabs, section-level (style-level) and tab-level filters apply together—see Fixed Group Tab-level Filters.
Filters
Filtering in Planner > Styles works across two levels for both Fixed Group and Dynamic Group views: section-level filters and tab-level filters.
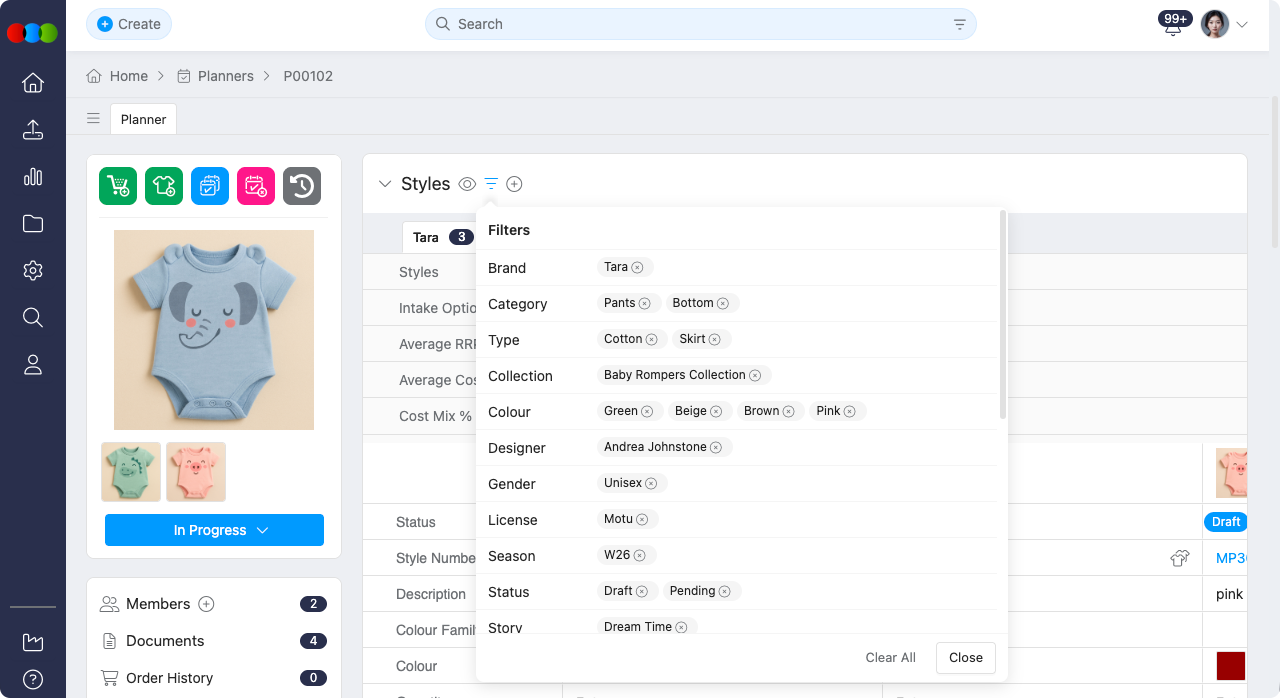
Section-level Filters
Section-level filters apply across the Styles section. If a tab does not have its own filters applied, the system automatically uses these section-level filters.
Filters available: Brand, Category, Department, Type, Collection, Colour, Designer, Gender, License, Season, Status, Story, Sub Category, Sub Type, Market Drop, Tags (from Style > Colours & Pricing > Tags), Order Status, Order Season, and the Show styles with orders tick box.
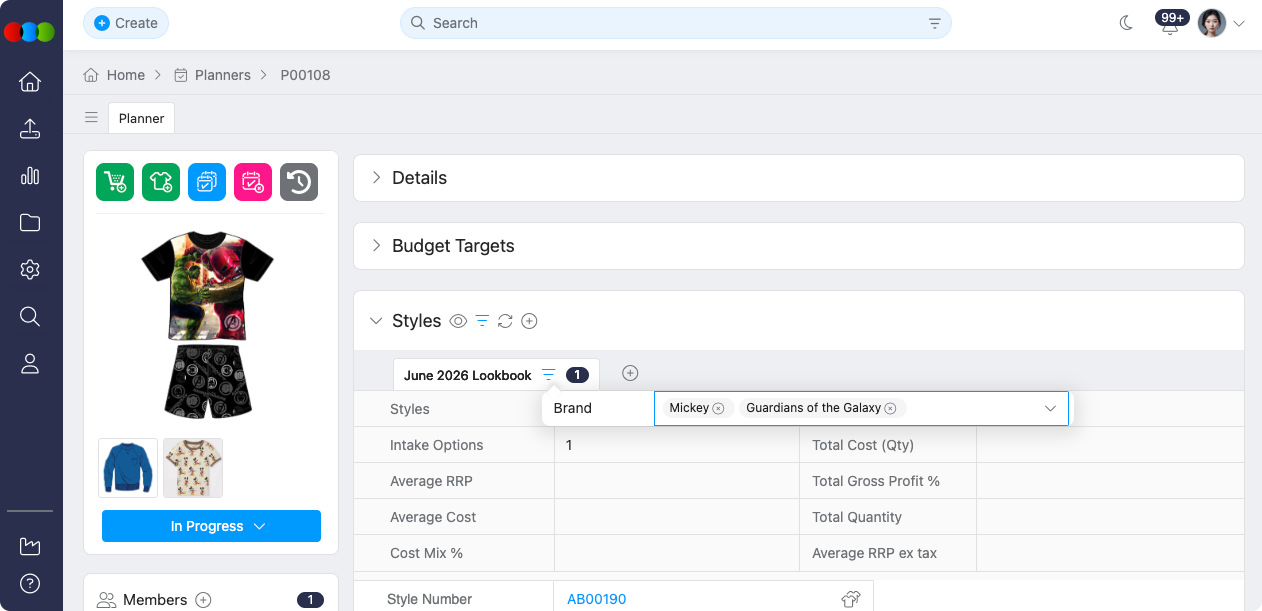
Fixed Group Tab-level Filters
For tabs with a Fixed Group type, the Admin-defined base filter is copied from Site Settings > Planner > Groups when the plan is created. Planners can then add extra tab-level filters within the individual plan without changing the Admin template or affecting other plans. Section-level (style-level) filters, the Fixed Group base filter, and any plan-level tab filters work together, every active filter in each place applies at once, so only styles that match the combined criteria appear in the grid, in badge count*, and when you add styles from the Style pop-up.
Example
For example, if the Admin base filter is Category = Footwear, you set Status to Approved and Season to W27 at the section level, and you add Gender = Mens on the Fixed Group tab, that tab lists only styles that satisfy all of those filters.
This setup lets Admins define broad Fixed Group templates and lets planners refine each tab within a plan. Plan-level additional filters are additive: they can only narrow the group and cannot bring in styles excluded by the base filter.
How to Add a Style
- Click the plus (+) icon to open the Style selector popup.
- Use filters to narrow down results by type, season, or category.
- Select one or more styles and click Add to include them in the planner.
How to Edit a Style
Once a style is added, you can perform the following actions:
| Action | Description |
|---|---|
| Upload Style Images | Add product visuals to support reviews and presentations. |
| Delete Style Images | Remove outdated or incorrect visuals. |
| Add or Edit Labels | Apply tags for filtering, categorisation, or workflow tracking. |
| Update Style Status | Set statuses (e.g. Draft, Approved, or Cancelled, or your configured values). |
| Duplicate Style | Create a copy of an existing style for reuse or variation. |
| Delete Style | Remove styles individually or in bulk. |
| Enter Pricing Information | Input the pricing information for: Buy Price, Sell Price, Retail Price, Alt RRP (Alternative Recommended Retail Price) |
| Input Size Scale | Define the size breakdown for each style. |
| Input Quantity by Colour | Allocate quantities per colour variant. |
| Manage Market Forecast | Add or remove markets, and edit forecast values for each market. Market forecasts are stored independently within the planner and won't affect the original style. |
| Change Season | Update the season for a style directly within the plan. Changes are stored in the plan database and remain independent from the original style. |
Example
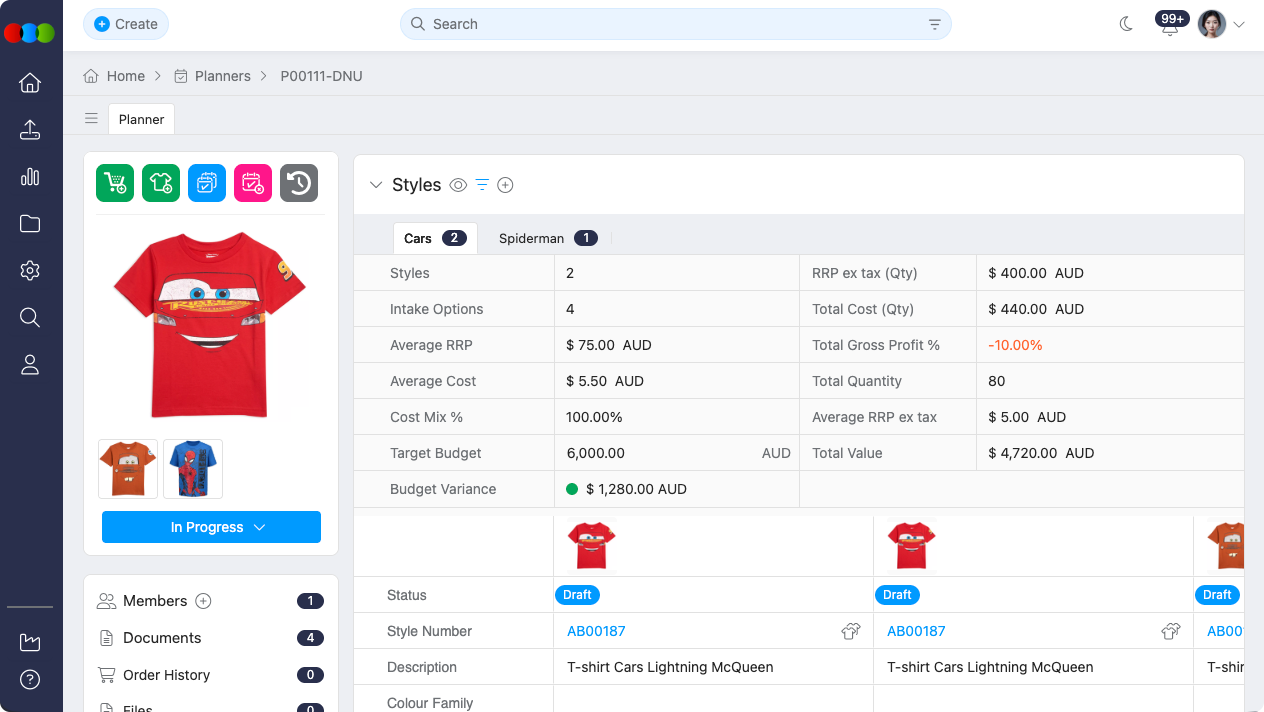
- Images and Details view
- Images only view — shows Style Number, Status, Description, Colour Description, and Colour Swatch on each card; the main picture is the Colourway Image when set, otherwise the preview image with the swatch.

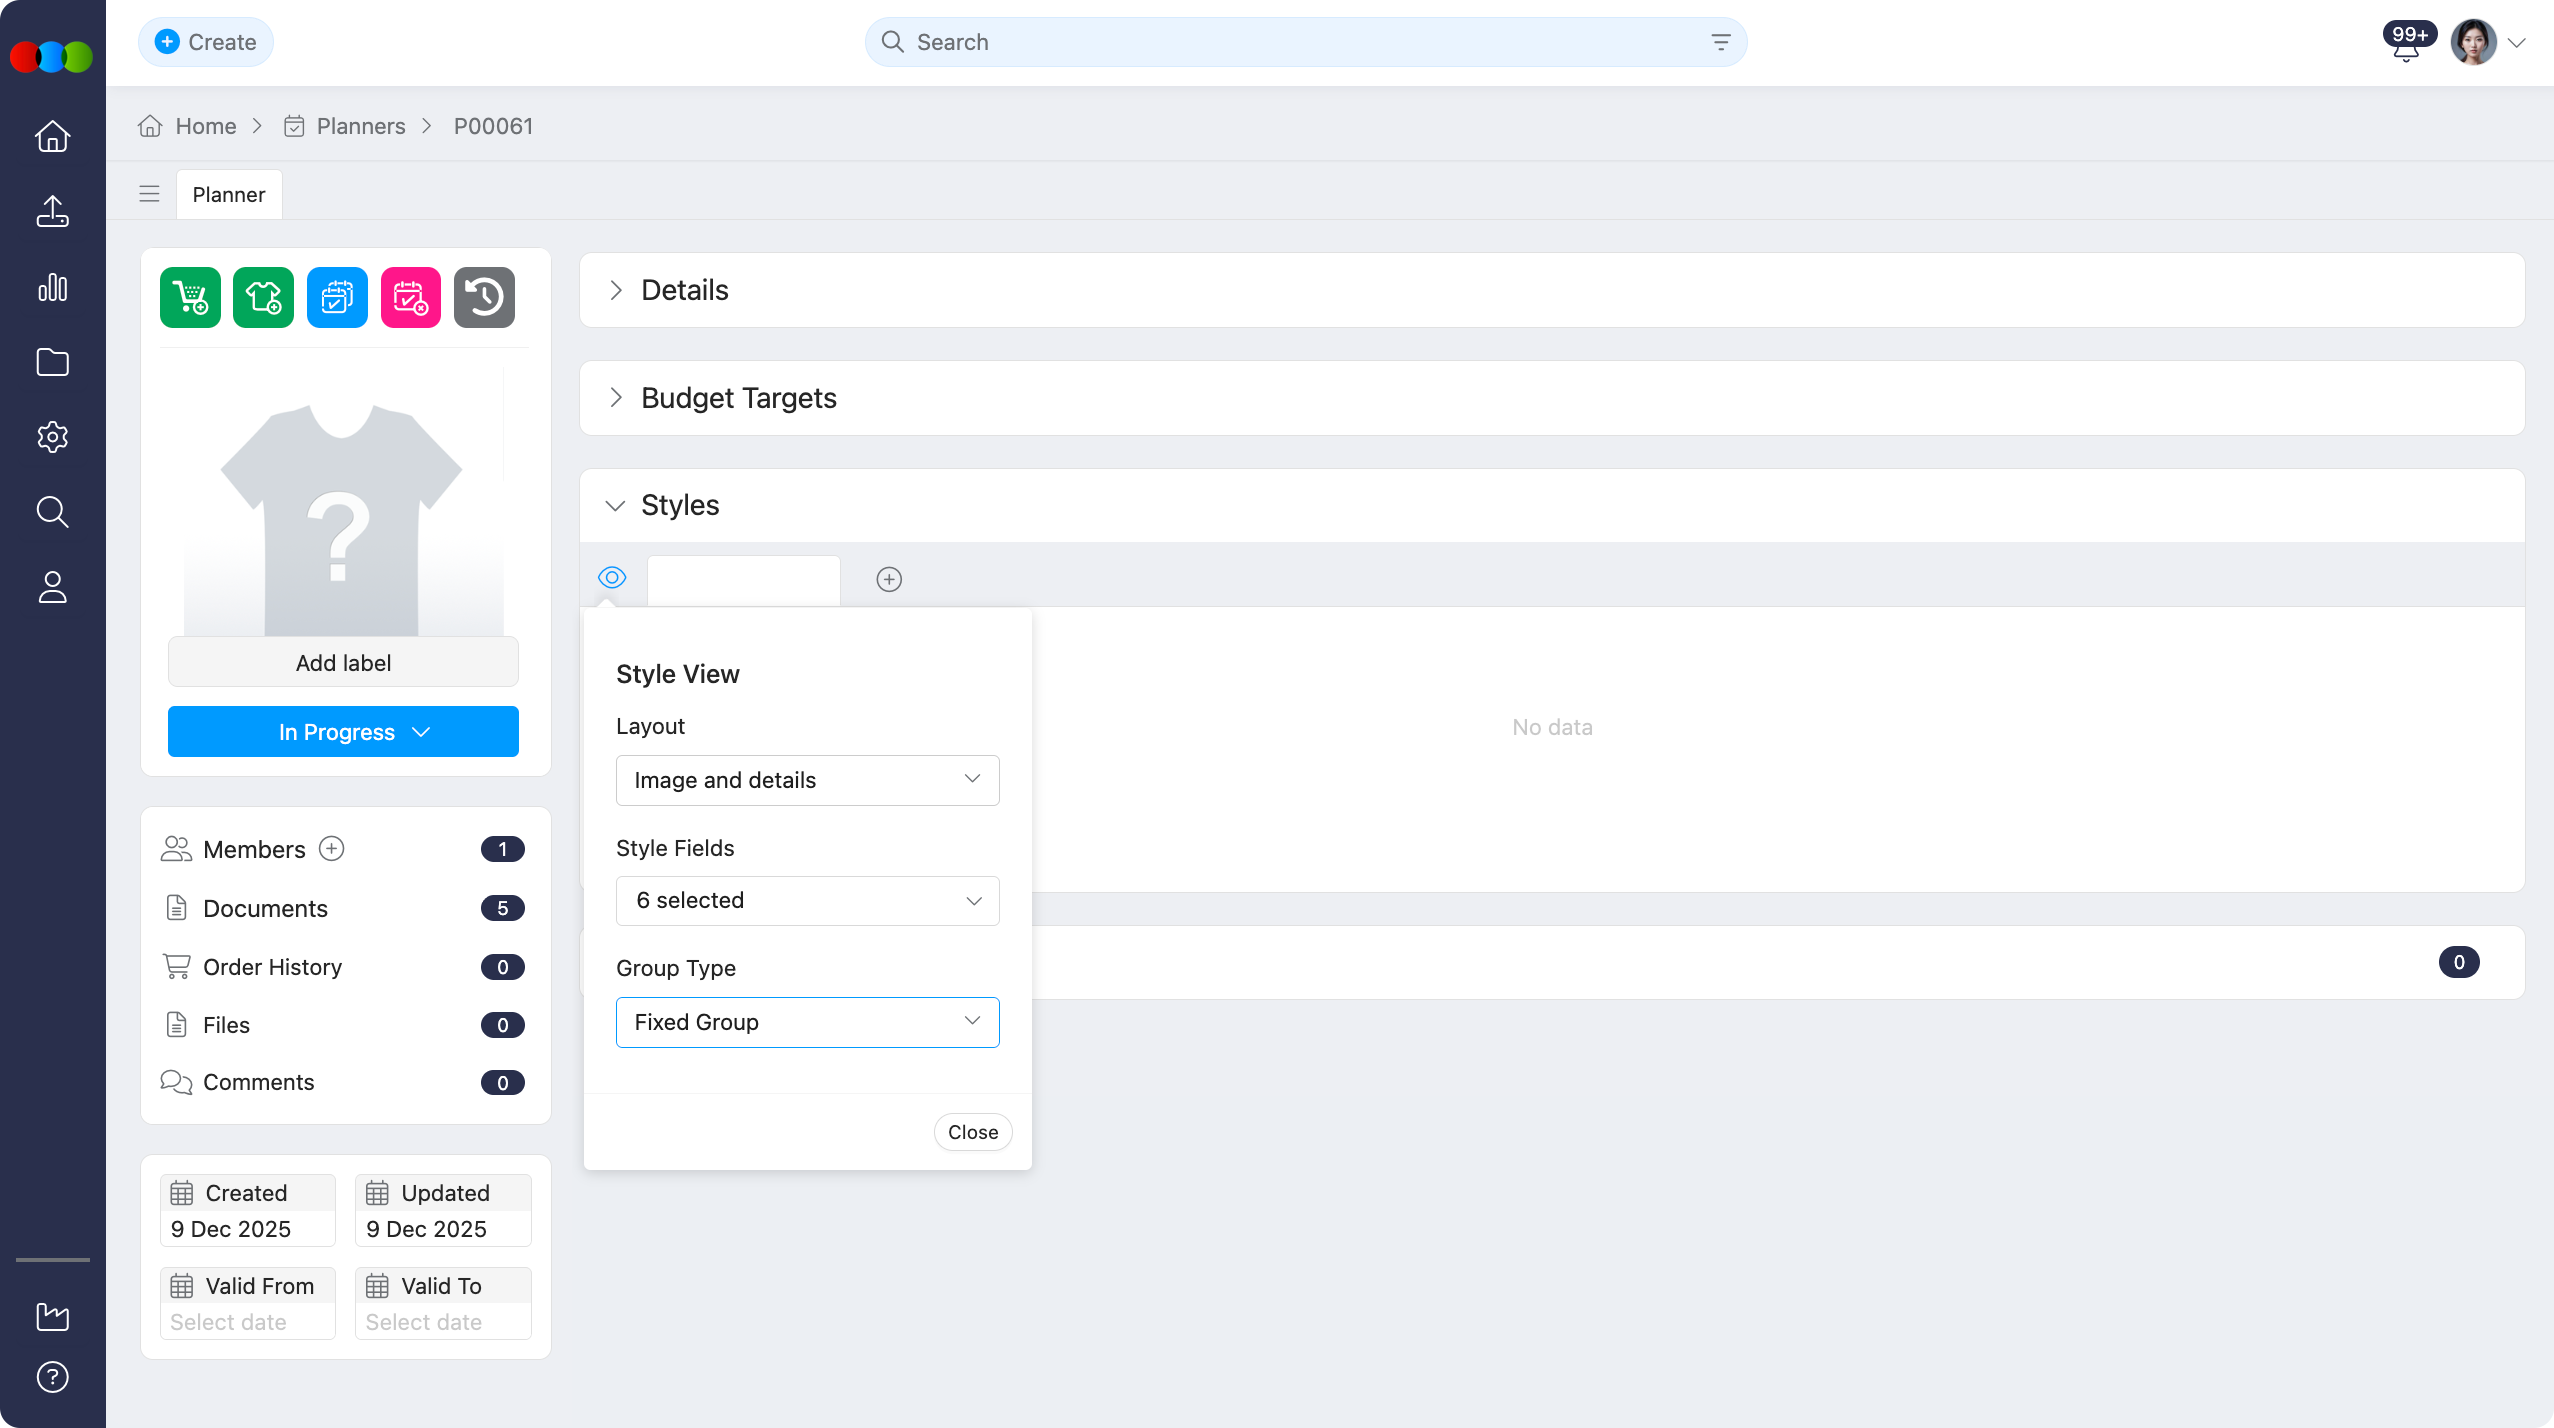
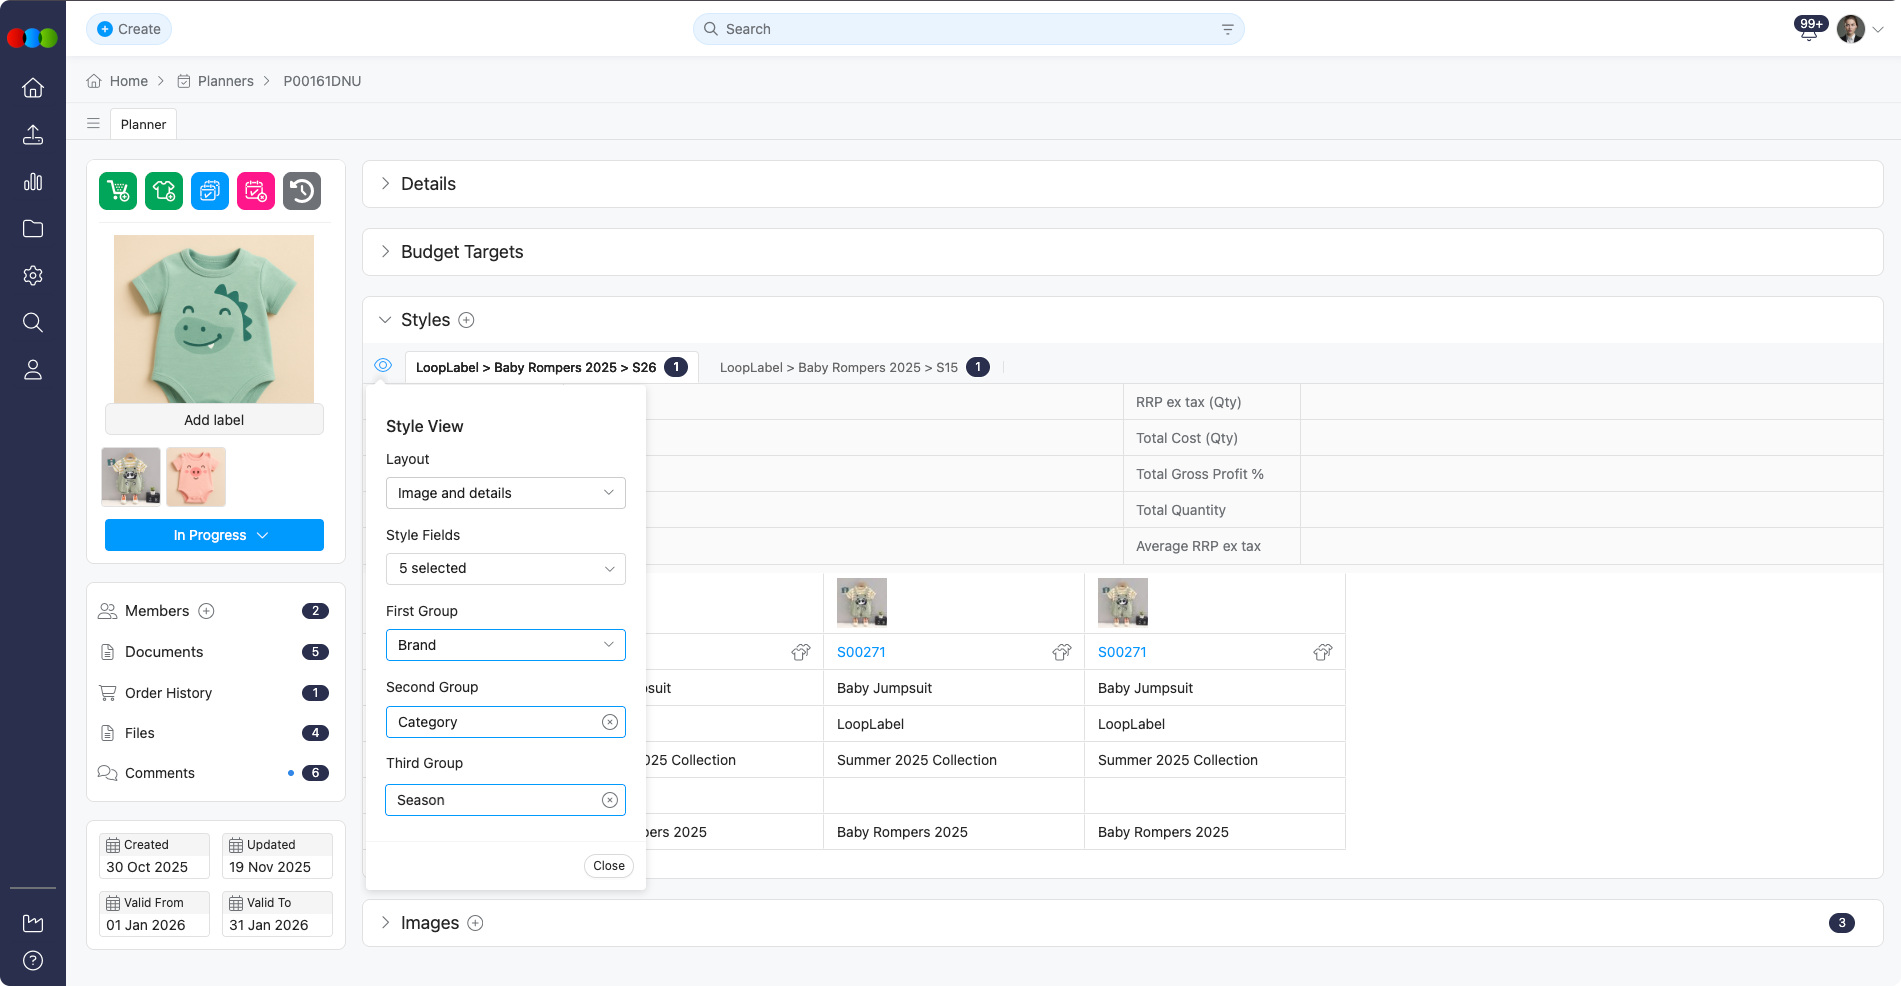
Style View Options
You can customise the layout and displayed fields by clicking the eye icon next to the Styles section:
- Click the view options icon on the left side of the section.
- Choose from the following options:
| Option | Description |
|---|---|
| Layout | Switch between Image and details and Image only views. • Image and details - full grid of rows you turn on under Style Fields; the image column uses the Colourway Image when uploaded for that colourway, otherwise the preview image and Colour Swatch. • Image only - compact cards: Style Number, Status, Description, Colour Description, and Colour Swatch appear with the same image arrangement (colourway image first, then preview plus swatch). Use Quick View on each card to preview style details in a pop-up without leaving your plan. See Quick View (Image only layout). |
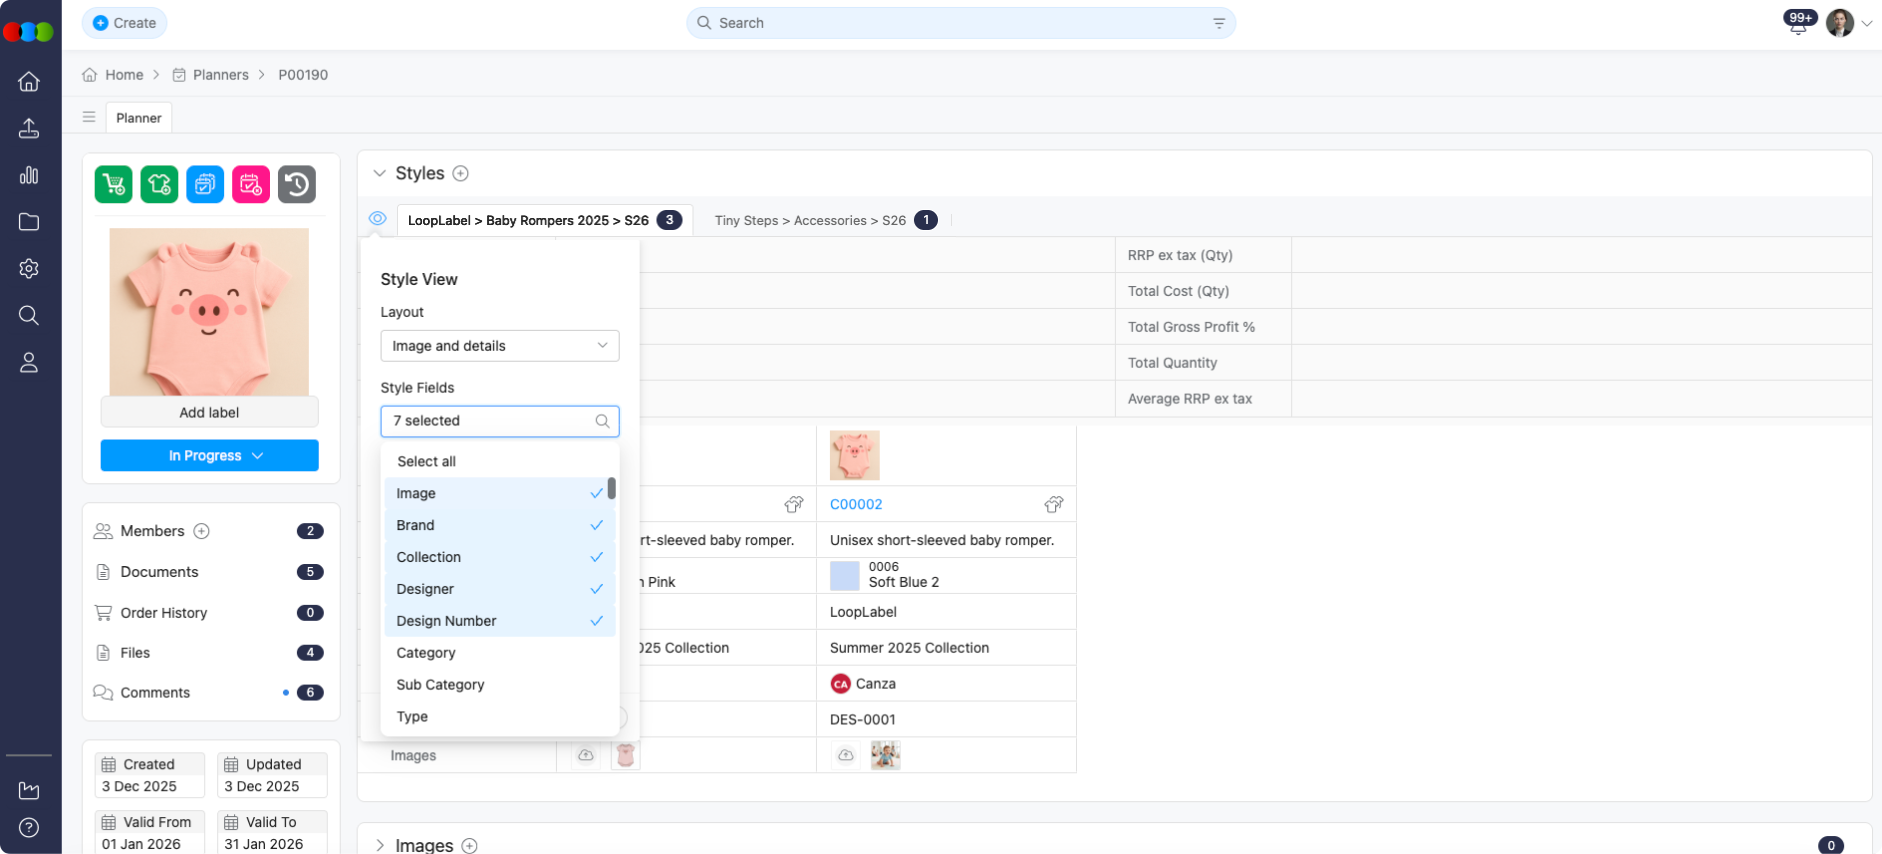
| Style Fields | Show or hide specific data rows: • Image • Brand • Collection • Department • Designer • Design Number • Category • Sub Category • Type • Sub Type • Story • License • Gender • Season • Size Scale • Colour • Status • Buy Price • Sell Price • Retail Price • Alt RRP • Forecast • eCommerce Short Description • eCommerce Description • Buy Value • Sell Value • Retail Value • In Store • Total Cost • RRP ex tax • Total Cost (Qty) • RRP ex tax (Qty) • Gross Profit % • Sell-Through Rate % • Stock on Hand • Weeks on Stock • Sales Trend • Total Sales • Costing • Factory • Order • Qty • Colour Family • Shipment • Images • Custom Fields |
| Order Fields | Select which Order fields you want to display in the Style details: • Order Number • Label • In Store • ETA • ETD • Quantity • Season • Warehouse |
| Sort By | Choose the first and second sort order for styles in the current view. Collection and Retail Price are available as sort options, so teams can review styles by range or by price from highest to lowest or lowest to highest. |
| Group Type | In this view, you can choose the style view to be: • Dynamic Group - You can change how the grouping appears accordingly by First, Second, and Third levels. 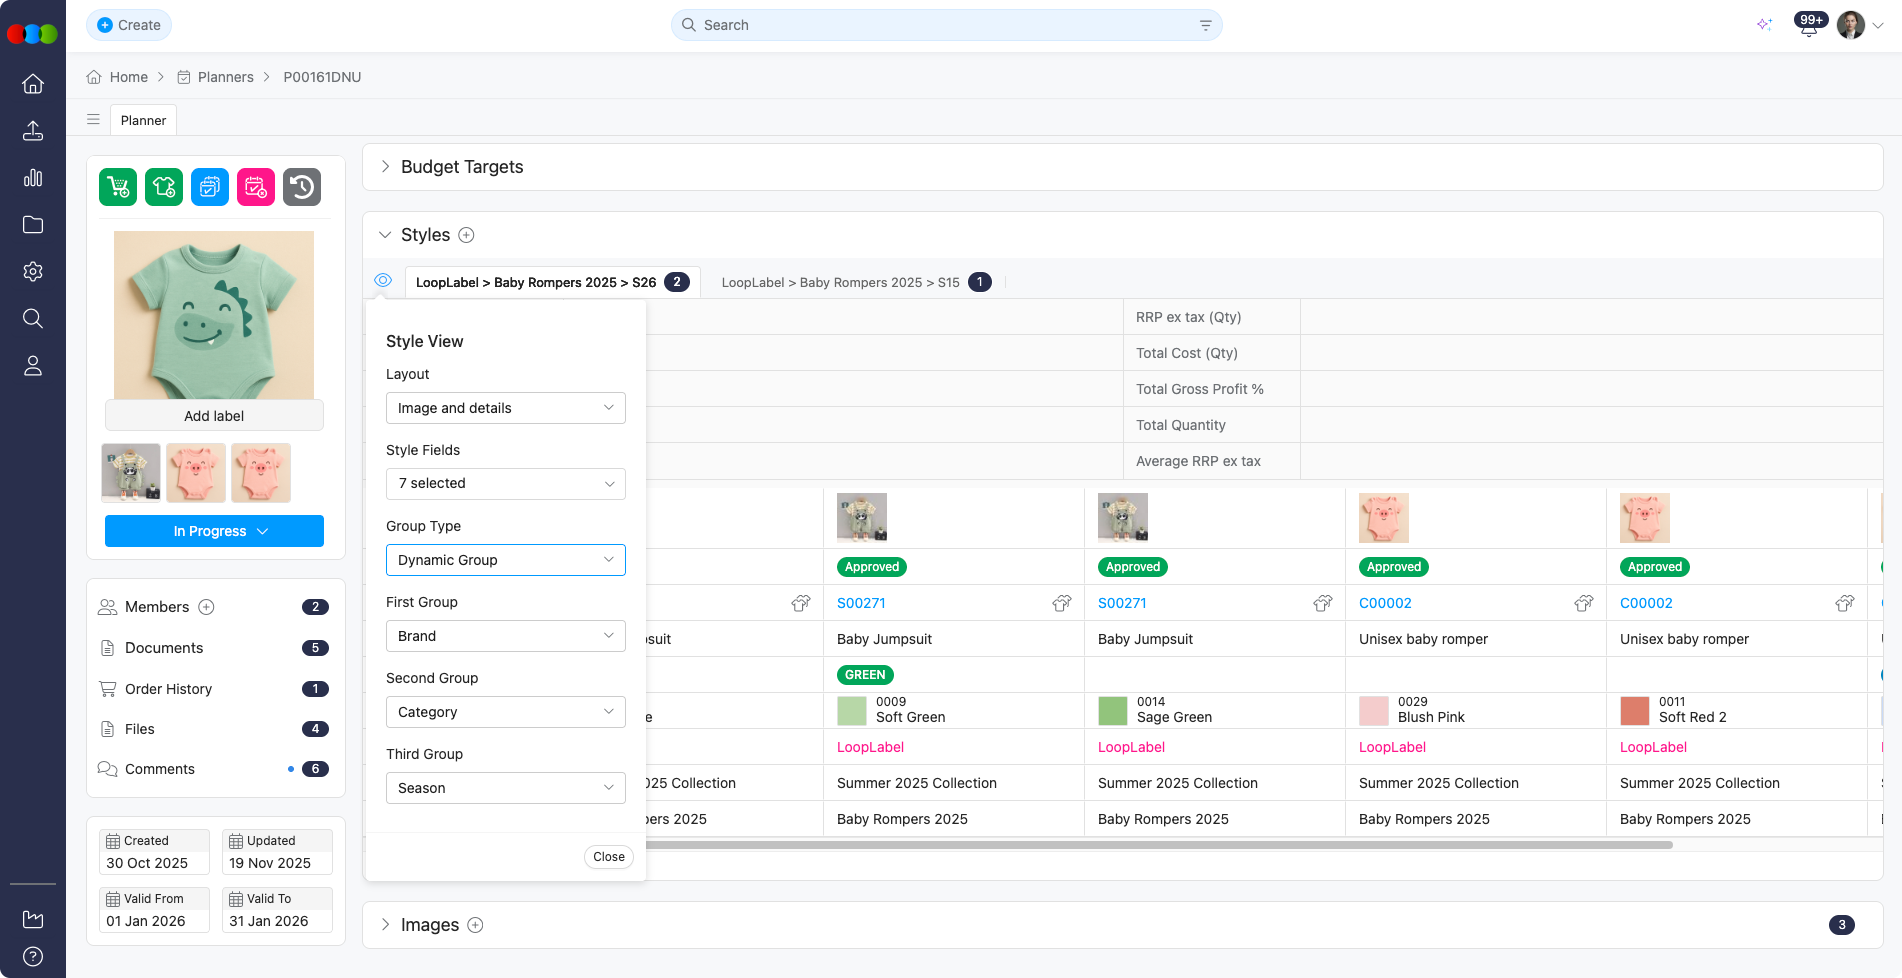 • Fixed Group - You can configure in Site Settings > Planner > Groups the hierarchy of groups by Brand, Category, Type, Collection, Gender, or Department. 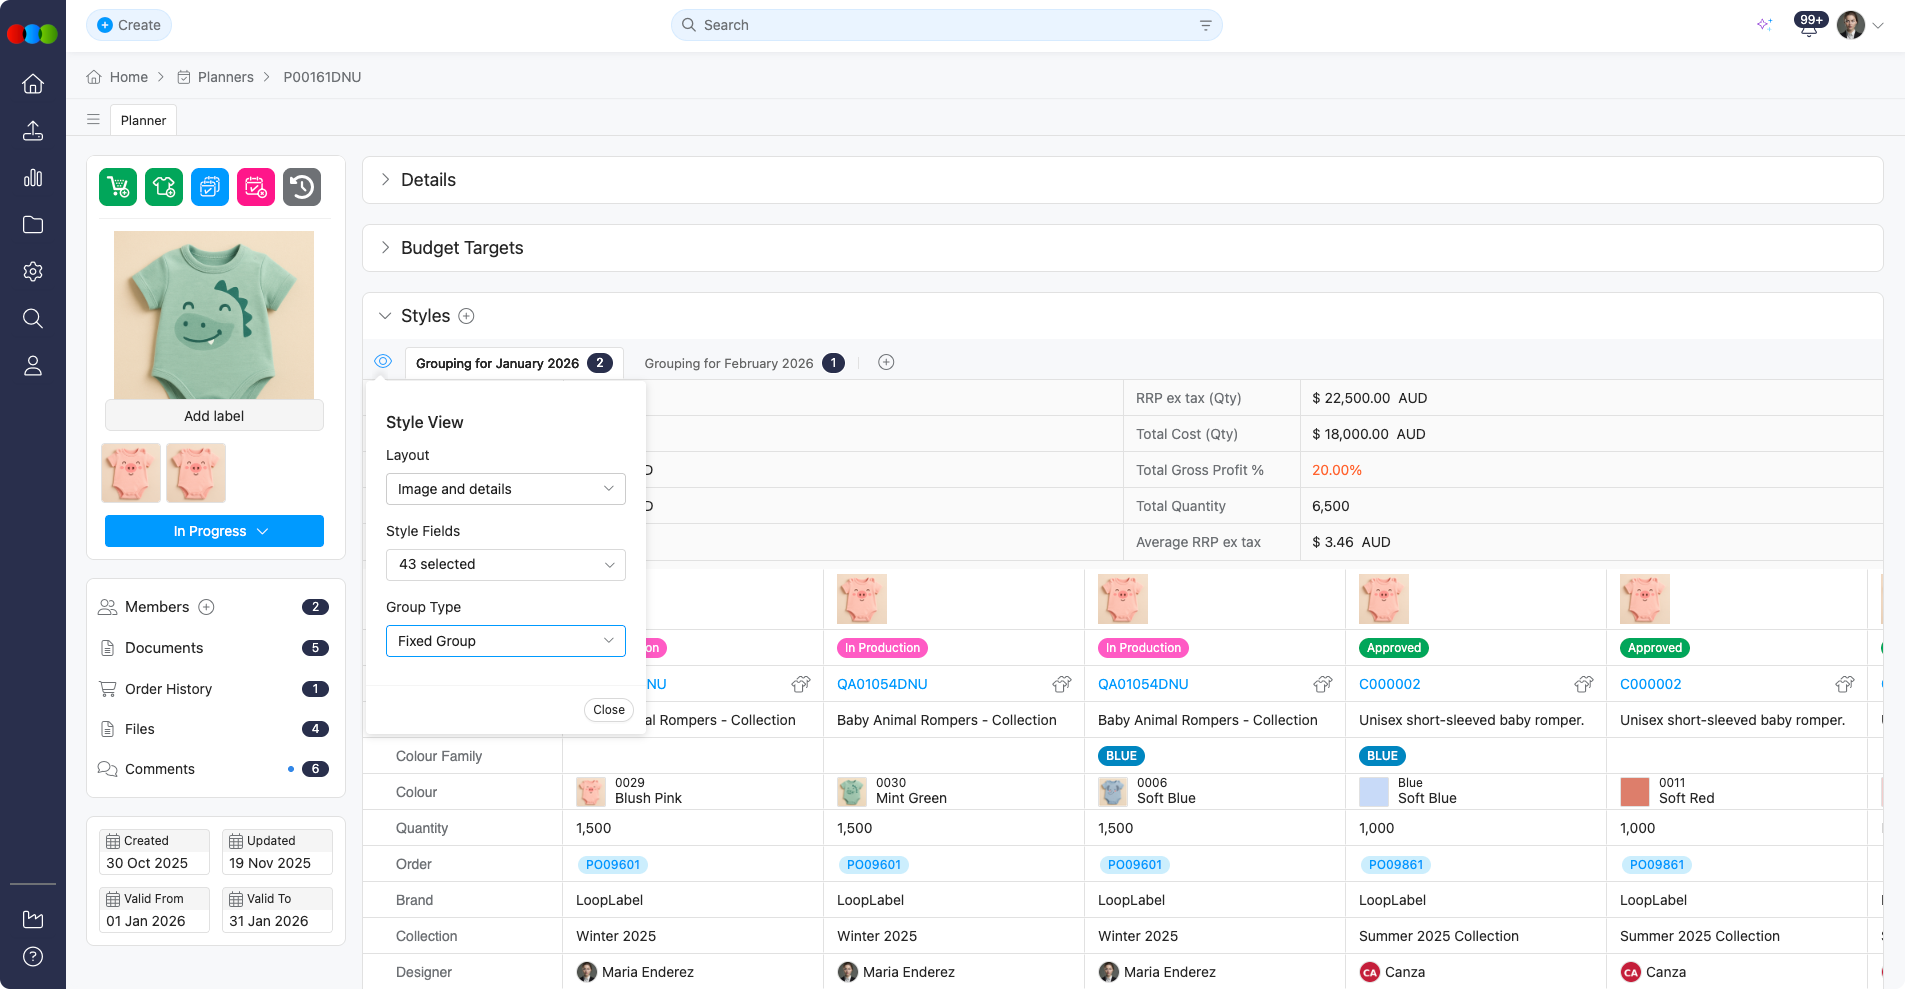 |
| Group By: First, Second, Third | Organise styles by attributes at each level (for example Type or Brand). You can also use In Store date (the Planner in store date for the style) and Drop (from Style > Colours & Pricing > Drop). See Multi-Level Grouping. |
Quick View (Image only layout)
When Layout is set to Image only, open Quick View from any style card to review key style information without leaving your plan.
- Click the Quick View eye icon on a style card.
The pop-up shows that style's details at a glance:
- On the Details tab, expand Details, Colours & Pricing, Images, and Custom Fields to review each section.
- Switch to the Files and Media Library tabs to browse style assets from the same pop-up.
Planner > Styles > Image Only View > Quick View 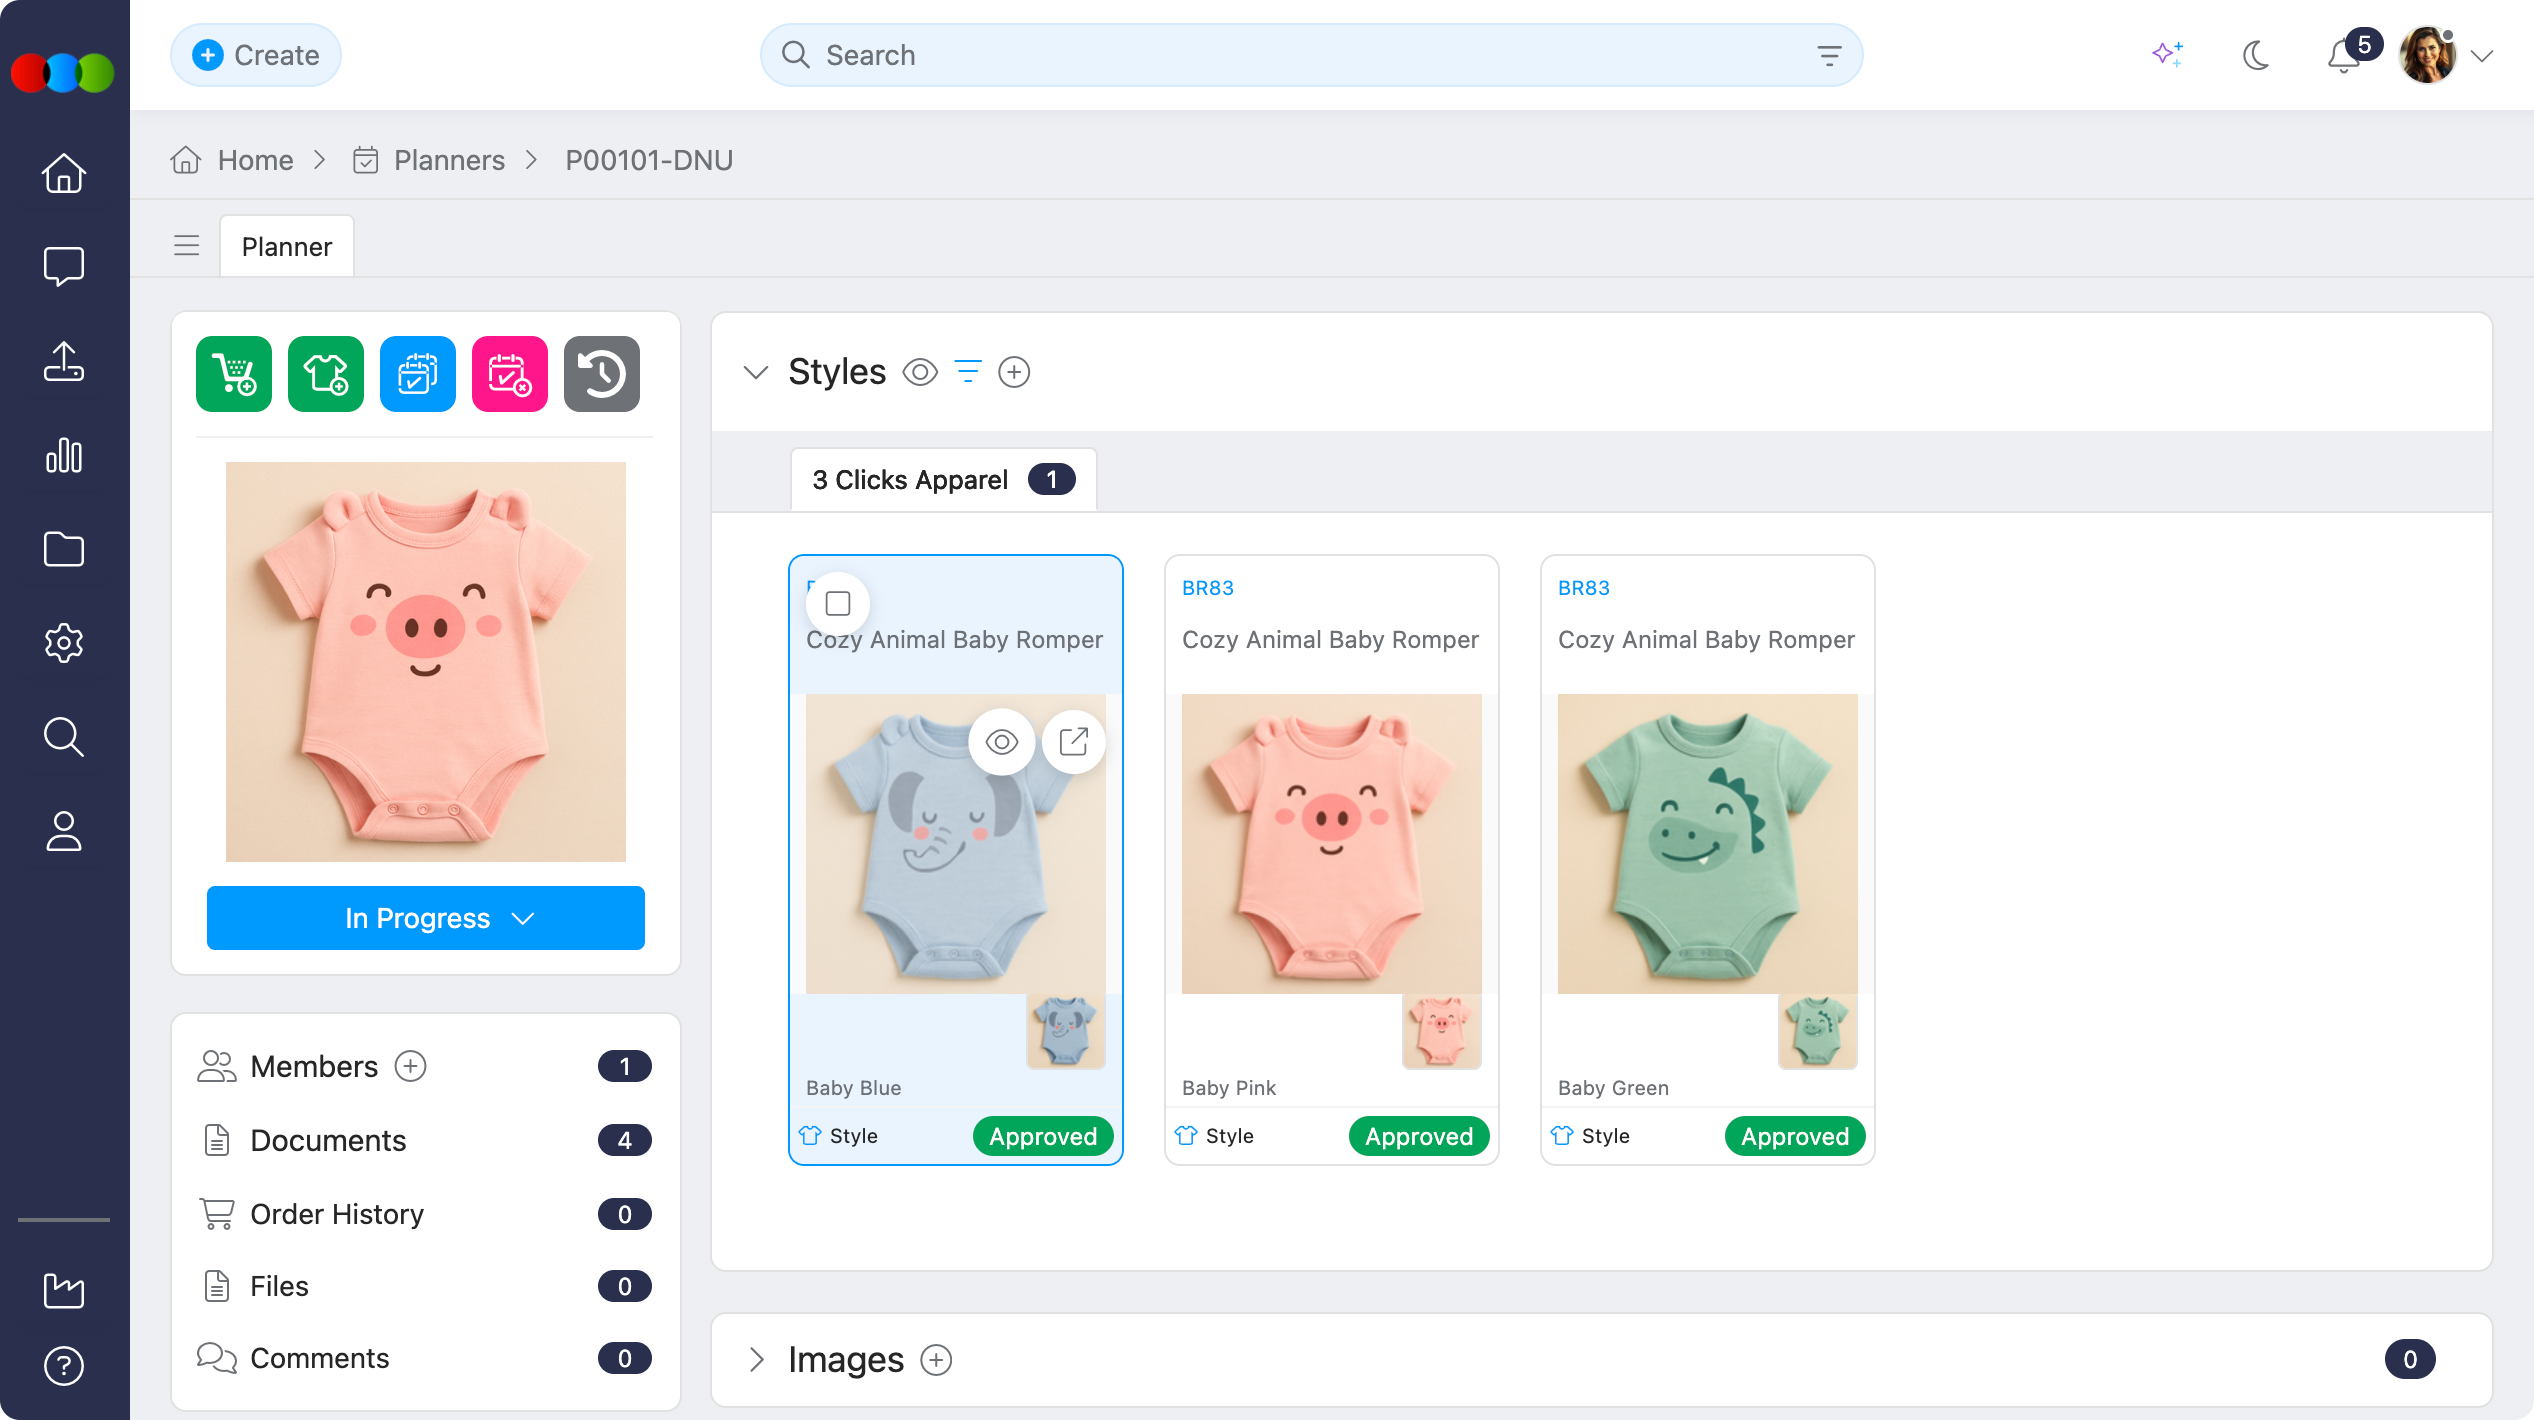
Planner > Styles > Image Only View > Quick View pop-up 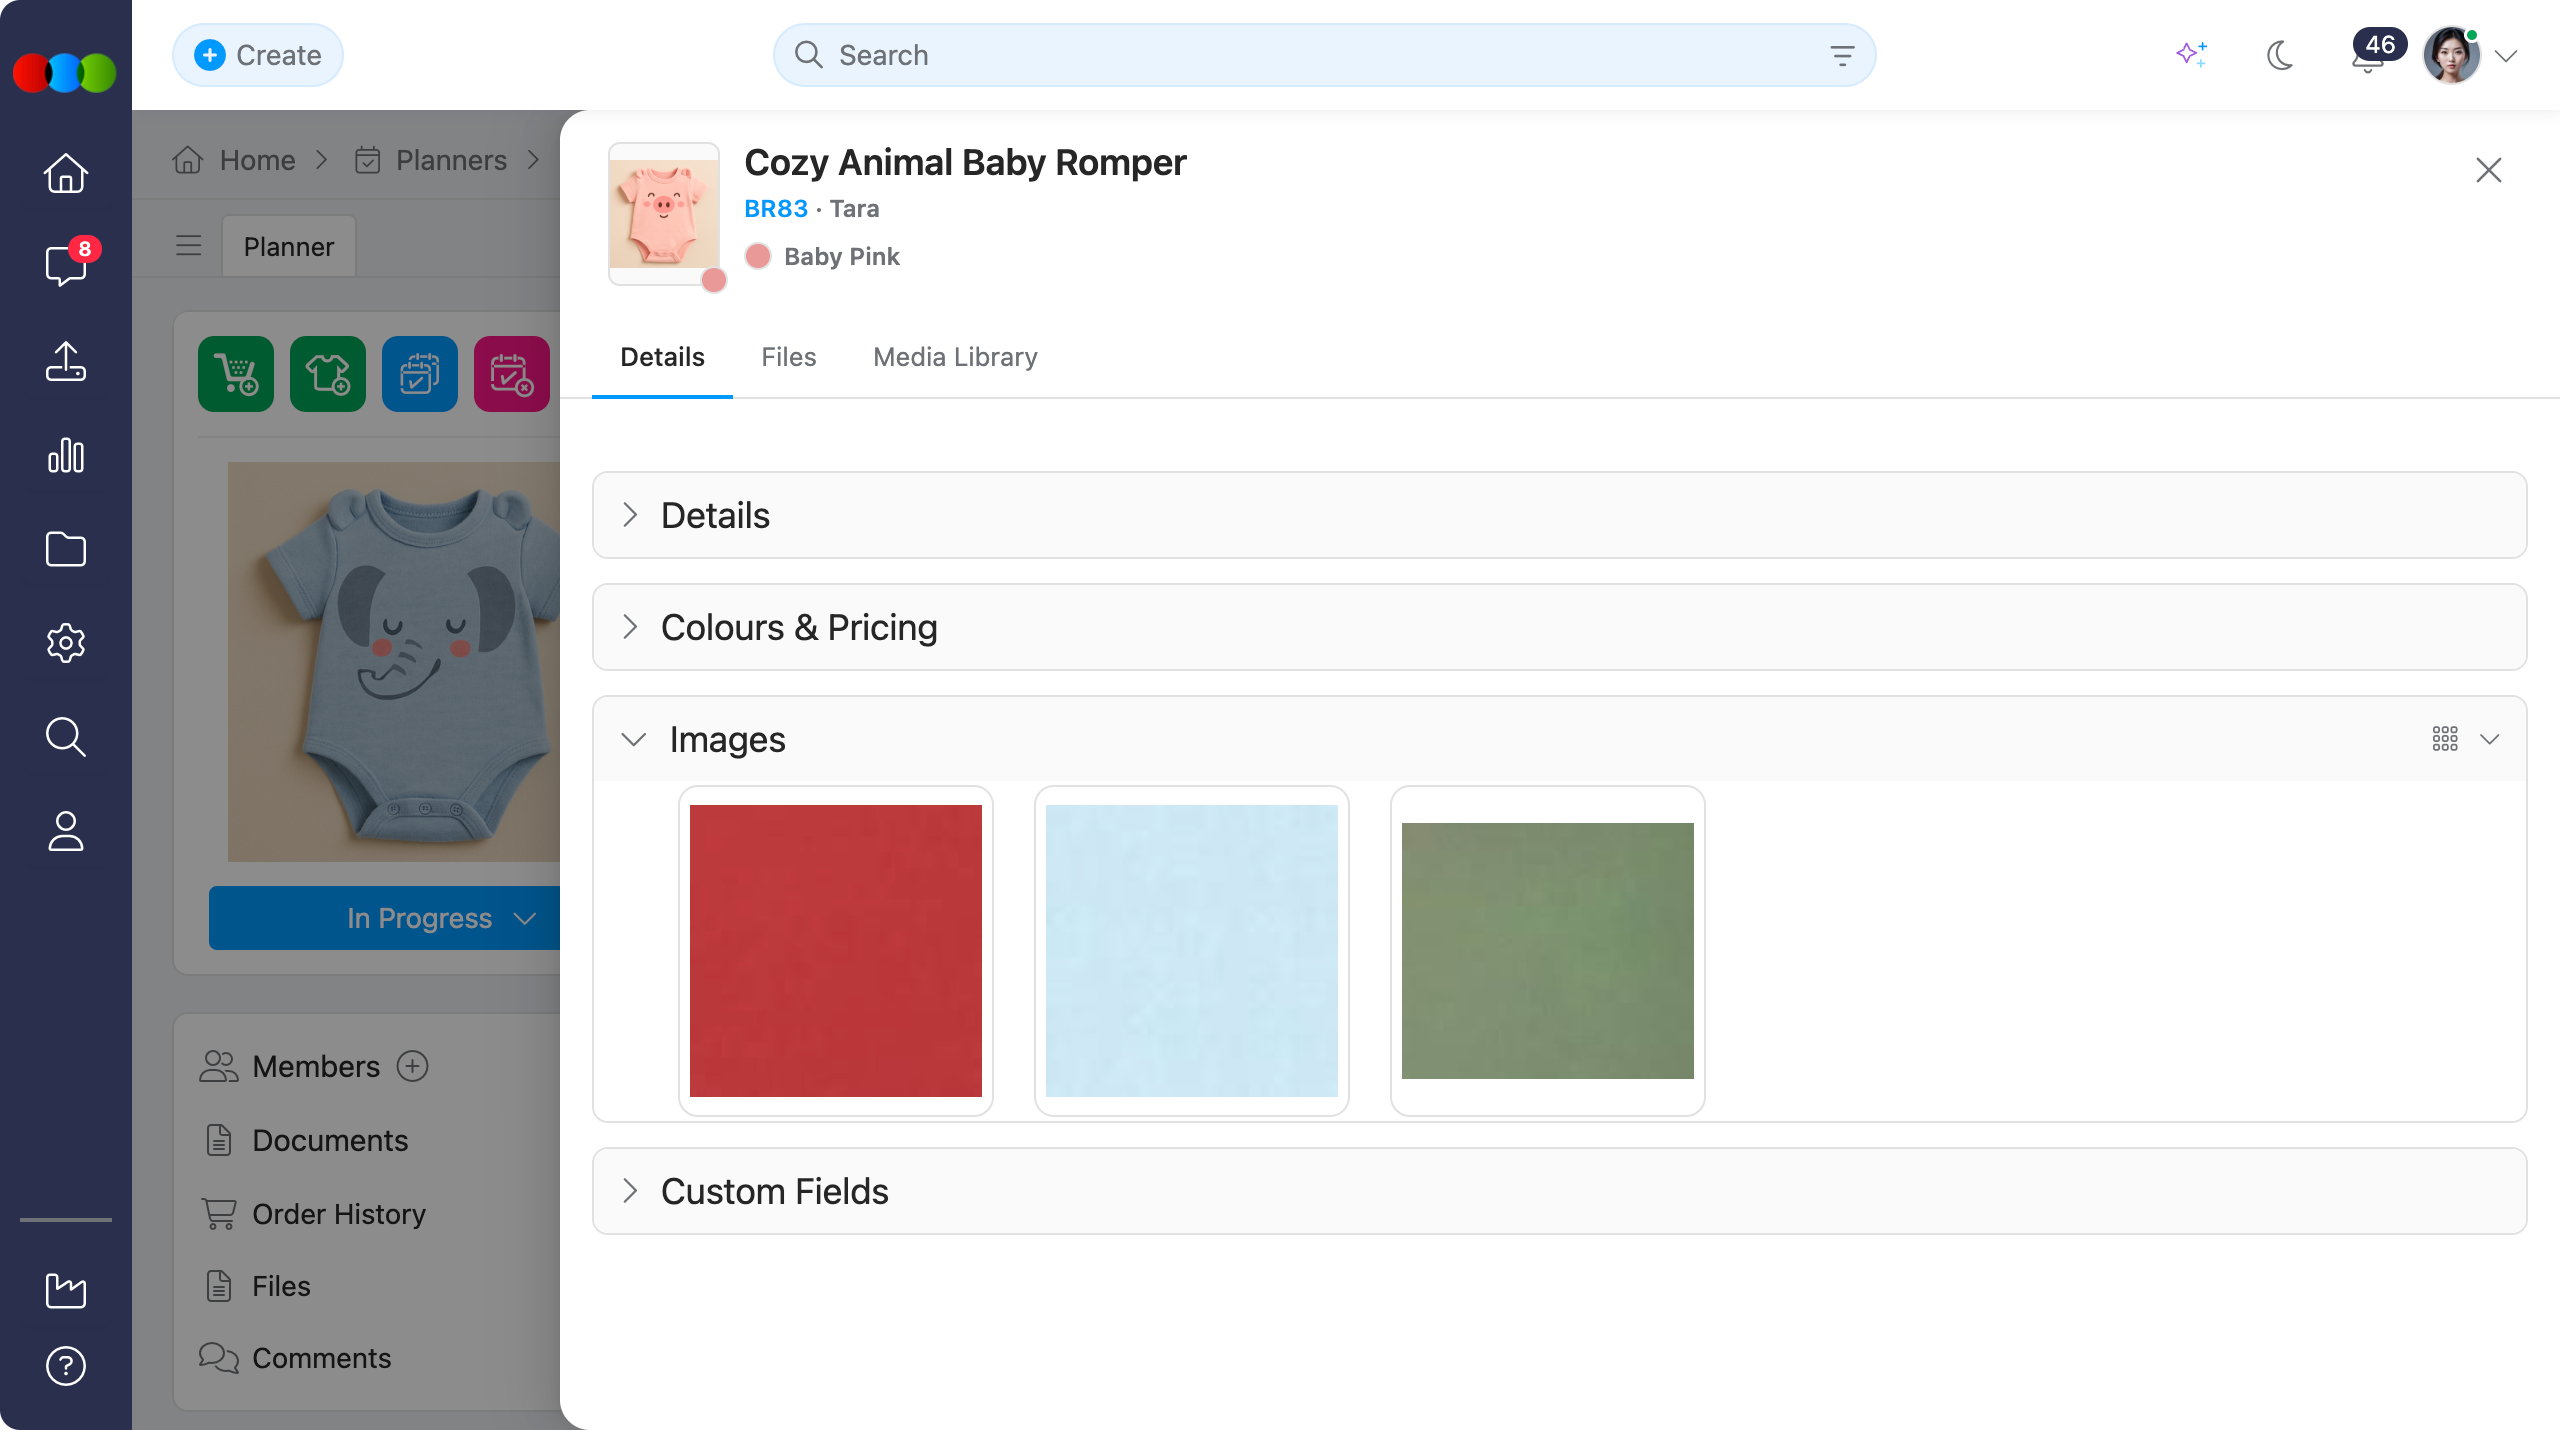
Sort By
Use Sort By in the Style View pop-up to control how styles are ordered after filters and groups are applied. You can select a first and second sort option; the first sort is applied first, then the second sort refines items within matching results.
| Sort Option | Description |
|---|---|
| Collection | Sorts styles by their assigned collection so range or drop reviews stay grouped together. |
| Retail Price | Sorts styles by retail price. Use this to review the assortment from highest to lowest or lowest to highest price. |
Style Fields
| Style Field | Description |
|---|---|
| Status | Current status (e.g., Draft, Approved, Cancelled). This can be changed by clicking the Status dropdown. |
| Style Number | Automatically displayed once the style is added. Clicking this will redirect you to the main Style page. |
| Description | Displays the description of the style. This is not an editable field. |
| Colour Family | Broader colour grouping (e.g., Blue family). |
| Colour | Specific colour of the style. If the style is created in the Planner > Create Style widget, clicking the Add button will allow you to manually add colour from the Add Colour pop-up |
| Quantity | Quantity of units for the style. You can input numerical values here. |
| Brand | The brand associated with the style. This is not editable. |
| Collection | The collection the style belongs to. This is not editable. |
| Department | The department the style belongs to (from Style > Details > Department). This is not editable. |
| Designer | Name of the designer who created the style. This is not editable. |
| Design Number | Unique identifier or code for the design. This is not editable. |
| Category | Main category of the style (e.g., Apparel, Footwear). This is not editable. |
| Sub Category | More specific classification under the main category. This is not editable. |
| Type | Type of product within the category. This is not editable. |
| Sub Type | Further refinement of the product type. This is not editable. |
| Story | Narrative or theme behind the style. This is not editable. |
| License | Licensing details if applicable. This is not editable. |
| Gender | Target gender for the style (e.g., Men, Women, Unisex). This is not editable. |
| Season | Season for which the style is intended (e.g., SS25, FW25). You can change and save the season directly within the plan. The season data is stored in the plan database for that specific style and tab, and remains independent from the original style, which means that changes won't sync back to the style itself. |
| Total Qty/Forecast | Clicking the pop-up will allow you to input values in the channel projections. These values will then automatically reflect in Style > Colours & Pricing > Region view. |
| Market Forecast | Displays the configured total projections for each market (region). When creating a plan, the system automatically copies regions from the associated style. These regions are stored within the Planner and won't be pushed back to the original style. You can directly edit the forecast values here. To add markets, click the Add button which displays a multiselect dropdown allowing you to select from available Markets (Countries). To remove a market, click the trashcan icon beside each region. Market forecasts are applied per planner style and are associated with their respective colours. When you delete a forecast, it will be removed for that style per colour. All changes are tracked in the history log. |
| Sell-Through Rate % | Percentage of inventory sold compared to total received. Indicates how quickly stock is moving. This is not editable. |
| Stock on Hand | Current quantity of inventory available for the style. This is not editable. |
| Weeks on Stock | Estimated number of weeks of inventory remaining based on the current sales rate. This is not editable. |
| Sales Trend | Direction or pattern of sales performance (e.g., increasing, decreasing, or stable). This is not editable. |
| Total Sales | Total number of units sold for the style. This is not editable. |
| Buy Price | The buy price of the style. These differs across Price Types: • One Price: You can directly edit here. • Price by Size: In the Buy Price by Size pop-up, it will display all the prices per size. This is not editable. • Price by Colour: This is not editable. |
| Sell Price | Wholesale selling price per unit. These differs across Price Types: • One Price: You can directly edit here. • Price by Size: In the Buy Price by Size pop-up, it will display all the prices per size. This is not editable. • Price by Colour: This is not editable. |
| Retail Price | Suggested retail price per unit. These differs across Price Types: • One Price: You can directly edit here. • Price by Size: In the Buy Price by Size pop-up, it will display all the prices per size. This is not editable. • Price by Colour: This is not editable. |
| Alt RRP | Alternative recommended retail price. These differs across Price Types: • One Price: You can directly edit here. • Price by Size: In the Buy Price by Size pop-up, it will display all the prices per size. This is not editable. • Price by Colour: This is not editable. |
| Size Scale | Available size range for the style. You can input here the size range. |
| eCommerce Short Description | Brief description for online listings. |
| eCommerce Description | Detailed description for eCommerce platforms. |
| Buy Value | Total cost based on buy price and quantity. This is not editable. |
| Sell Value | Total wholesale value based on sell price and quantity. This is not editable. |
| Retail Value | Total retail value based on retail price and quantity. This is not editable. |
| In Store | Indicates the date when the style is in store. You can select the date here. |
| Total Cost | Aggregate cost for the style. You can enter the cost here. |
| RRP ex tax | Recommended retail price excluding tax. You can input the value here. |
| Total Cost (Qty) | Total cost calculated by quantity. This is not editable. |
| RRP ex tax (Qty) | Total retail price excluding tax, multiplied by quantity. This is not editable. |
| Gross Profit % | Percentage of profit margin for the style. This is not editable. |
| Costing | Detailed cost breakdown for production. You may select from the dropdown or open the Component Library for the list of associated costings. |
| Factory | Name of the factory producing the style. This is not editable. |
| Shipment | Shipment details or status. You may select from the dropdown or open the Shipment Library for the list of associated shippings. |
| Images | Additional images related to the style. You may upload images or generate AI images here. |
| Custom Fields | User-defined fields for extra information. You can input text/values, select a date, and choose from dropdowns. |
Order Fields
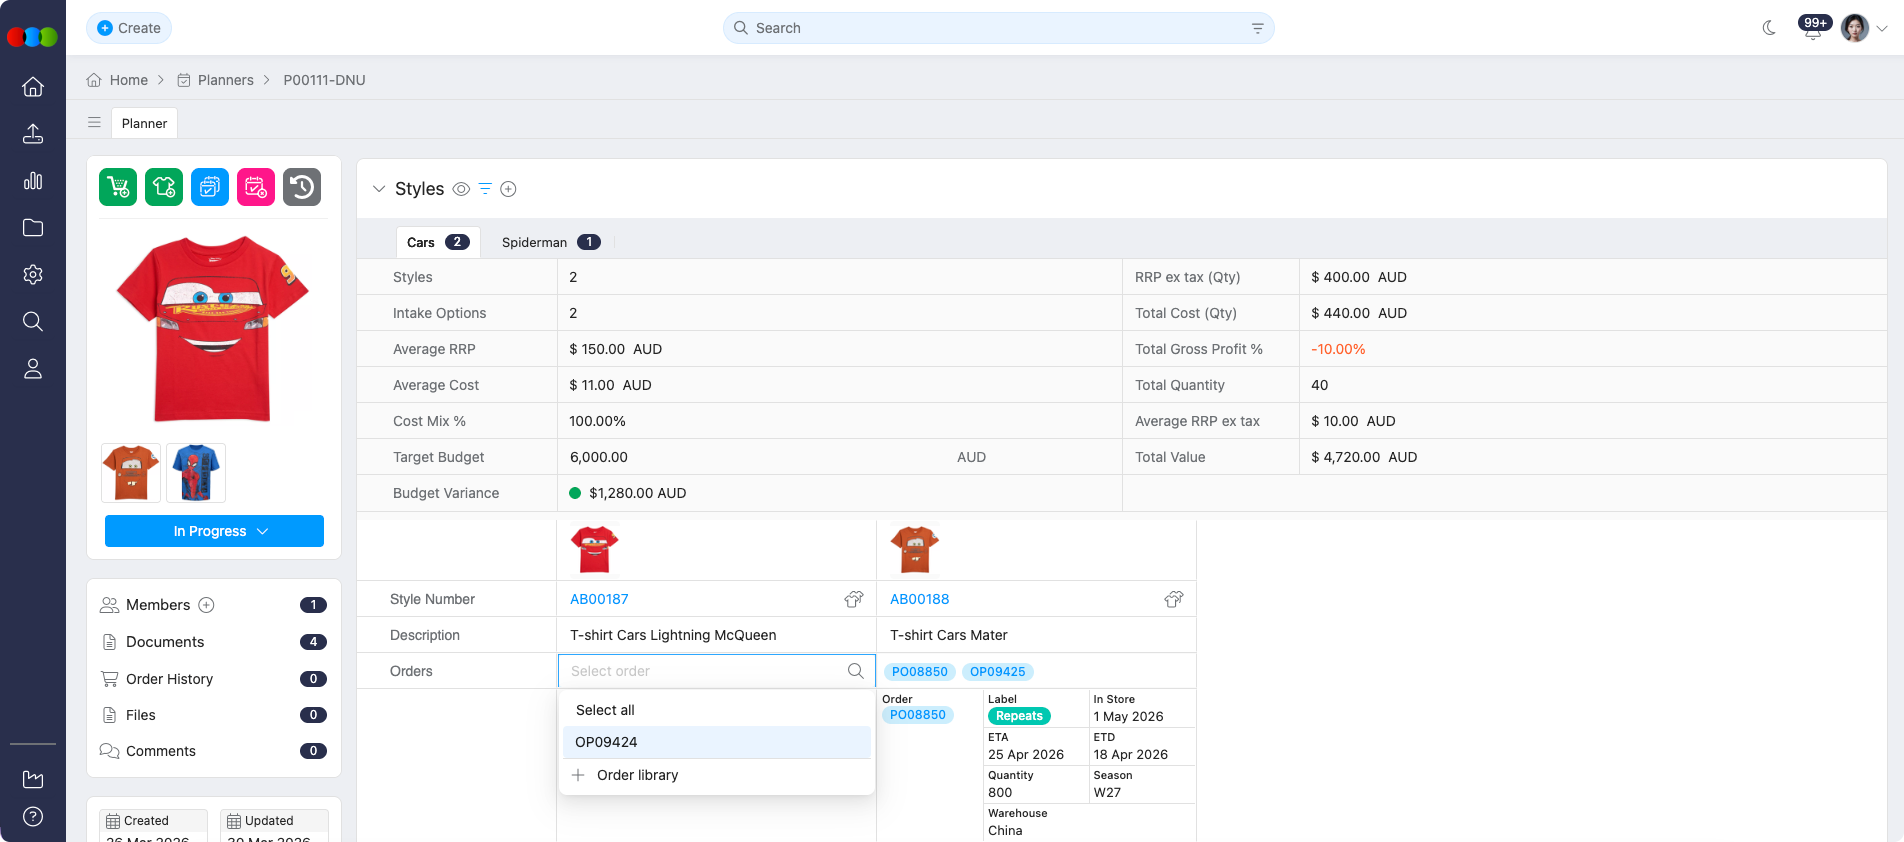
In Planner > Styles, select the order or orders associated with a style to compare relevant order information alongside your plan, without opening the main Order screens.
You can surface the following order fields for the orders you select:
| Field | Description |
|---|---|
| Order Number | Order identifier. |
| Label | Order label. |
| In Store | In store date on the order. |
| ETA | Estimated time of arrival. |
| ETD | Estimated time of departure. |
| Quantity | Order quantity. |
| Season | Season on the order. |
| Warehouse | Warehouse on the order. |
Market Forecast
The Planner provides enhanced Market Forecast, giving you greater flexibility when working with styles in your planning workflow.
Market Forecast Management
When creating a plan, the system automatically copies regions from the associated style. These regions are stored within the Planner and won't be pushed back to the original style. You now have full control to add or remove markets as needed for your planning requirements.
How to manage Market Forecasts:
- Add Markets: Click the Add button to display a multiselect dropdown. This dropdown allows you to select from available Markets (Countries) to add to your forecast.
- Remove Markets: Click the trashcan icon beside each region to remove it from the forecast.
- Edit Forecast Values: You can directly edit the forecast values for each market in the Market Forecast field.
Important Notes
- When you add a style to a planner, the system automatically copies its forecast data.
- You can customise the Market Forecast specifically for that planner without affecting the original style.
- Market forecasts are applied per planner style and are associated with their respective colours.
- When you delete a forecast, it will be removed for that style per colour.
- All changes are tracked in the history log.
Group View
The Group View in the Planner allows users to organise and analyse Styles based on different grouping methods. These views help teams quickly segment information, identify trends, and work more efficiently within their planning workflow.
How it works:
- When you create a plan, the system snapshots each selected Group’s name and filters into the plan. Any future admin edits or deletions to those Groups won’t change the existing plan.
- If you duplicate a plan, the same Groups and filters are carried over, so you can iterate without rebuilding the selection.
- If you need to change a Group for future plans, adjust it in admin—existing plans keep their captured version, preserving your reporting history.
Target Budget and Variance
When a Target Budget template is selected for the plan (see Planner › Budget Target), additional fields appear on Group rows in Planner › Styles. They compare each group’s rolled-up value to the target budget for that category so you can see under-, on-, or over-budget positions at a glance.
| Field | Description |
|---|---|
| Target Budget | The group’s target budget amount from the budget configuration. |
| Budget Variance | The difference between the group’s Target Budget and Total Value, with a visual indicator for whether the group is under, on, or close to, or over budget: • 🟢 = under budget (good) • 🟠 = on or close to budget • 🔴 = over budget (attention needed) |
Total Value is calculated using the Reference Price defined on the target budget template—for example RRP ex tax × Quantity when that reference is selected.
Budget Variance is Target Budget − Total Value (e.g. Target Budget − RRP ex tax (Qty) when the reference is RRP ex tax with quantity).
The Total Value can follow any of these reference prices, depending on the template: RRP ex tax, Total Cost, Buy Price, Sell Price, or Retail Price. Templates and reference price options are managed in Site Settings › Planner › Target Budget.
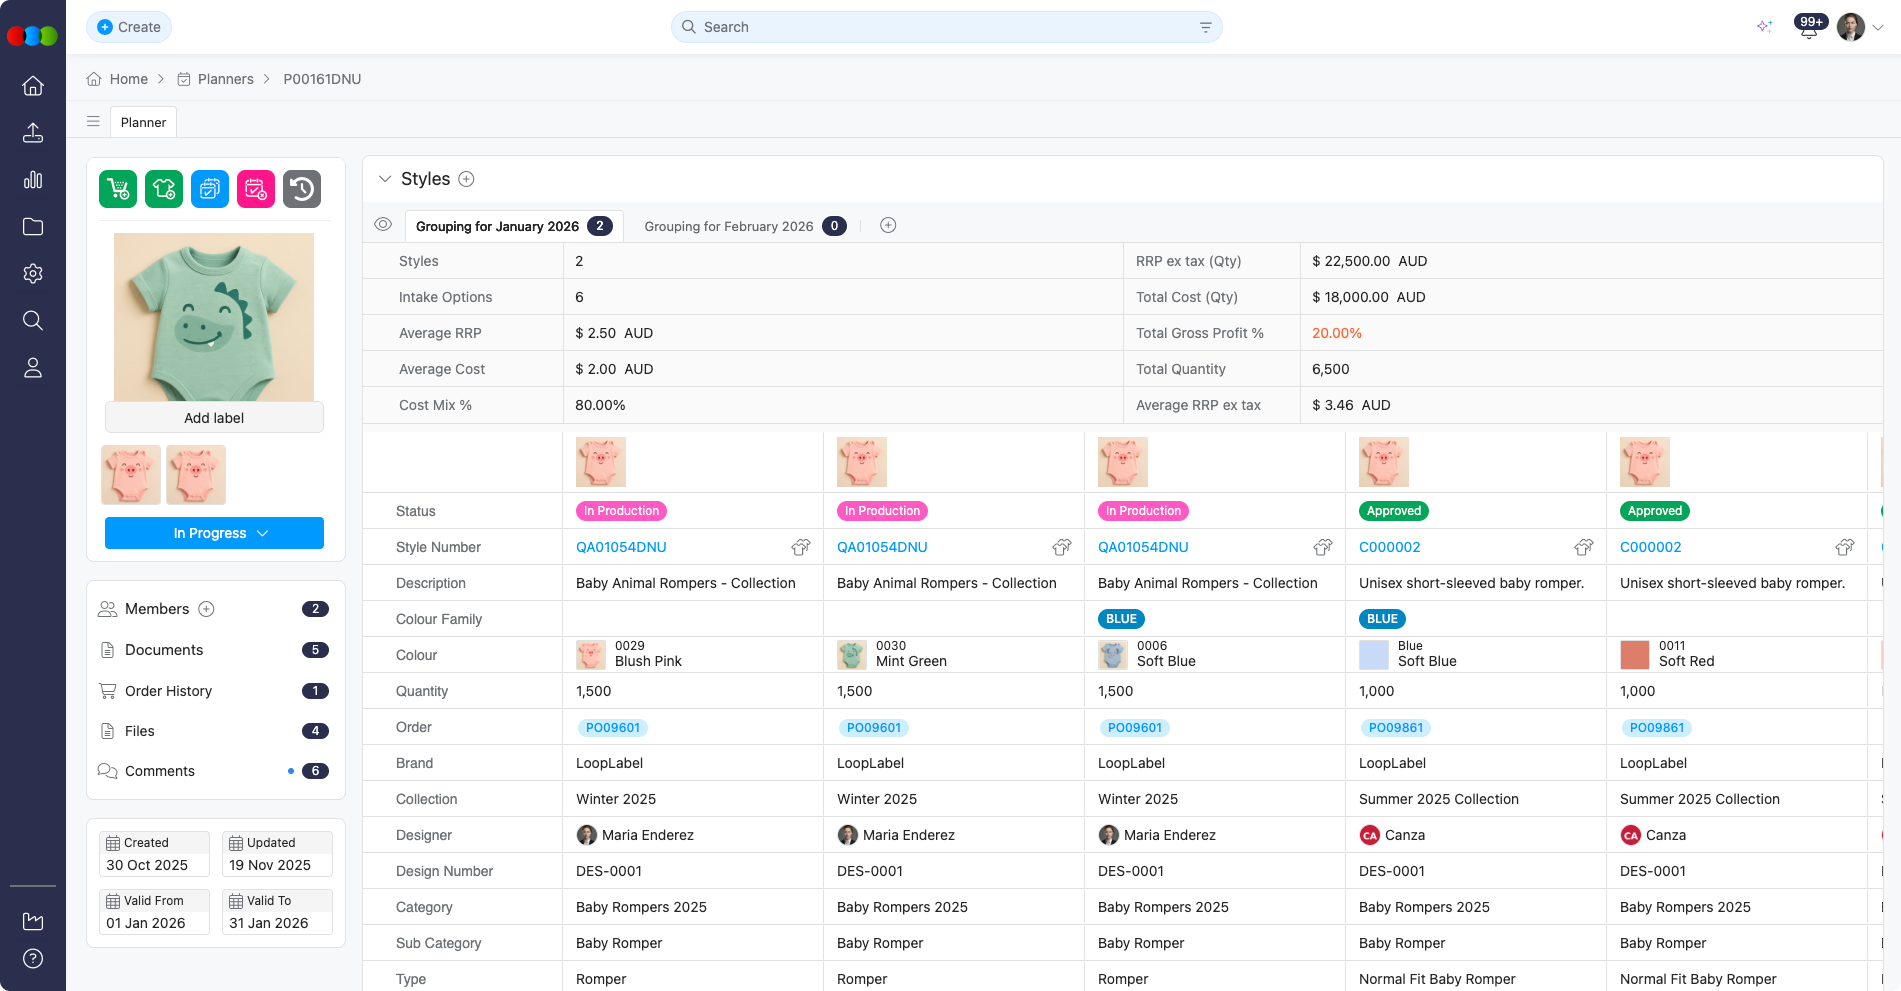
Example
Dynamic Group
This view allows you to be flexible in adjusting the First, Second, and Third levels in grouping. These groups adjust in real time as Styles are added, removed, or updated.
Key Benefits:
- Automatically reflects updates to Style view.
- Useful for quick, flexible viewing of live product groupings.
- Flexible grouping options with customisable First, Second, and Third levels.
Dynamic Group is ideal for teams who need immediate visibility of how Styles naturally cluster based on existing attributes.
Fixed Group
Fixed Group is a group view option in Planner > Styles. Fixed Groups organise styles into named tabs. Administrators configure the group heading and base filter rules in Site Settings > Planner > Groups, and those rules are copied into the plan when the plan is created.
Unlike Dynamic Group, these groupings do not change unless an Administrator updates the configuration.
When Group Type is Fixed Group, you can drag group tabs to reorder them. This is useful in cases where tabs follow your review sequence instead of the default order.
Key Benefits:
- Provides consistent, custom-defined group structures.
- Ideal for planning scenarios that require predefined segmentation.
- Users can switch to Fixed Group view to apply these curated groups during planner creation.
- Configured grouping hierarchy by Brand, Category, Type, Collection, Gender, or Department.
- Lets planners add plan-level filters such as Gender, Season, Collection, or Type to narrow a tab for their own plan.
- Reorder Fixed Group tabs by dragging, without changing site settings.
Fixed Group ensures teams can work with stable, intentional groupings tailored to their planning needs.
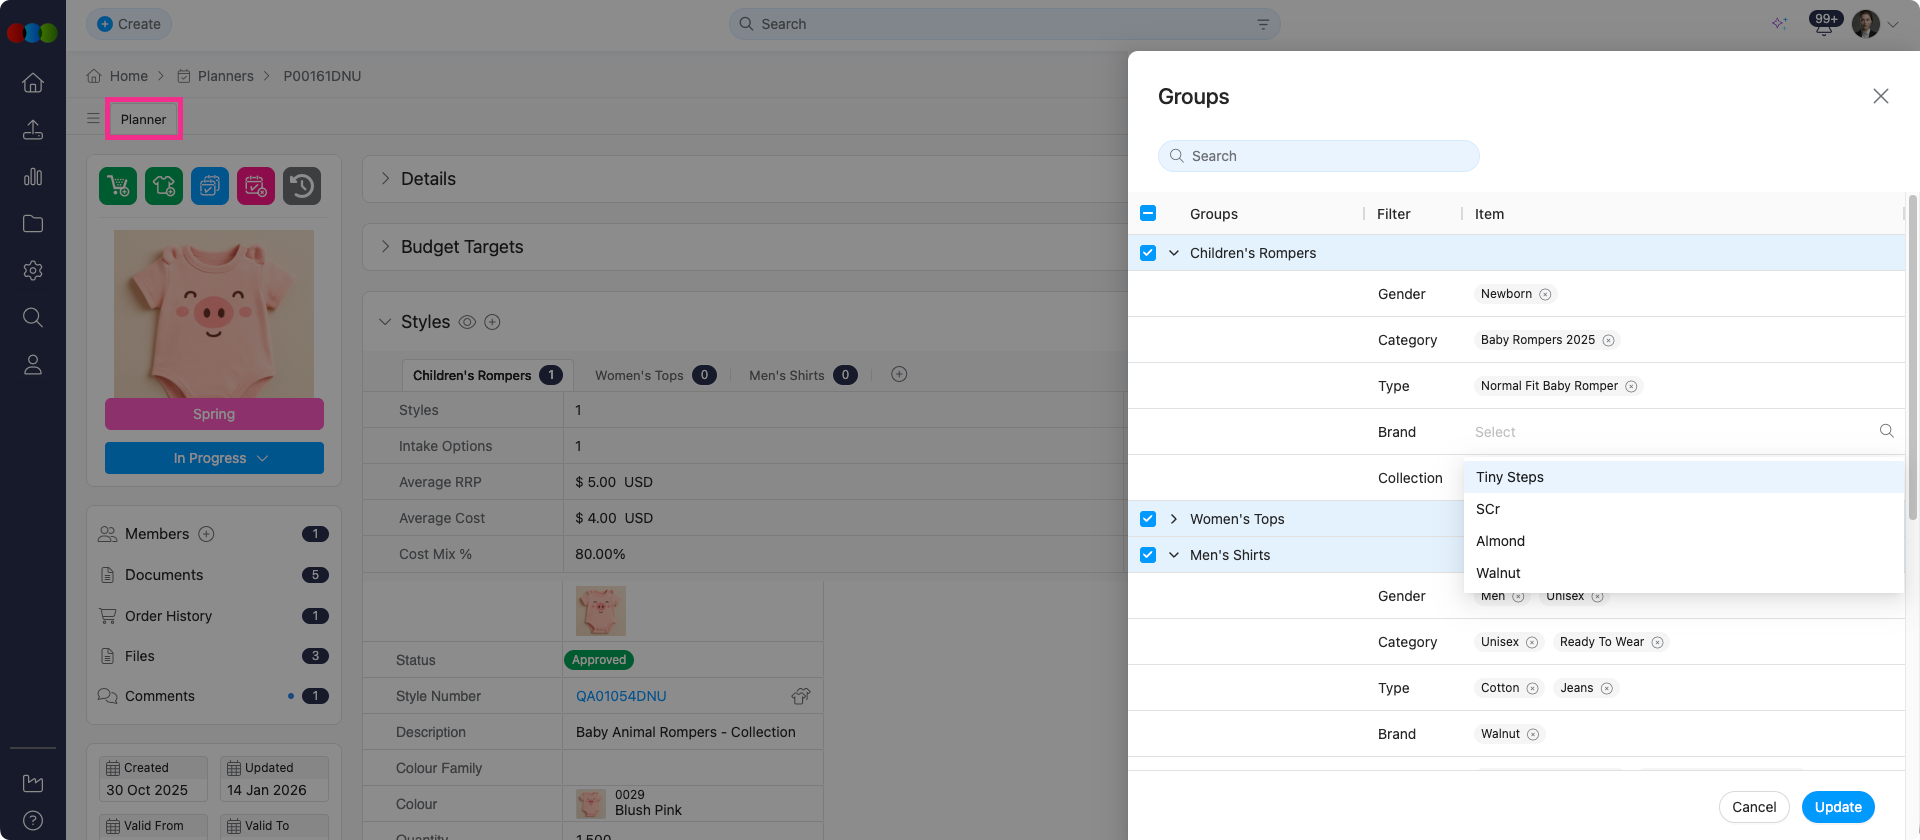
The Groups pop-up allows you to choose which group to include in your current Planner > Styles view.

Plan-Level Additional Filters
You can add extra filter levels directly within a Fixed Group tab in your plan without changing its Site Settings > Planner > Groups template. These plan-level filters stack on top of the Admin-defined base filter and are saved to that planner group only.
Base filters are still applied
The Admin-copied base filter is the foundation of the Fixed Group and is not shown as an editable row in the plan filter panel. The base filter is always applied silently beneath the plan-level filters you see.
Add an Additional Filter
- Open the relevant plan from Planner.
- Go to the Fixed Group tab you want to refine.
- Open the group settings or filter panel within the tab.
- Click Add Filter Level.
- Choose the filter field, such as Gender, Collection, Season, or Type.
- Select one or more values from the multi-select dropdown.
- Click Save.
The group re-evaluates on save and displays only styles matching all filter levels: the Admin base filter plus the plan-level additional filters.
Remove an Additional Filter
- Open the Fixed Group tab.
- Open the group settings or filter panel.
- Click the remove or clear icon next to the additional filter level you want to delete.
- Click Save.
The group refreshes to reflect styles matching only the remaining filters. If all plan-level filters are removed, the tab reverts to the Admin base filter only.
Stacking Multiple Additional Filters
You can add more than one additional filter level to a group. For example, a group already filtered by Category = Footwear could have Gender = Mens added, and then Collection = SS26 Drop 1 added as another level. All filter levels use AND logic, so a style must satisfy every level to appear in the group.
When to use additional filters
Use additional filters when a season's plan needs a narrower scope than the Admin template. For example, if the Admin group covers all footwear, apply a Collection filter in the plan to restrict the tab to SS26 footwear only.
Additional filters cannot broaden a group
Plan-level filters only narrow the group further. If a style is excluded by the Admin base filter, adding a plan-level filter will not make that style appear. To broaden the base filter, the Admin template must be updated in Site Settings > Planner > Groups.
Unsaved changes are discarded
After adding or removing an additional filter, the group membership updates on save. If you navigate away before saving, unsaved filter changes will be discarded.
Add Styles > Filters
When adding styles, the Add Styles pop-up automatically applies filters from the selected Group.
On Fixed Group tabs, the style list follows the same combined logic as the grid and badge counts. This means section-level filters (e.g. Brand, Season, Status) and tab-level filters (e.g. Collection) work together with the Group, so you only see and add styles that match all active filters.
Edit Group List Removed
The Add Styles > Edit Group List option has been removed. To edit the Group's settings, directly head to Site Settings > Planner > Groups.
Refresh Planner Styles
The Refresh Planner Styles feature allows you to automatically update planner styles and colours based on the current filter settings saved in a Fixed Group plan. This is especially helpful when you've changed plan-level additional filters and want to apply those updates across all your planner tabs without starting over.
How to use Refresh Planner Styles:
| Step | Action |
|---|---|
| 1 | Go to Planner > Styles and make sure you're viewing in Fixed Group mode. |
| 2 | Click the Refresh Planner Styles button in the Style section. 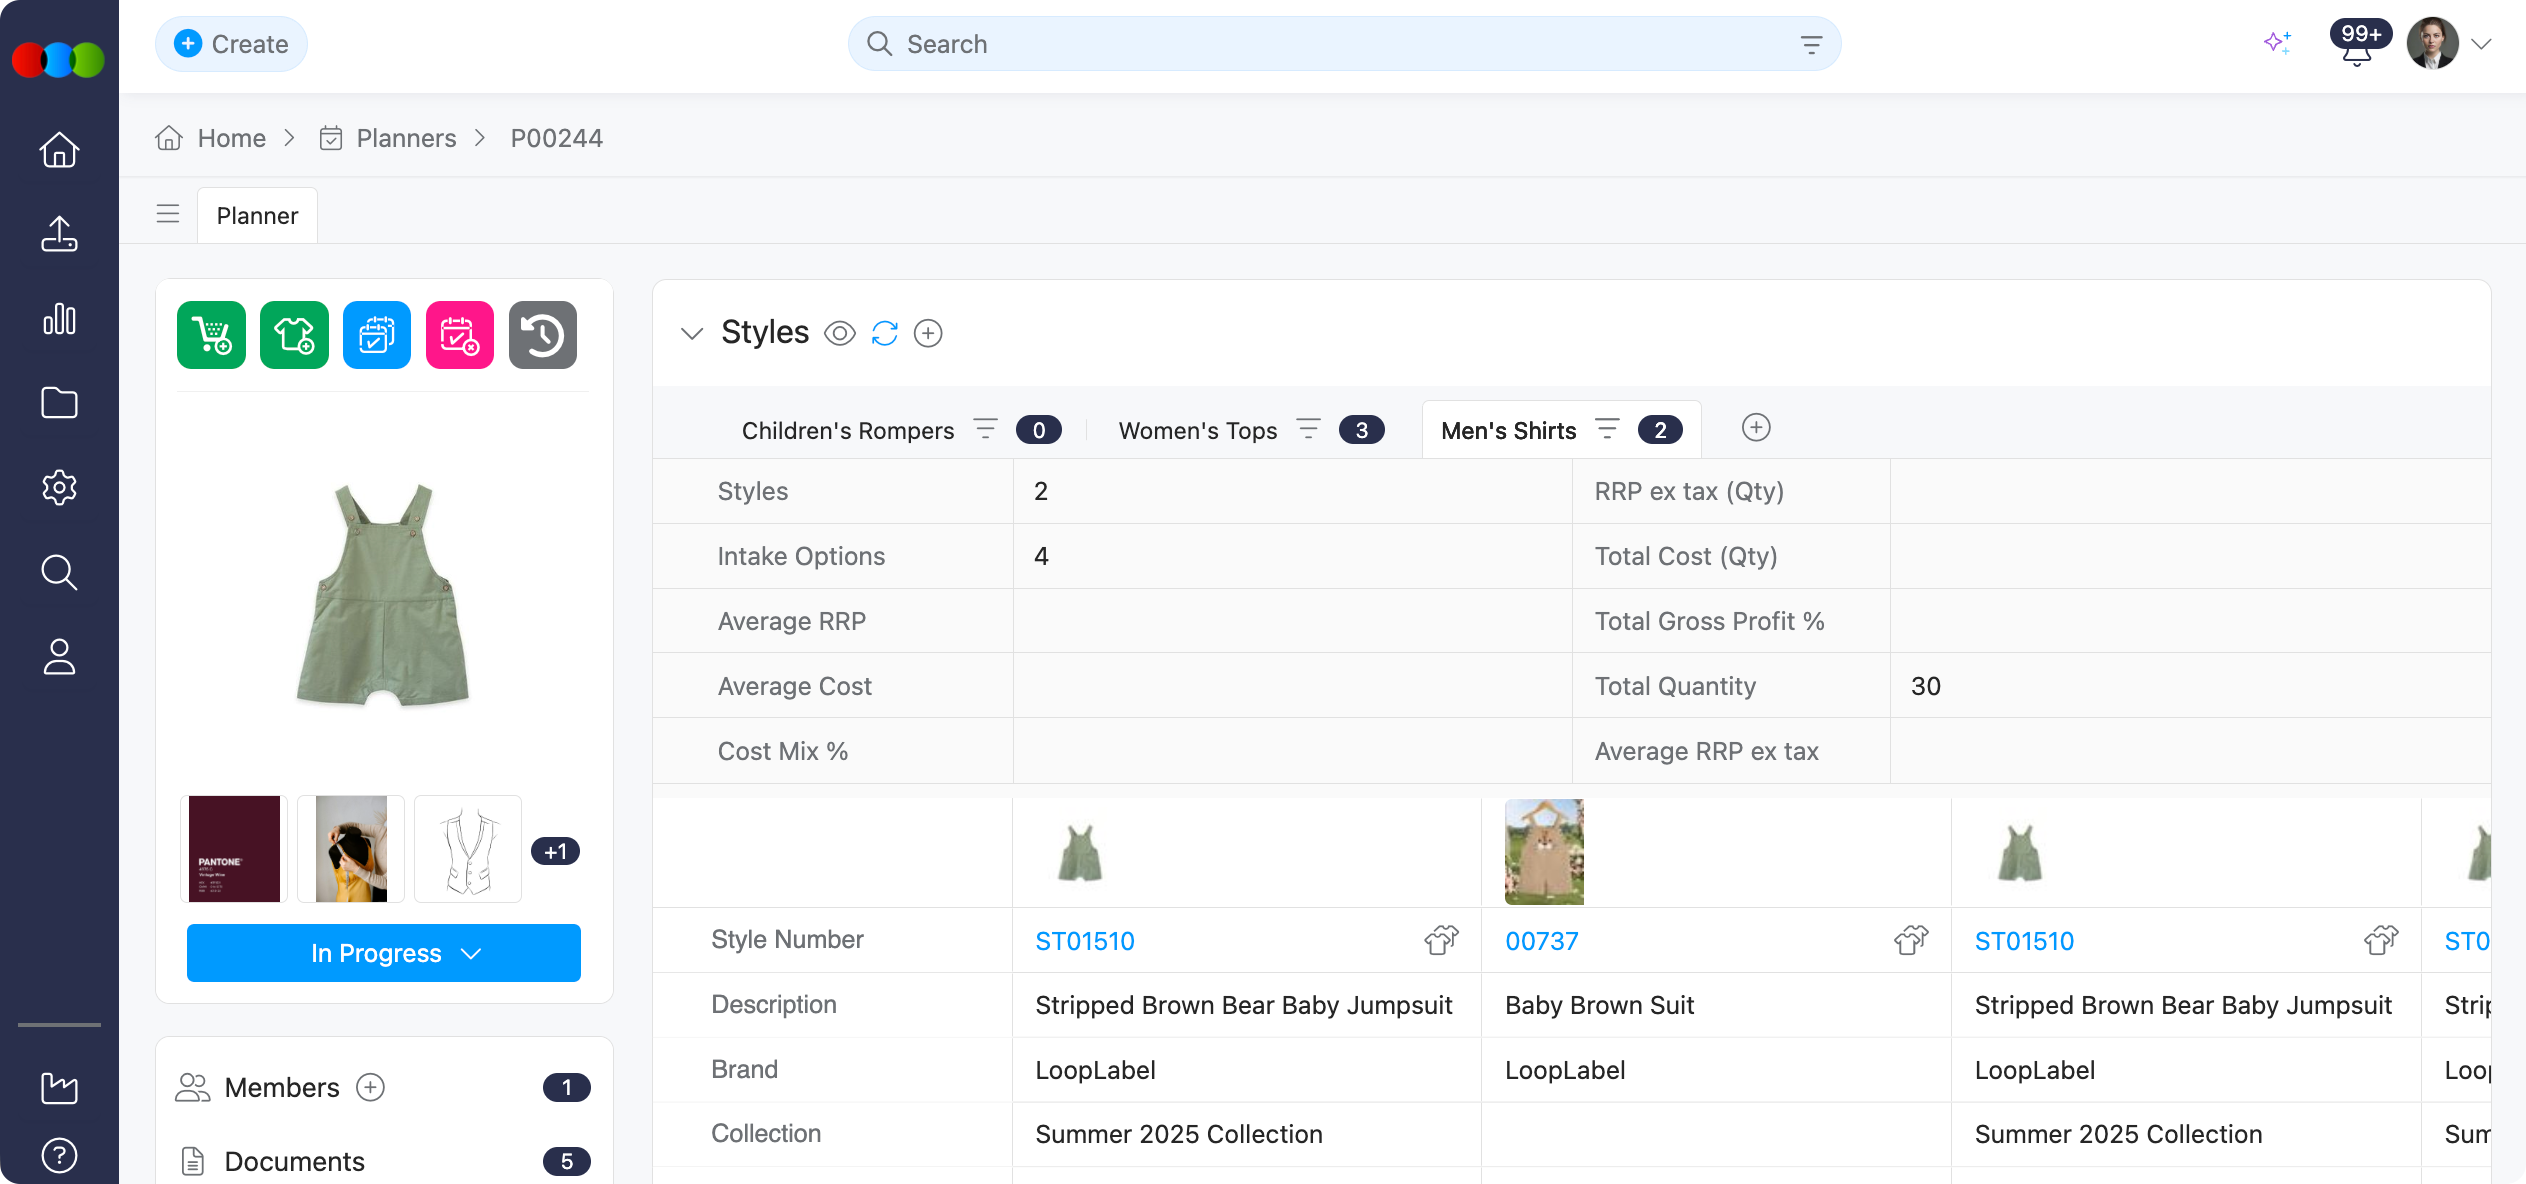 |
| 3 | Check the confirmation pop-up, which shows how many planner tabs will be updated. 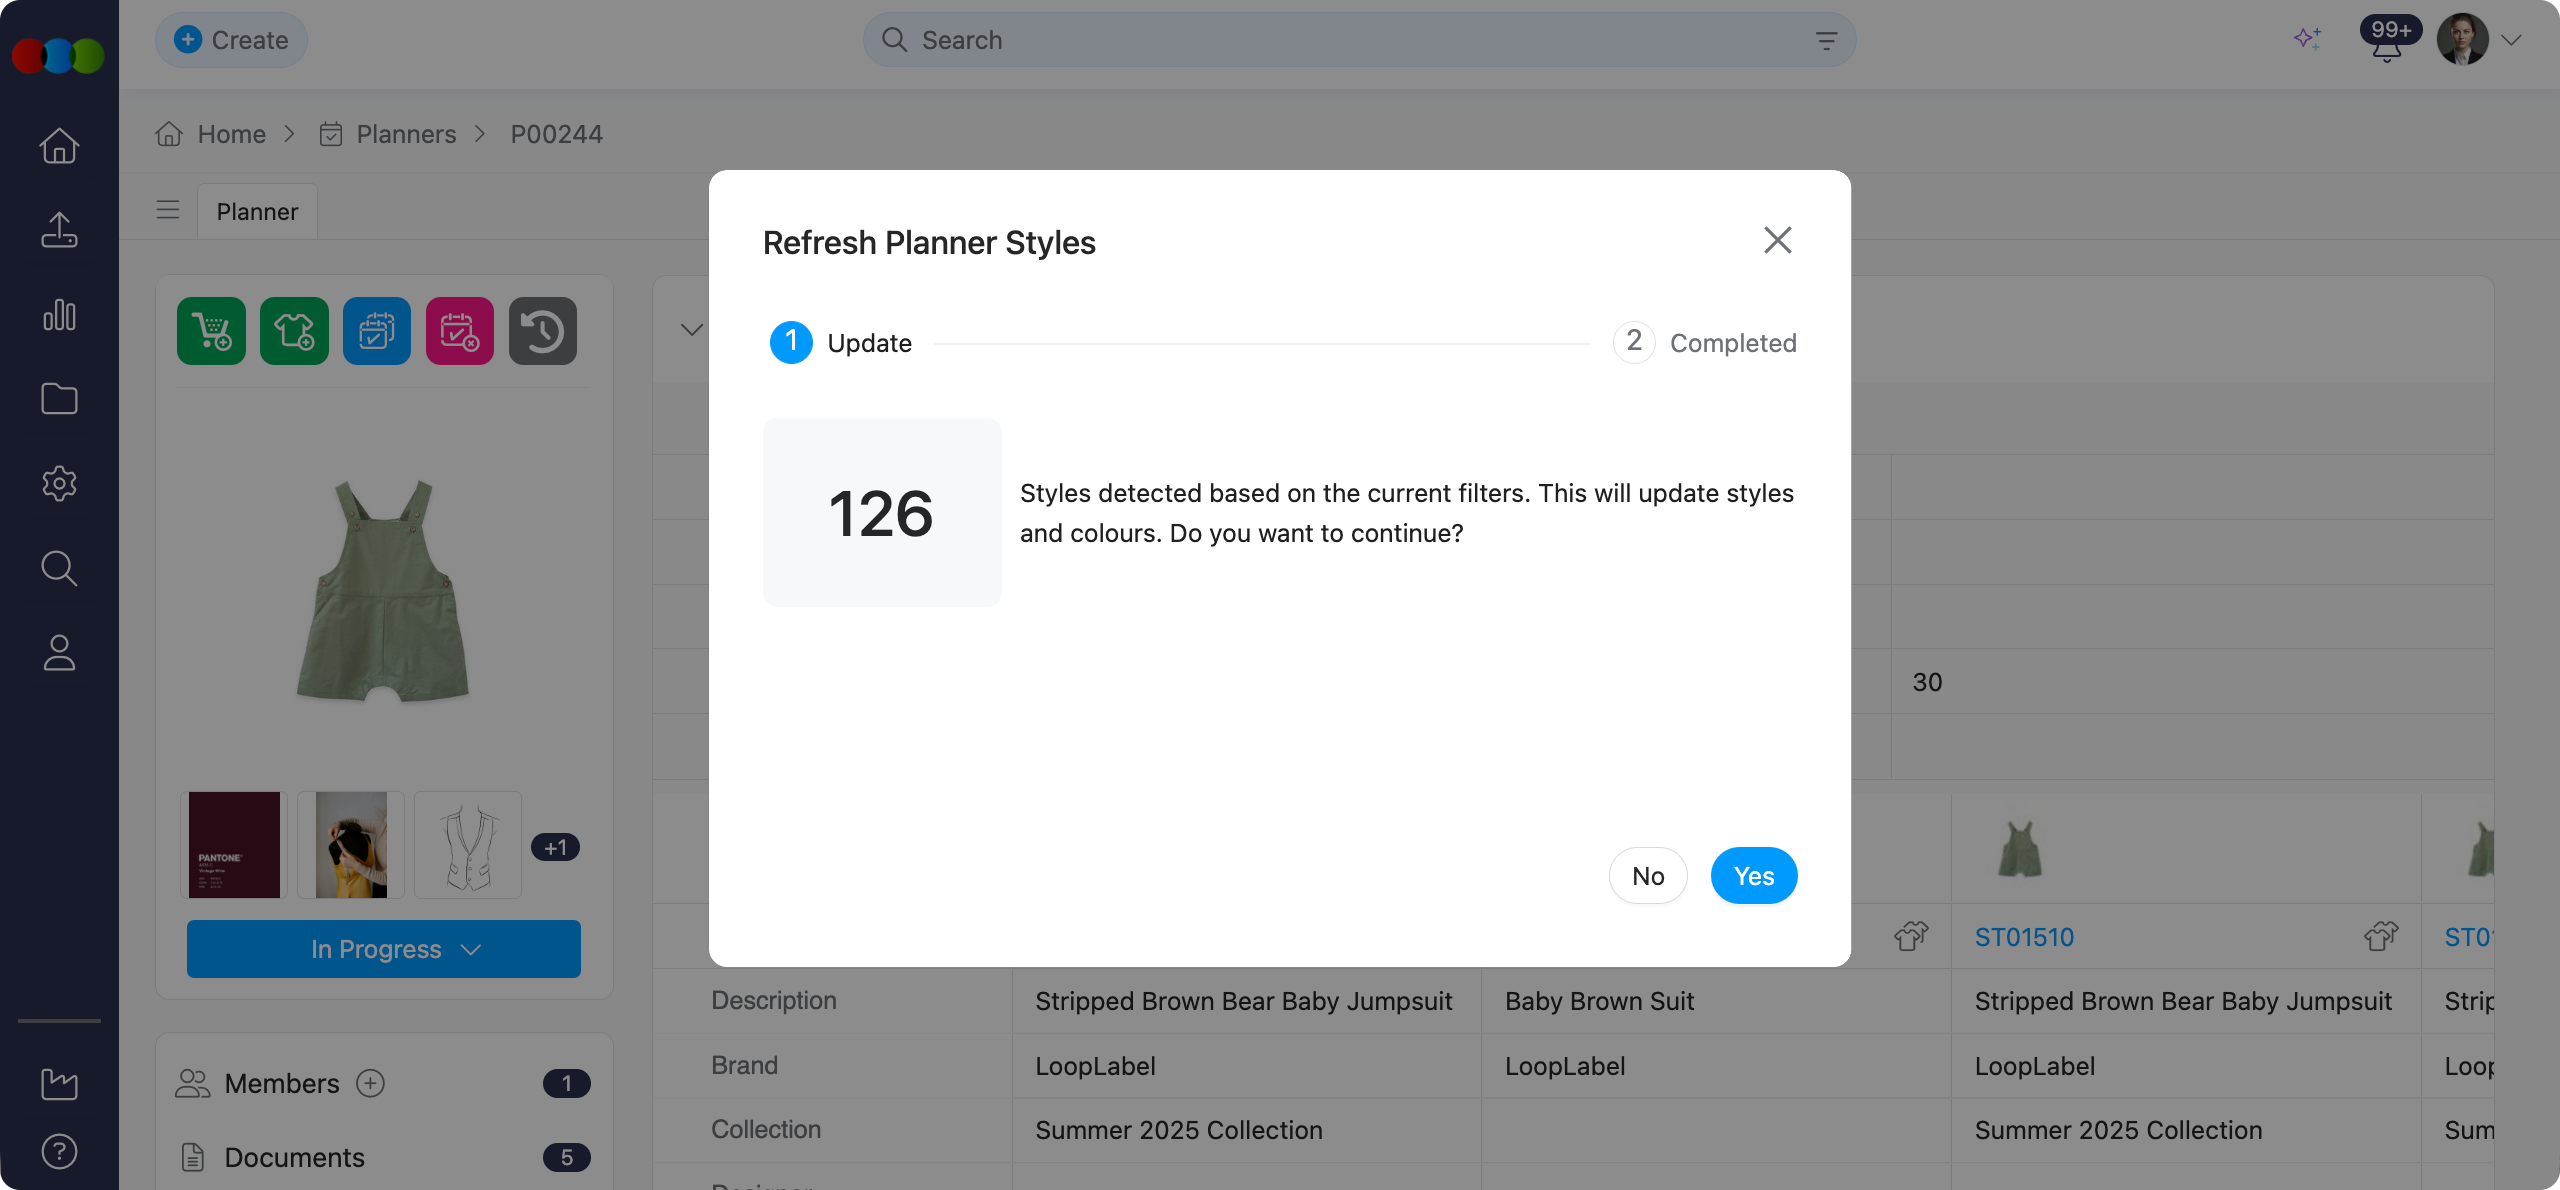 |
| 4 | Click Confirm to start the refresh process. |
| 5 | When finished, you can download a summary file to see what changed.  |
What happens during refresh:
| Process | Description |
|---|---|
| Re-applies Filters | The system uses your current filter settings to re-evaluate all groups. |
| Updates Styles & Colours | Styles and colours are automatically added or removed from planner tabs based on your updated filter rules. |
| Bulk Refresh | All planner tabs (both styles and colours) are updated at once for efficiency. |
| Audit Logging | All changes are recorded in the system log file so you can track what happened. |
Summary File:
After the refresh completes, you'll receive a downloadable summary file that shows exactly what changed:
| Information | Description |
|---|---|
| Plan Number | The plan identifier that was refreshed. |
| Styles and Colours Added | New styles and colours that were added based on your updated filters. |
| Styles and Colours Removed | Styles and colours that were removed because they no longer match your filter criteria. |
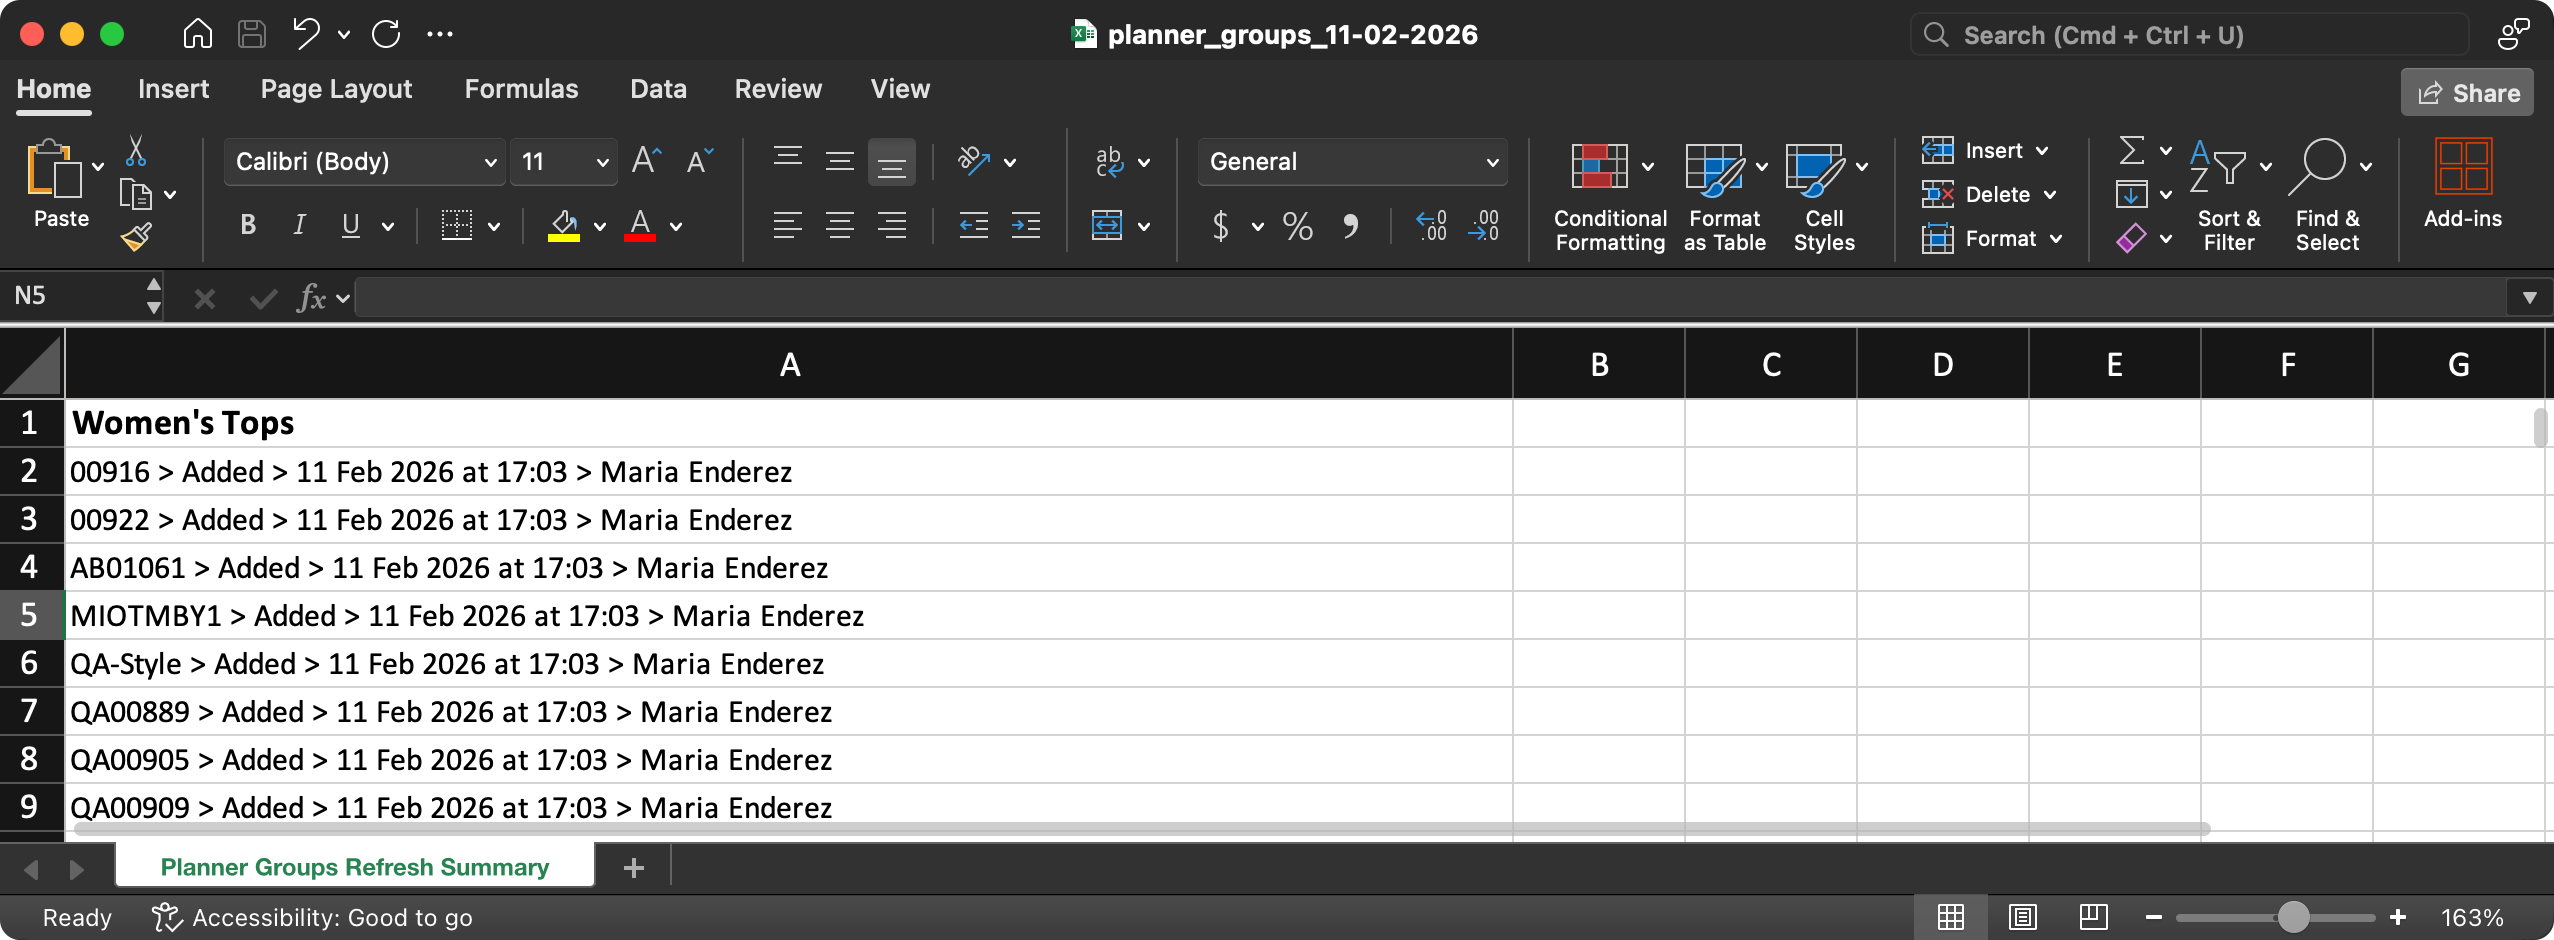
This summary helps you track exactly what changes were made during the refresh process.
When to use Refresh Planner Styles
Use this feature when:
- You've added or removed plan-level additional filters within a planner and want to refresh the style selection based on the updated filters.
- You need to recalibrate your planner styles after filter configuration changes without manually rebuilding the planner.
Important Notes
The refresh only affects styles and colours within the current planner and does not modify the original style records.
Helpful Tips
- If you need to trial new filters, duplicate an existing plan first so the original stays untouched while you experiment.
- When retiring a Group in admin, confirm any live plans that rely on it have already captured the right filters to keep reporting stable.
- Use Refresh Planner Styles after updating group filters to ensure your planner remains aligned with the latest filter logic.
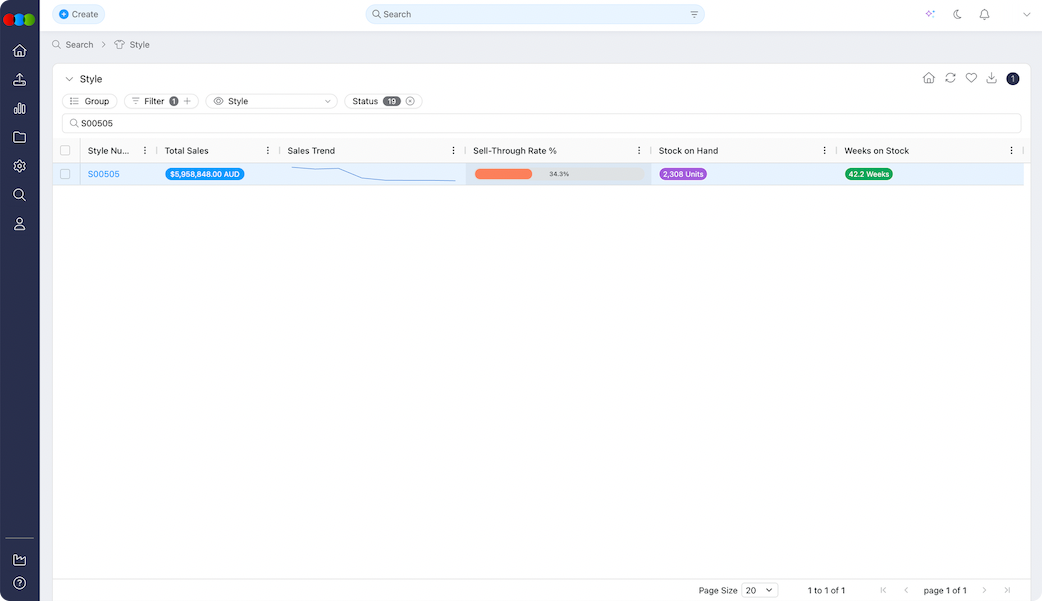
Style Sales Data
The Sales Data feature in Planner transforms merchandise planning from assumption-based decisions into data-driven planning. By integrating actual sales performance into the planning view, users can quickly evaluate which styles and colours are performing well, identify stock risks, and make faster commercial decisions.
This functionality is essential because it connects design, inventory, and sales performance in one place; allowing planners and merchandisers to react proactively based on data.
Sales Data provides immediate visibility into the following:
| Sales Data | What you see |
|---|---|
| Sell-through Rate % | How sell-through is performing for the style or colour. |
| Sales Trend | How demand changes over time. |
| Total Sales | Commercial value, including across multiple currencies. |
| Stock on Hand | Current inventory levels. |
| Weeks on Stock | Estimated weeks of cover from current SOH and the last 8 weeks of sales. |
| Regional Heatmap | How sales are distributed by region. |
| Size Curve Overlay | Size curve and broken size analysis. |
This creates a stronger link between planning and real business outcomes.
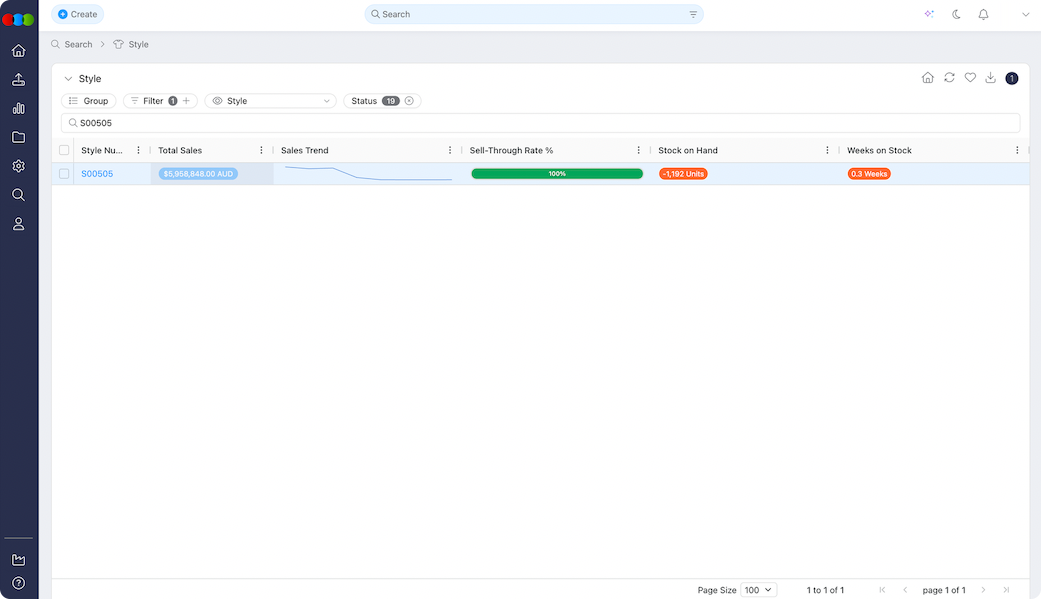
Sell-Through Rate
The Sell-Through Rate % (STR%) is the most critical performance metric in Planner. It shows how much of the available inventory has been sold and helps users quickly determine product performance.
Rather than relying on raw sales numbers, this provides a clearer commercial indicator of demand and stock efficiency.
| Aspect | Description |
|---|---|
| Display | The Sell-Through Rate is shown in the main planning view using a small progress bar, and visual colour coding so you can spot strong and weak performers without opening another view. |
| Function | Helps you identify fast-selling products, spot underperforming styles early, make better replenishment decisions, and improve future assortment planning. |
| Performance level | STR % |
|---|---|
| Green 🟢 | Greater than 80% |
| Orange 🟠 | 50% to 80% |
| Red 🔴 | Less than 50% |
Sales Breakdown
Click the Sell-Through Rate to open the Sales Breakdown pop-up.
| What you can do | Description |
|---|---|
| By country | The regional heatmap ofA sales breakdown by country. Hover a country to see the number of styles sold. 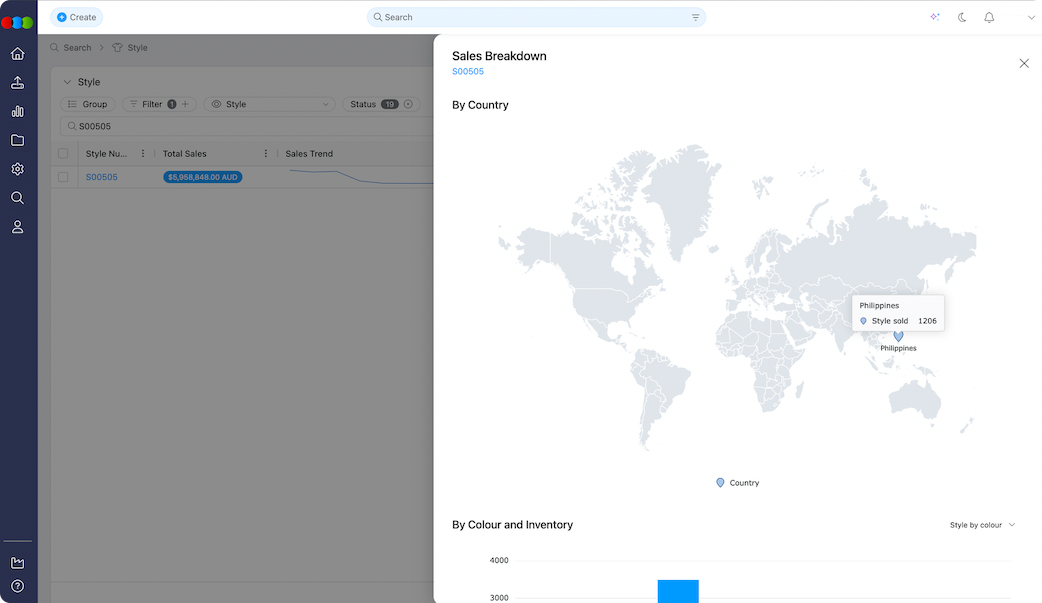 |
| Bar chart (sales and inventory) | A bar chart with Quantity on the vertical axis. The horizontal axis shows Colour or Size depending on your view (Style by Colour or Style by Size). It shows sales and inventory per colourway.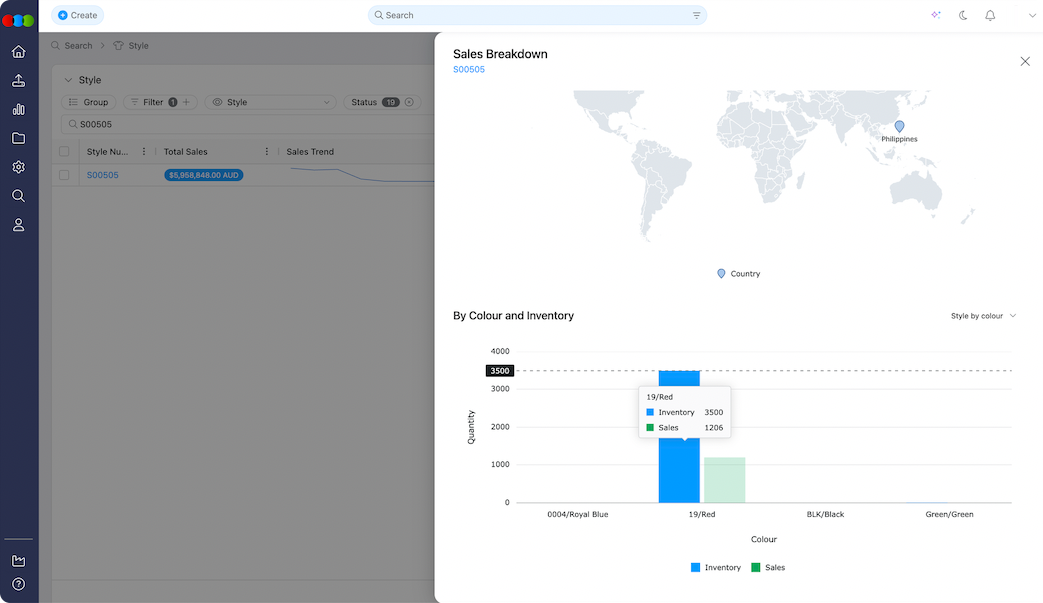 |
Regional Heatmap
The Regional Heatmap provides deeper sales visibility by showing where a Style's colourway is performing geographically.
This helps users understand regional demand patterns and improve regional planning strategies.
| Aspect | Description |
|---|---|
| Display | The panel shows region-level sales performance and size-level sales performance. |
| Map | Regions are coloured by sales intensity. Higher sales activity appears more visually prominent. |
| Pop-up header | Style Number, Colour Code, and Colour Description so users always know which product they are reviewing. |
Size Curve Overlay
The Size Curve Overlay compares sales performance against available inventory by size.
This immediately highlights broken size runs and helps users make better replenishment decisions.
| Aspect | Description |
|---|---|
| Display | A bar chart shows Sales by Size and Inventory by Size. |
| Colours | Sales = green, Inventory = blue. |
| View options | Style by Colour (default), Style by Size, or Column Order. |
| Column order | In column view, columns are Inventory then Sales; Inventory always appear first. |
This is a great tool for surface issues such as medium sizes selling out too quickly, excess stock in larger sizes, and imbalance in size buying decisions, improving both planning accuracy and inventory efficiency. |
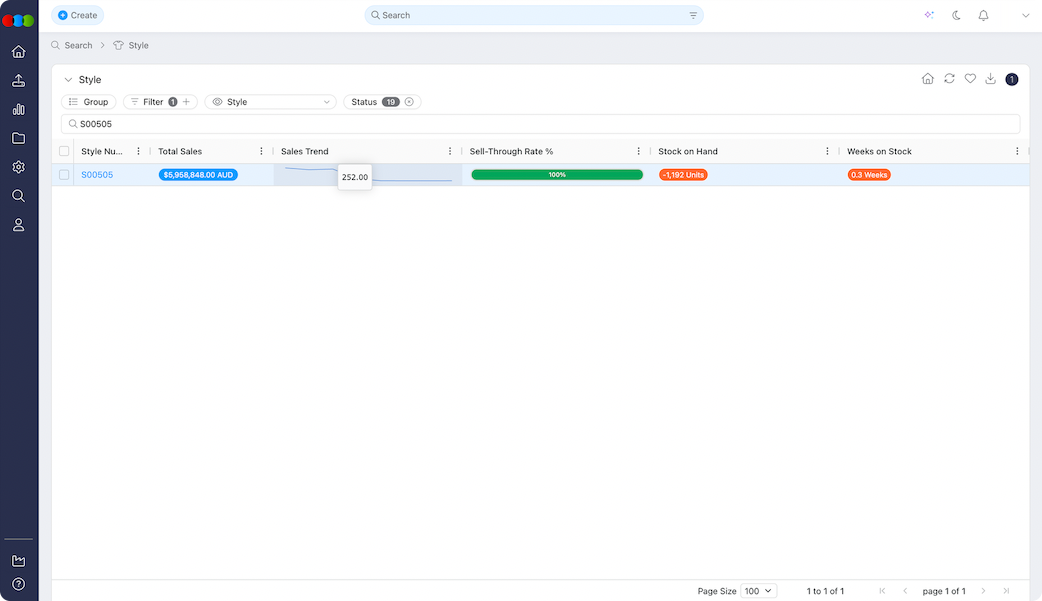
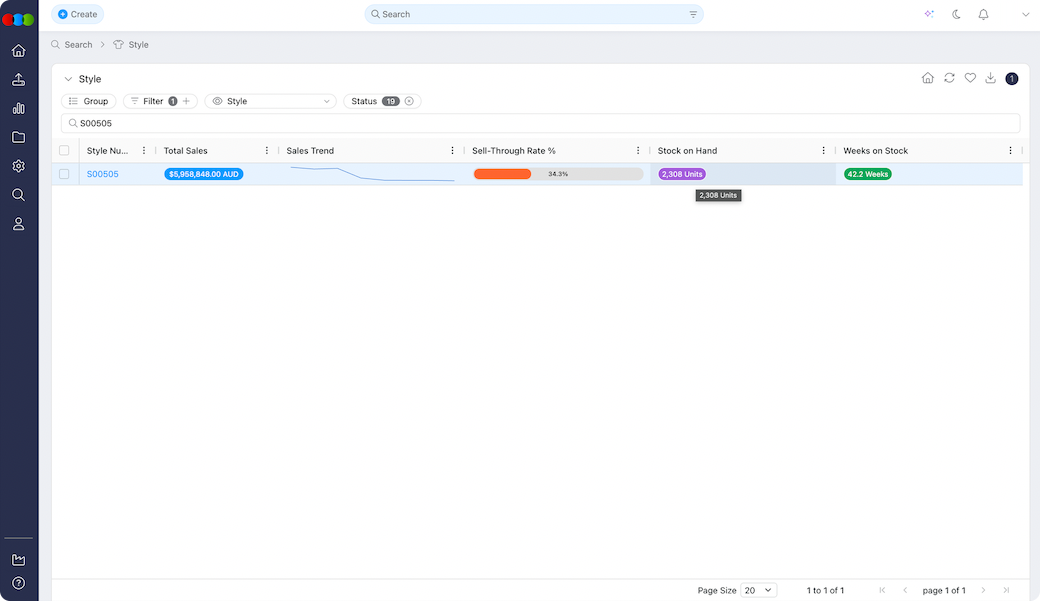
Sales Trend
The Sales Trend field shows a mini trend line for sales over the last 6 weeks, so you can see at a glance whether demand is rising, stable, or declining without opening a detailed report.
No Sales Data
If no sales data exists, dependent fields show No Data. That applies to all fields that rely on sales reporting so it is clear when no reporting information is available.
Total Sales
| Aspect | Description |
|---|---|
| Purpose | Total Sales shows the aggregated revenue for a Style/Colour so you see commercial value as well as unit movement. |
| Display | Value by Currency — one pill per currency — for clarity when you work across regions and currencies. |
| Calculation | Total Sales = total quantity sold × total revenue; calculated per currency. |
Stock on Hand
The Stock on Hand (SOH) field shows the current available inventory after sales and stock adjustments. Use it to spot stock risk, replenishment needs, and overstock.
| Aspect | Description |
|---|---|
| Calculation | SOH = (Received + Adjustments) − Sold |
| Function | Monitor remaining stock levels, identify sell-out risks, detect excess inventory, and improve stock planning decisions. |
| Component | How it is Derived |
|---|---|
| Total Received | Sum of the stock quantity recorded in Style Inventory. This represents the original shipment quantity received for the Style per colourway. |
| Total Adjustments | Sum of all stock adjustment entries made for the Style per colourway. |
| Total Sold | Total quantity sold taken from the Sales Summary. |
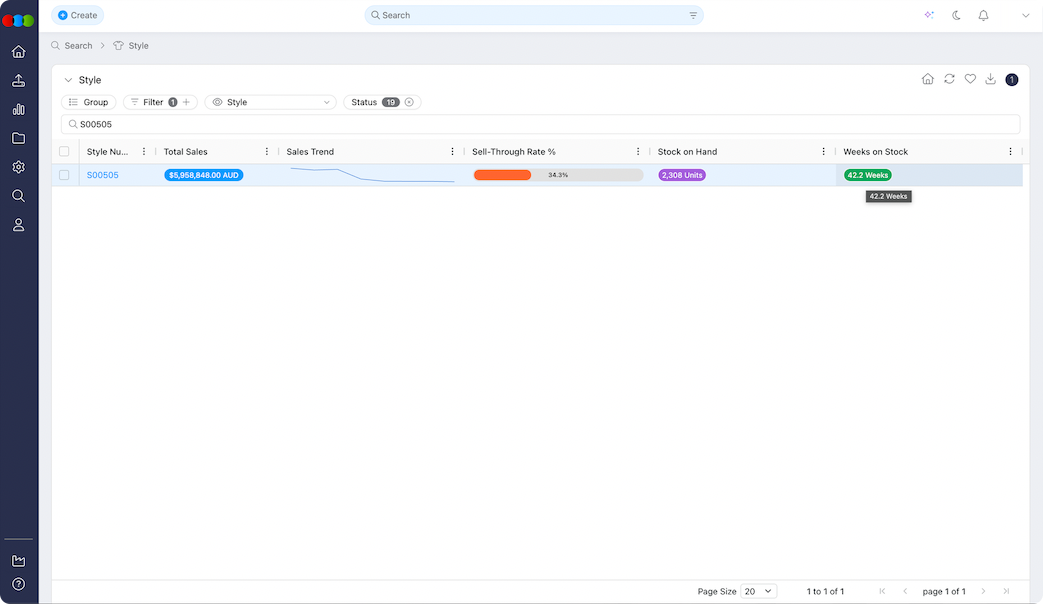
Weeks on Stock
Weeks on Stock estimates how long the current inventory will last based on recent sales. It is calculated automatically and cannot be edited in the grid. It shows how many weeks on stock are likely to remain before replenishment may be needed, using current Stock on Hand (SOH) against average weekly sales over the last 8 weeks. |
| Input | Source |
|---|---|
| Current Stock on Hand (SOH) | Inventory summary for the selected Style/Colour |
| Sales in the last 8 weeks | Sales summary for the same Style/Colour |
| Step | System Calculation |
|---|---|
| 1. Stock on Hand | total units received − total units sold + stock adjustments = SOH (your current available inventory) |
| 2. Average weekly sales | total units sold in the last 8 weeks ÷ 8 = average weekly sales rate |
| 3. Weeks on Stock | SOH ÷ average weekly sales = WOS (how long remaining stock is expected to last if the current sales pace continues) |
Permission Control
| Aspect | Description |
|---|---|
| Where to configure | Site Settings > Company > Roles & Permissions > Planner > Advanced > Total Sales on the Production Portal role |
| Permission | Total Sales (Planner > Advanced): If enabled = Users can view Total Sales data. If disabled = The Total Sales column is hidden. Users cannot access this data in Planner, Search, or the Chatbot. |
Sales Reporting Configuration
Style Sales Data in Planner > Styles (and other areas that use weekly sales) relies on a consistent sales calendar defined for the company. The calendar type is not edited inside Planner; administrators set it in Site Settings > Style > General Settings > Sales Reporting.
These settings control how the sales calendar is structured for reporting and planning purposes.
| Calendar Type | Configuration Behaviour |
|---|---|
| Standard | Only the Week Start Day dropdown is displayed. |
| 454 | The Variant dropdown and Fiscal Year Start Month dropdown are displayed. |
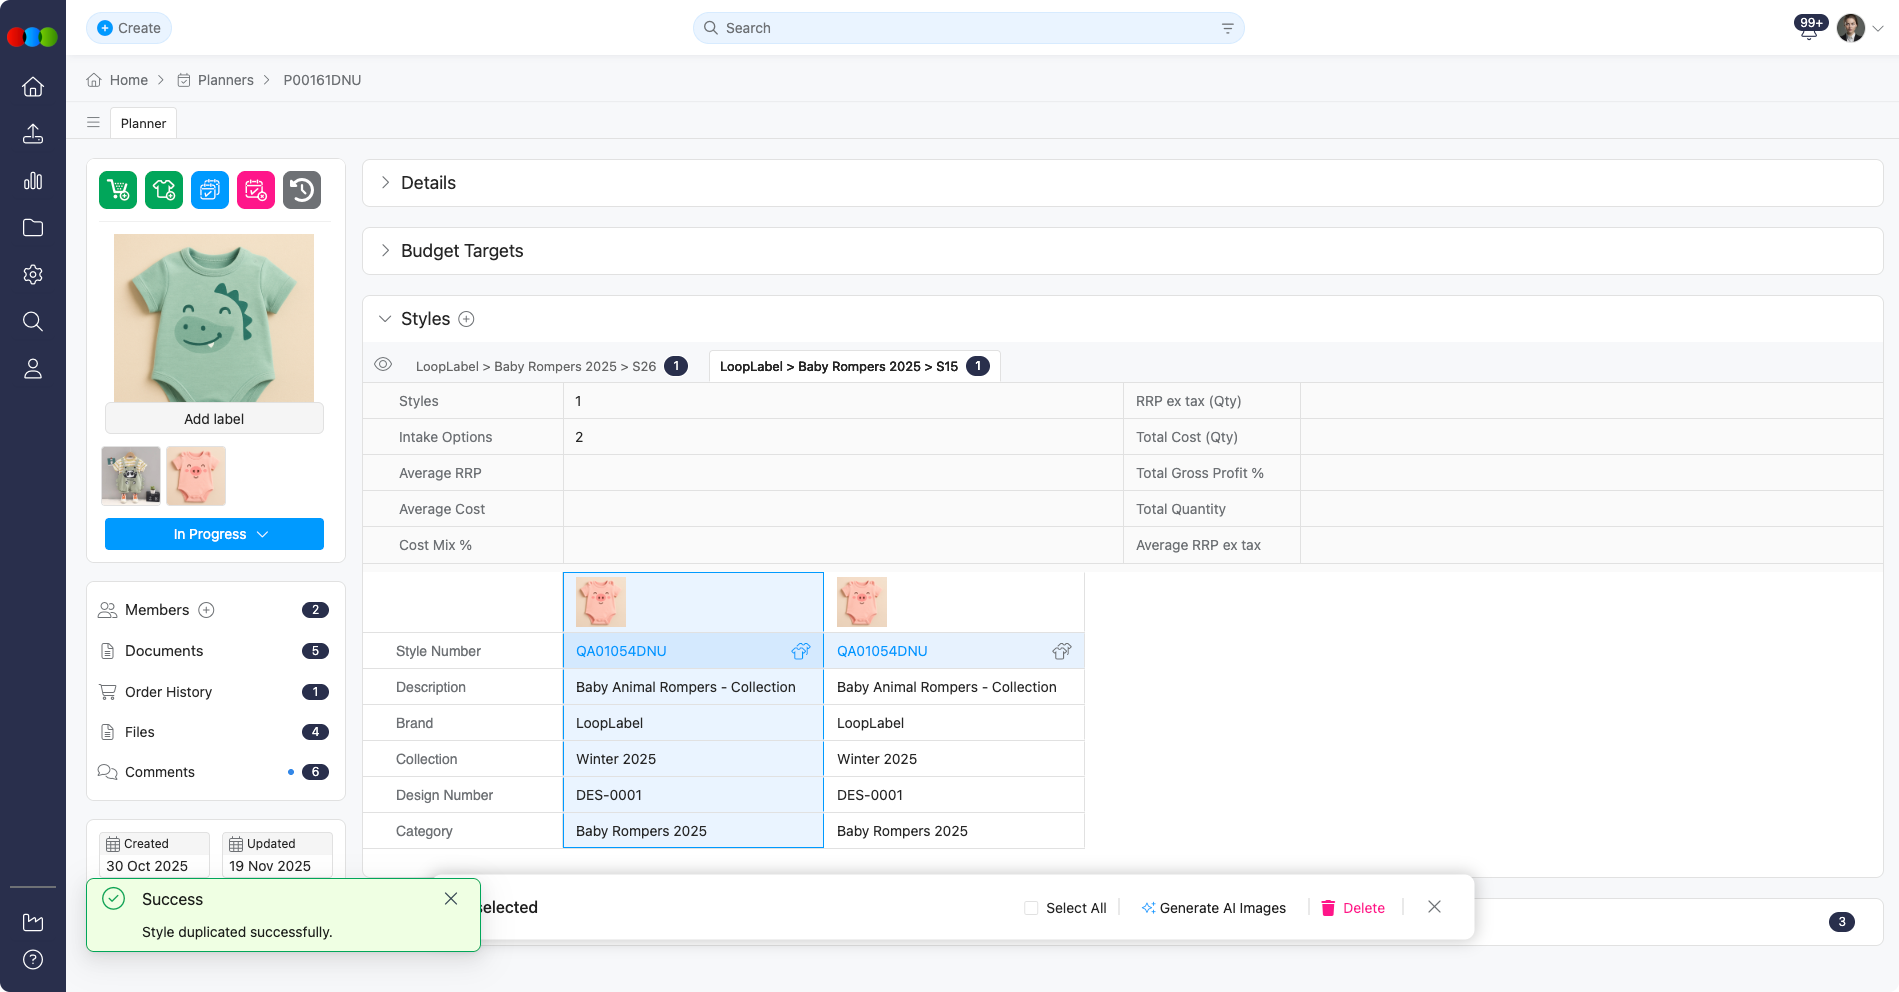
Duplicate Style
This feature streamlines your workflow by allowing quick reuse of style data across planning items.
| Functionality | Description |
|---|---|
| Duplicate Styles Easily | You can duplicate a style directly within the Planner section. This is useful when planning multiple items that share similar style attributes. |
| Synchronised Edits | Any changes made to fields in the duplicated style—such as Costing, Shipment, or Description—will automatically reflect across all instances of that style within the planner. This ensures data consistency and reduces manual updates. |
| Planner-Exclusive Styles | Duplicated styles within the Planner do not appear as separate entries in the main Style application. These styles are exclusive to the specific planner and are treated as linked references rather than independent styles. |
| Carry-Over on Duplication | When a Planner item is duplicated, any associated duplicated styles will also be carried over, maintaining the same linked behaviour. |
Example
Multi-Level Grouping
The Style section includes enhanced grouping capabilities designed to help you stay organised and work more efficiently. This allows you to have a more intuitive way to structure and manage style data, making it easier to navigate complex style collections.
Example
Style-by-Colour Display
The styles are grouped and displayed by colour. This helps you quickly identify and organise styles at a glance.
Example
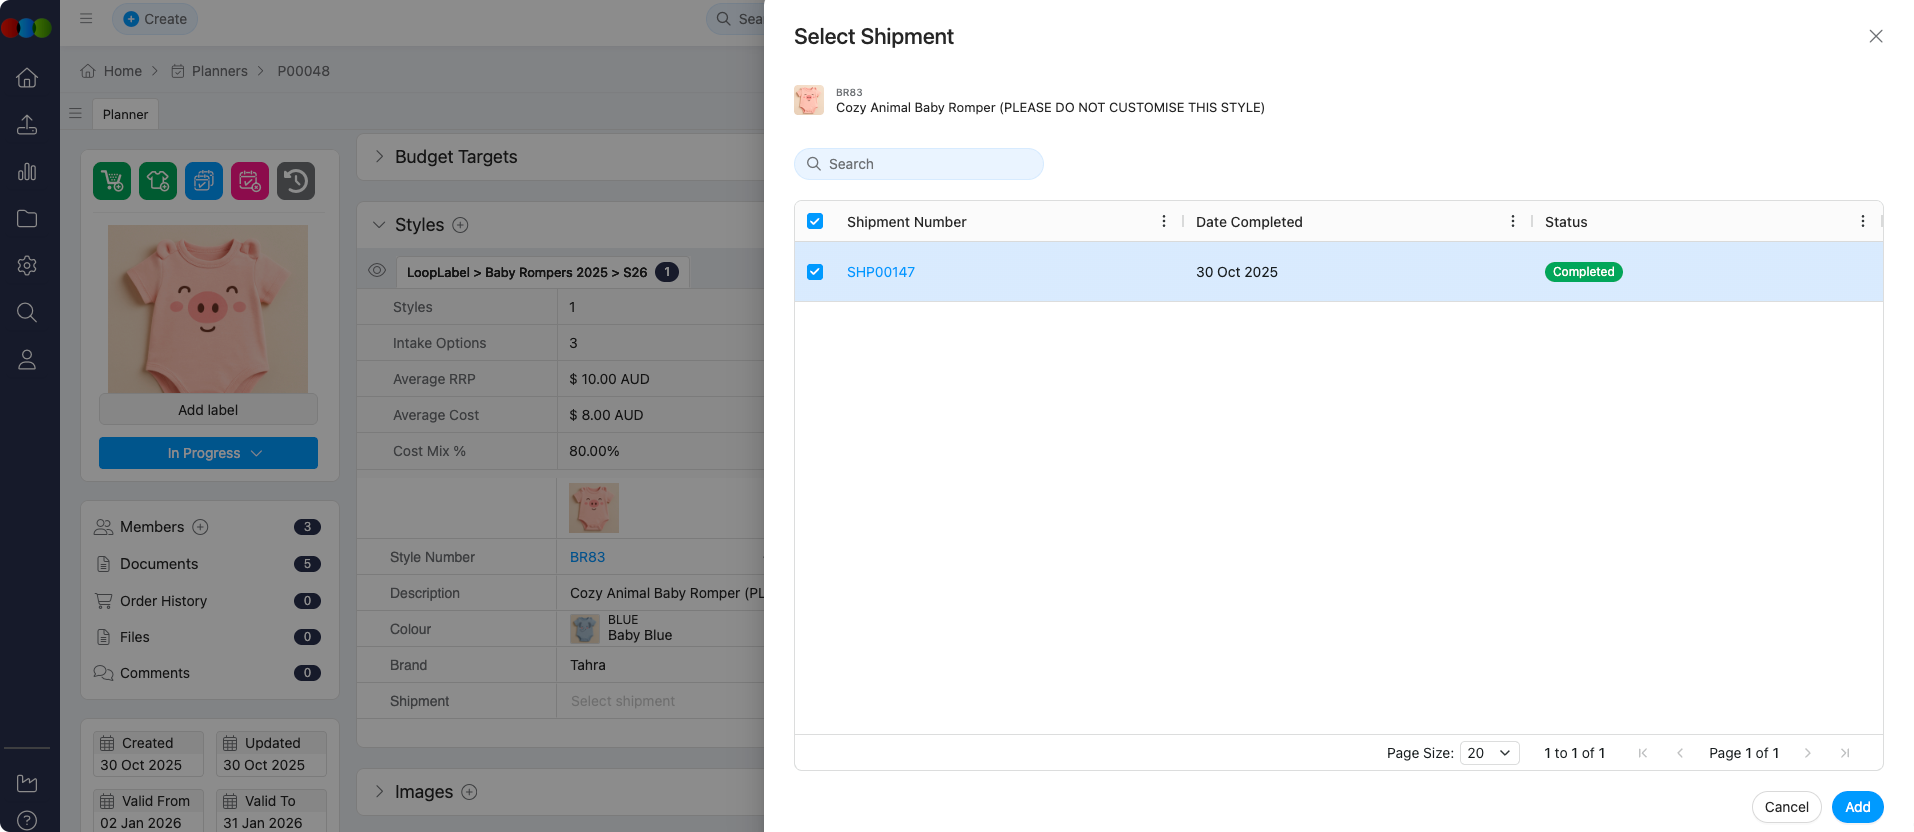
Shipment Selection
This allows you to assign shipments directly from the Style section, streamlining the planning process and improving data consistency across related styles.
| Functionality | Description |
|---|---|
| Direct Assignment | Shipments can be assigned without navigating away from the Style section. |
| Automatic Population of Related Styles | Once a shipment is assigned to a style, all other styles linked to the same shipment will be automatically populated with the relevant data. This eliminates the need for repetitive manual entry and ensures uniformity across styles. |
Generate AI Images
This feature allows you to generate visual content directly from style data. This streamlines the creative process and supports faster visual planning within the Planner.
| Functionality | Description |
|---|---|
| Style-Based Image Generation | You can create images based on the data associated with a style—such as colour, material, or design attributes. |
| Regeneration of Images | You can regenerate new versions as many times as needed until satisfied. |
| Automatic Upload | Once saved, it is automatically uploaded to: • Planner > Images • Planner > Styles > Images • Styles > Colours & Pricing > Images |
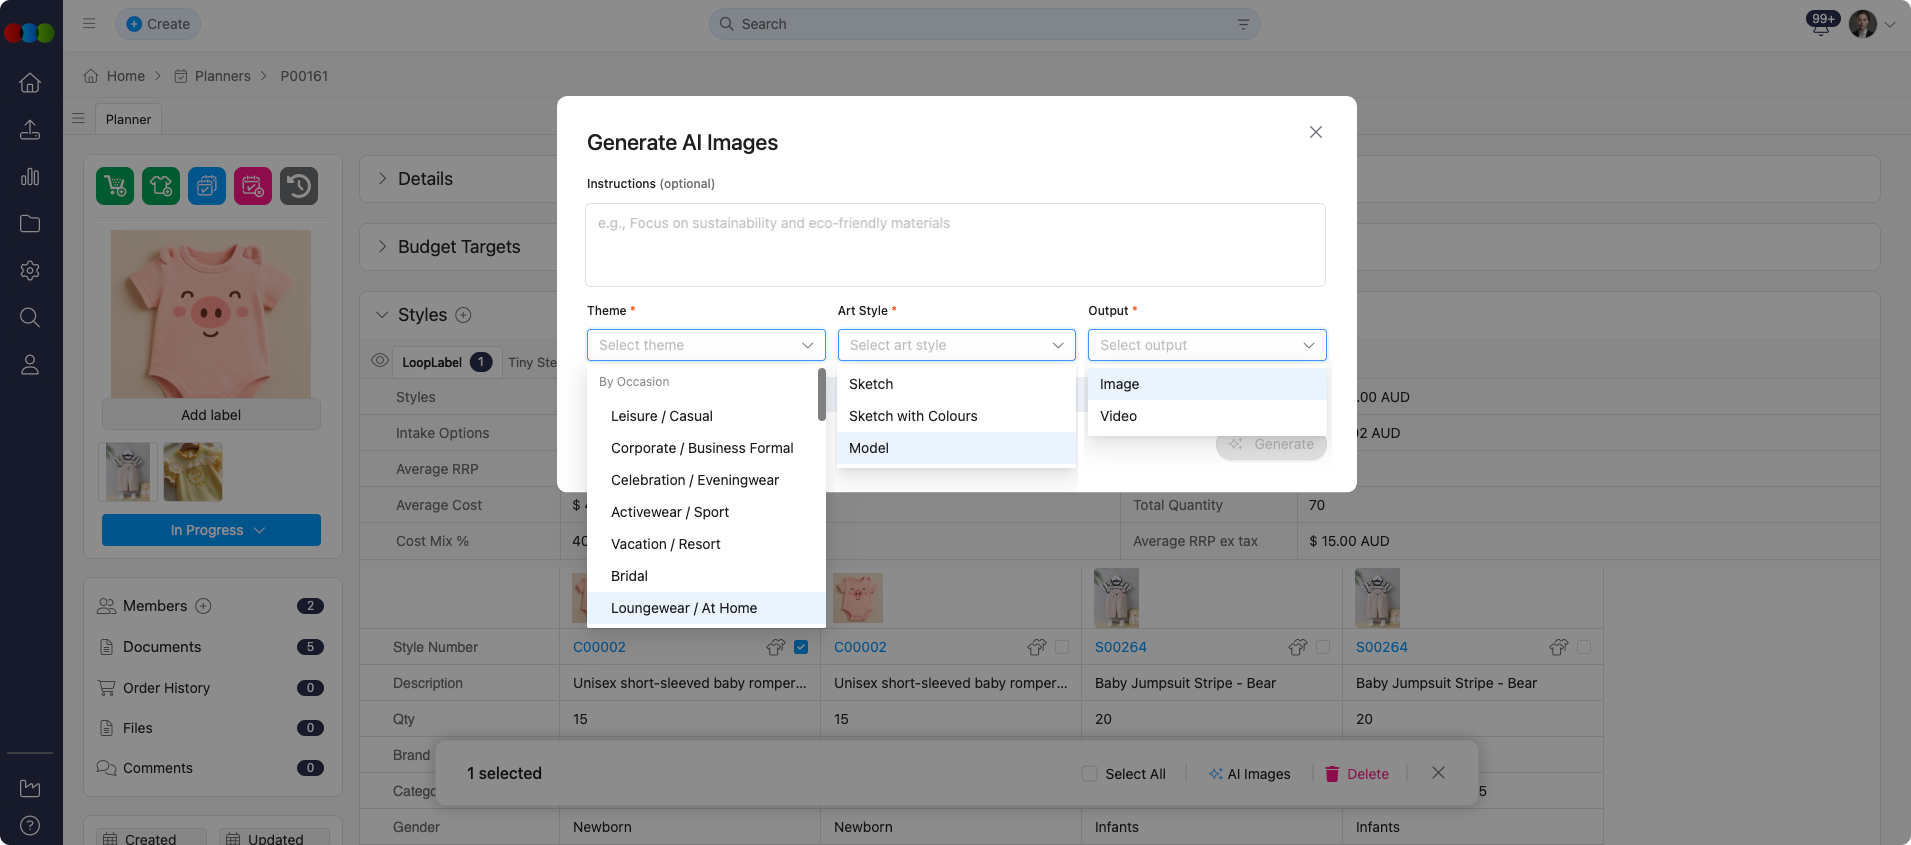
How to Generate AI Images
You can generate AI images in two ways:
Option 1: Styles > Images
| Step | Action |
|---|---|
| 1 | In the Styles section, click the image or images that you want to select. |
| 3 | Select Generate AI Image from the action bar. |
| 4 | Fill in the fields to help generate more accurate images. |
| 5 | You can create generate additional images by clicking the Generate More button directly or by adding more context to the prompt. |
| 6 | Save the AI generated image according to your preference. |
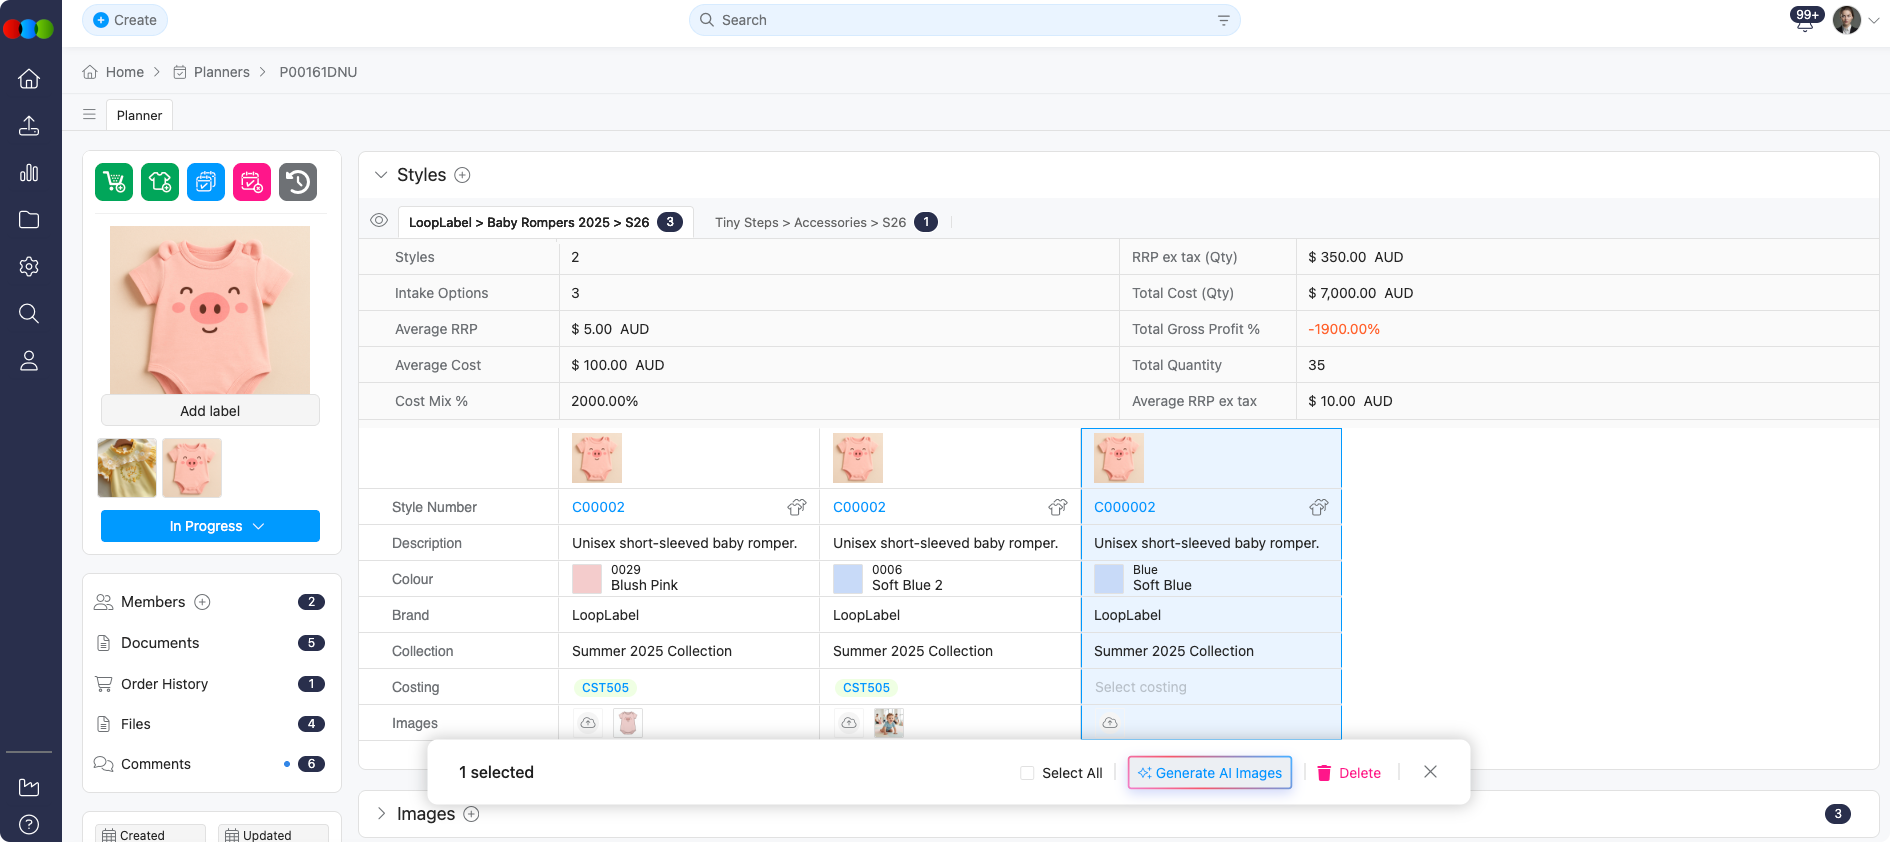
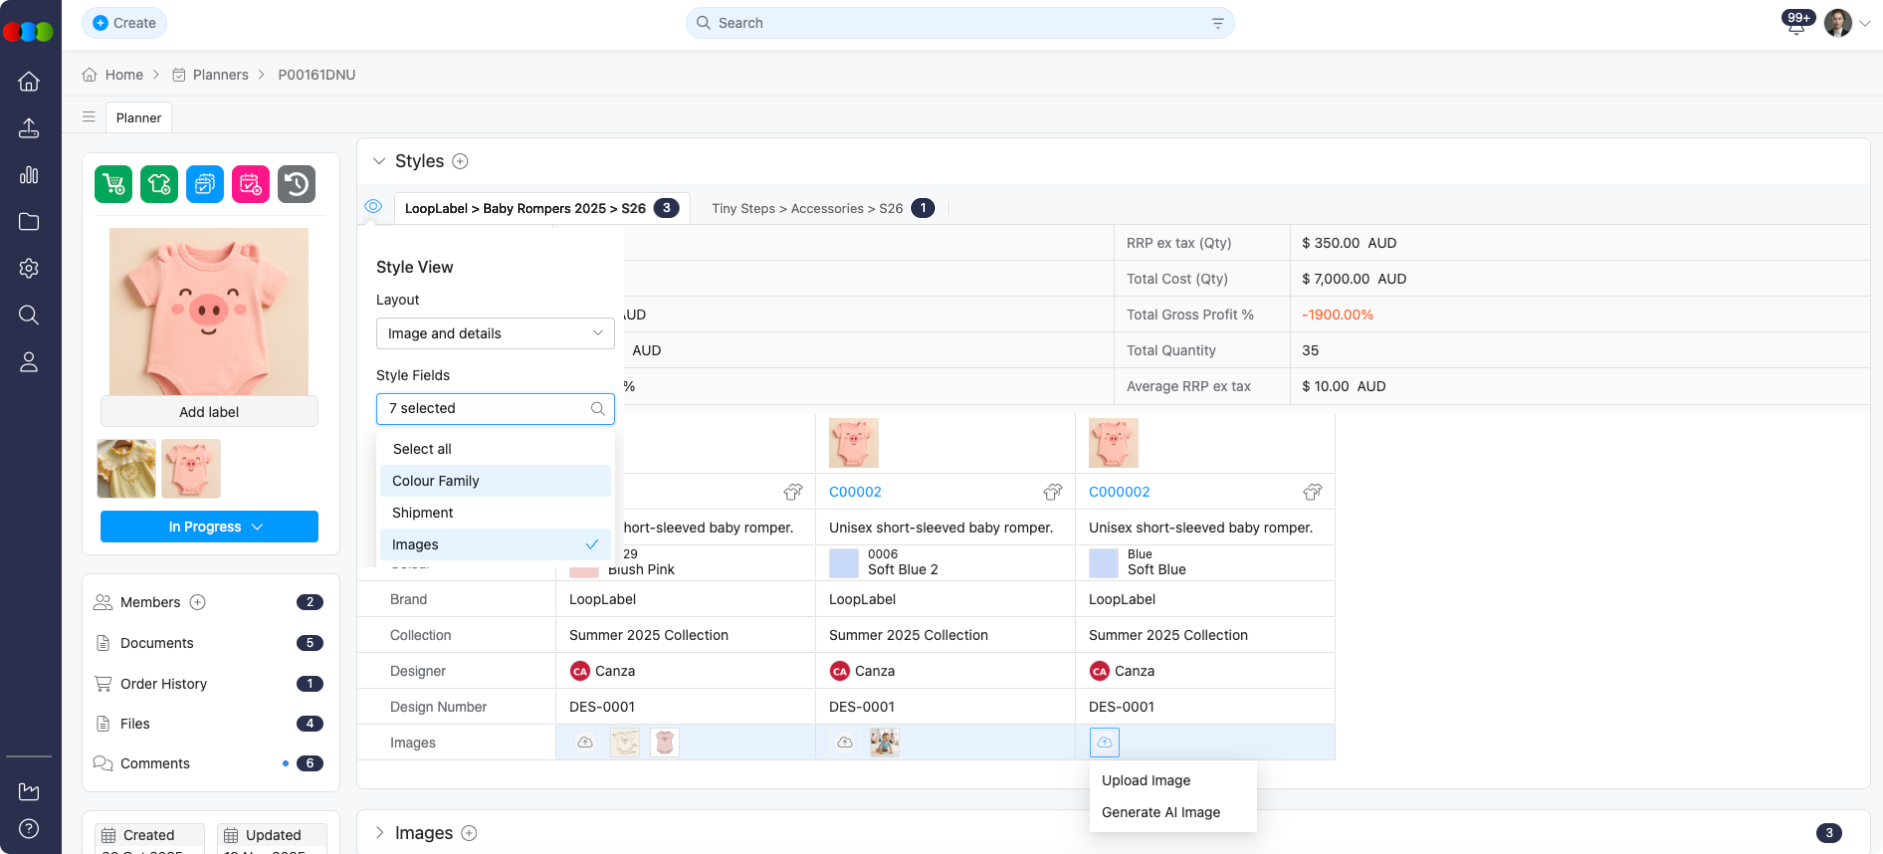
Option 2: Styles > Images Row
| Step | Action |
|---|---|
| 1 | In the Styles section, enable the Images field by clicking the eye icon. |
| 2 | After enabling, navigate to the Images row. |
| 3 | Click the upload image icon, and then select Generate AI Image. |
| 4 | Fill in the fields to help generate more accurate images. |
| 5 | You can create generate additional images by clicking the Generate More button directly or by adding more context to the prompt. |
| 6 | Save the AI generated image according to your preference. |
Example
-
In the Styles section, enable the Images field by clicking the eye icon. Click the upload image icon, and then select Generate AI Image.
-
Fill in the fields to help generate more accurate images.
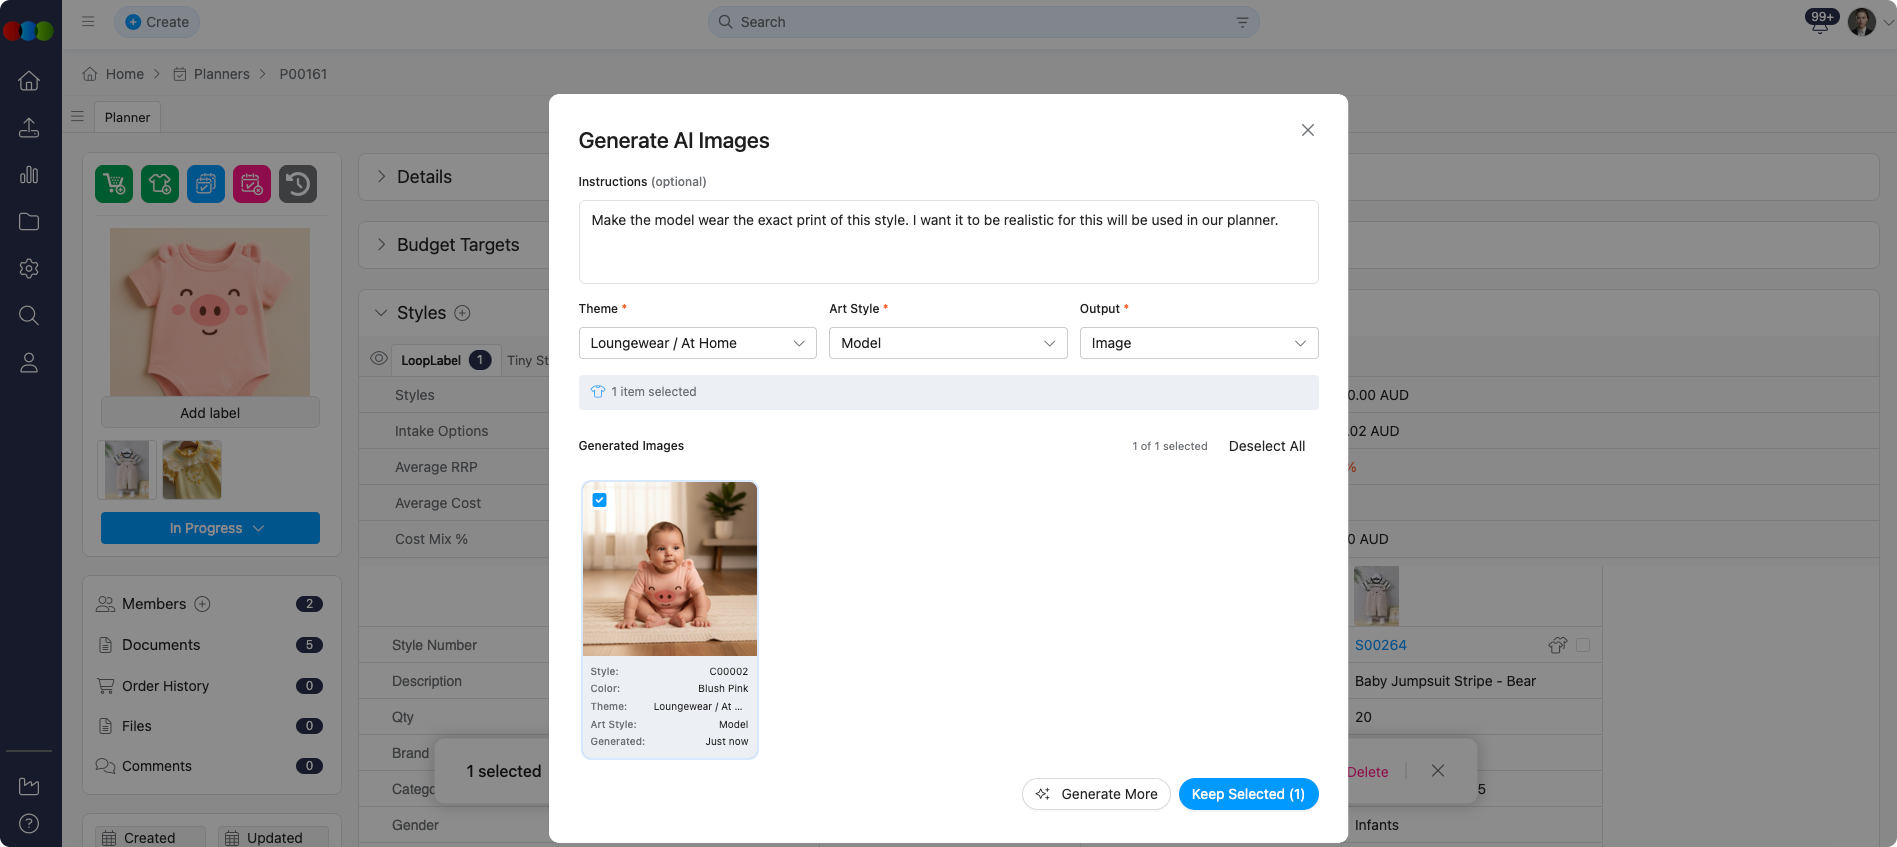
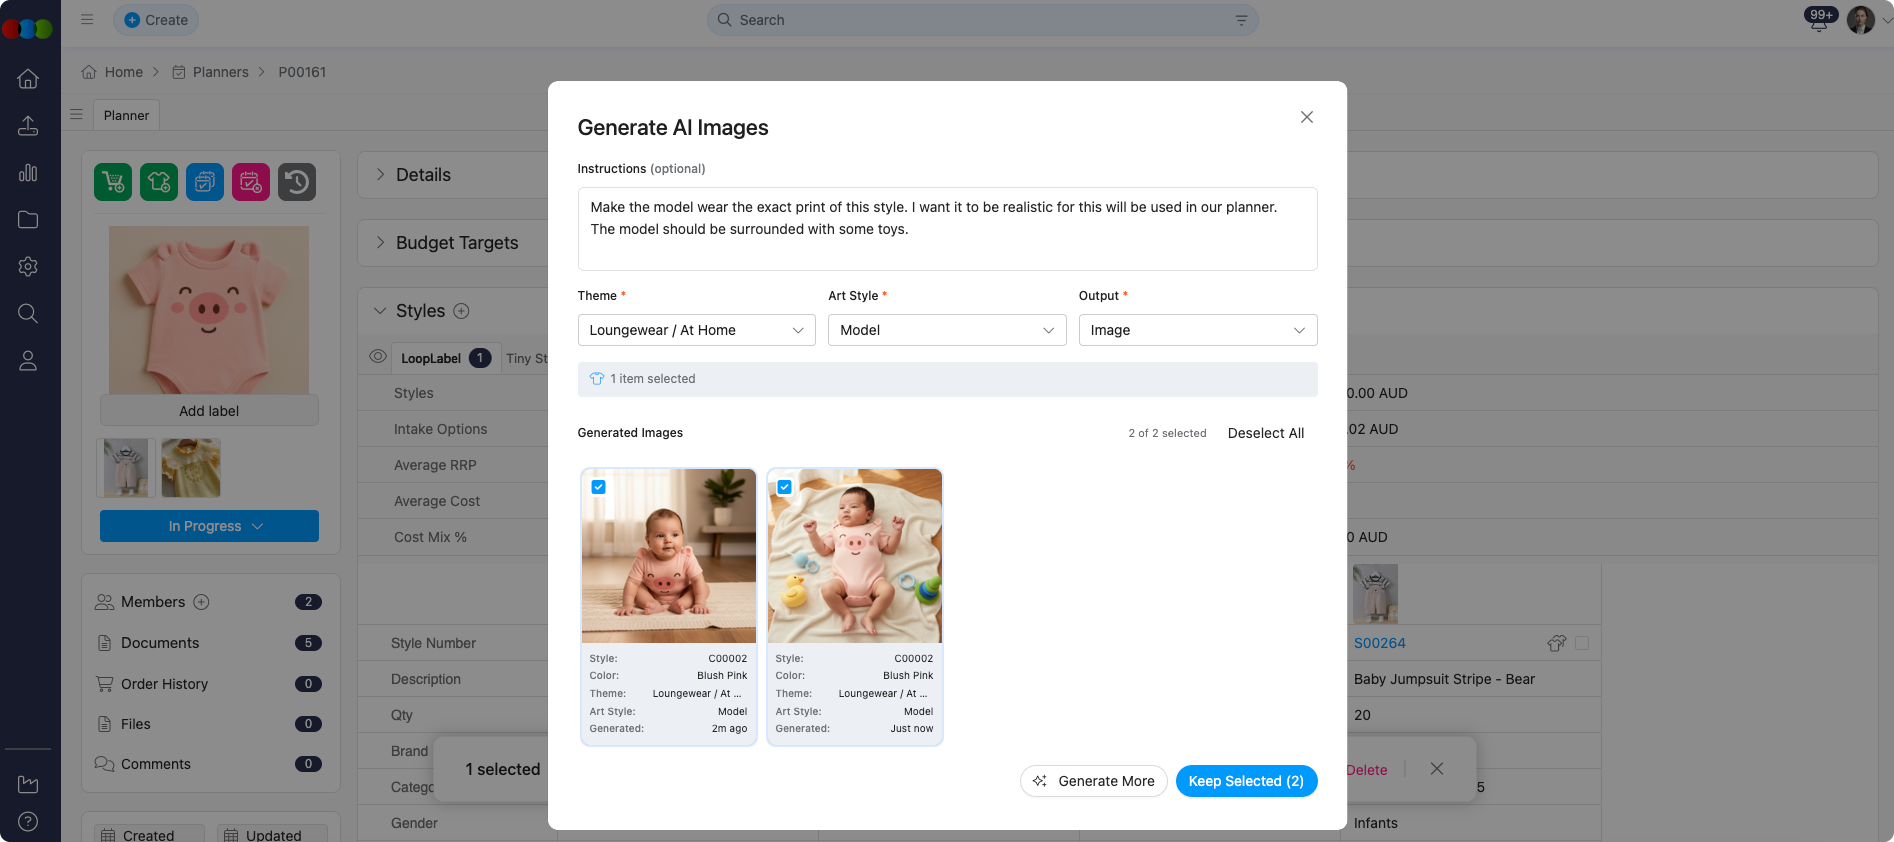
-
You can create generate additional images by clicking the "Generate More" button directly or by adding more context to the prompt.
Deleting Images
The Planner > Styles > Images and Styles > Colours & Pricing > Images sections are interconnected. Any changes made in one will also affect the other. Ensure that you thoroughly cross-check both areas before deleting an image to avoid unintended impacts.
Document Generation
When generating documents (Storyboard A4, Storyboard A3, Range Planner A4, Option Plan) in Planner > Documents, the styles included match Planner > Styles. For Fixed Group planners, section-level (style-level) filters and tab-level filters are applied together—the same combined logic as the Styles grid, badge counts, and Add Styles—so generated documents only include styles that match the full filter set. For Dynamic Group views, documents reflect the styles visible under your current filters and grouping.
See Planner › Documents for details.
Related Actions
- Add Styles to Planner
- Planner › Budget Target
- Site Settings › Planner › Target Budget
- Review Planner Option Plan
Troubleshooting
How do section-level and tab-level filters interact on Fixed Group tabs?
They work together. Section-level (style) filters and tab-level filters apply to the same results—affecting badge counts, the Style grid, the Add Styles pop-up, and generated documents in Planner > Documents (Storyboard, Range Planner, Option Plan, and similar). A style must meet all active filters to appear.
Steps to resolve:
- If counts or the add popup look off after changing filters, use Refresh Planner Styles so tabs realign.
- Compare Site Settings > Planner > Groups with each tab’s filter bar.
- Clear a tab-level filter if you want it to follow only the section-level filter (when applicable).
Why did my planner not update when an admin changed Groups in Site Settings?
Group names and filters are snapshotted into each plan when the plan is created; later admin edits do not retroactively change existing plans.
Steps to resolve:
- Use Refresh Planner Styles on Fixed Group plans when you intentionally want to reapply current filter logic.
- Duplicate a plan to trial new group configurations without altering the original snapshot.
- Coordinate with administrators before retiring a group that live plans still reference.
Why do edits to season or market forecast in the planner not appear on the main style?
Planner stores season, market forecast, and related planning values in the plan; they are independent from the master style record.
Steps to resolve:
- Update the Style application directly if the business source of truth should change globally.
- Treat planner values as plan-specific when reporting or handing off to buying.
- Check the history log for market forecast changes if numbers look wrong after collaboration.
Why are price or quantity fields read-only for my style row?
Price by Size and Price by Colour (and some related price types) restrict inline editing in the grid; only One Price allows direct edit in some fields.
Steps to resolve:
- Confirm the style’s Price Type in the main style record.
- Open the Buy Price by Size (or equivalent) pop-up when the grid shows prices as non-editable.
- For Total Qty/Forecast, use the channel projections pop-up so values flow to Style > Colours & Pricing > Region as documented.