Search Application
The Search function in 3 Clicks Cloud provides robust tools to manage and organise your data efficiently. This guide covers bulk updates, column customisation, inline editing, and more actions to control and customise your search results.
Manage Data is where users perform bulk updates, customise column views, edit records inline, and access search utilities such as favourites and export. These features help you quickly find, update, and organise information across Order, Style, Claim, Compliance, and other applications—saving time and improving productivity.
By leveraging bulk actions, column grouping, sorting, and pinning, teams can standardise workflows, reduce manual effort, and maintain consistent data views for reporting and analysis.
Quick Check - Before You Start
- Open the correct Search view for the application (Order, Style, Claim, etc.) you need to update or export.
- Narrow the list with filters or the search bar before selecting rows for Bulk Actions.
- Confirm you have permission to run the bulk action you intend; actions are context-sensitive and depend on selection and record status.
Bulk Update
Applications and Available Bulk Actions
| Application | Share | Actions | Fields |
|---|---|---|---|
| Order | Share with Agent | New Shipment | Agent |
| Share with Factory | New Sample Requirement | Alt Retail Price | |
| New Purchase Order Form | Buyer | ||
| Members | Buy Price | ||
| Delete | Customer | ||
| Department | |||
| Destination | |||
| ETA | |||
| ETD | |||
| Ex-Factory | |||
| Factory | |||
| Freight Status | |||
| In Store | |||
| Origin | |||
| Retail Price | |||
| Season | |||
| Sell Price | |||
| Shipping Method | |||
| Status | |||
| Stopped | |||
| Terms | |||
| Vessel | |||
| Warehouse | |||
| --- | --- | --- | --- |
| Style | Share with Agent | Add Components | Agent |
| Share with Factory | AI - Add eCommerce Description | Available Until | |
| New Sample Requirement | Brand | ||
| Members | Category | ||
| Delete | Collection | ||
| Cost Centre | |||
| Critical Path | |||
| Customer | |||
| Department | |||
| Designer | |||
| eCommerce Status | |||
| ETA | |||
| ETD | |||
| Ex Factory | |||
| Factory | |||
| Gender | |||
| In Store | |||
| Label | |||
| Lead Time | |||
| License | |||
| Market | |||
| MOQ | |||
| Price Type | |||
| Season | |||
| Start | |||
| Status | |||
| Story | |||
| Sub Category | |||
| Sub Type | |||
| Tariff | |||
| Type | |||
| --- | --- | --- | --- |
| Claim | Delete | Agent | |
| Due Date | |||
| Factory | |||
| Resolution | |||
| Status | |||
| Type | |||
| --- | --- | --- | --- |
| Compliance | Delete | Audit | |
| Audit Code | |||
| Auditor | |||
| Manager | |||
| Status | |||
| Valid From | |||
| Valid To | |||
| --- | --- | --- | --- |
| Component | Delete | Brand | |
| Collection | |||
| Season | |||
| Status | |||
| Story | |||
| Supplier | |||
| Type | |||
| --- | --- | --- | --- |
| Shipment | Delete | Custom Fields | |
| Delivery Date | |||
| Destination | |||
| ETA | |||
| ETD | |||
| Freight Status | |||
| Origin | |||
| Status | |||
| --- | --- | --- | --- |
| Costing | Remove from Costing | Account Manager | |
| Delete | Customer | ||
| Department | |||
| Season | |||
| Status | |||
| --- | --- | --- | --- |
| Planner | Delete | Customer | |
| Status | |||
| Valid From | |||
| Valid To | |||
| --- | --- | --- | --- |
| License | Delete | License | |
| Licensor | |||
| Status | |||
| Valid From | |||
| Valid To | |||
| --- | --- | --- | --- |
| Sales Order | Customer | ||
| Payment Status | |||
| Status |
Actions are Context-Sensitive
Not all bulk actions are available at all times. The available actions depend on the selection and the current status of the records.
How to Use Bulk Actions
Bulk Actions allow you to efficiently update multiple records at once, saving time and reducing manual effort. Here's how to do it:
- Navigate to the Search View: Open the Search view of the relevant application where your records are listed.
- Filter or Search Records: Use filters or the search bar to narrow down the list to the records you want to update.
- Select Records: Tick the checkboxes next to the records you want to include. You can select individual items or click the checkbox in the first column to select all.
- Initiate Bulk Action: Click on Bulk Actions and choose the desired action from the dropdown menu.
- Complete Required Fields: Fill in any necessary fields or respond to confirmation prompts that appear.
- Submit the Action: Confirm and submit to apply the changes across all selected records.
Style Search
Order Search
Columns
Group Columns
Organise data by grouping columns for a clearer view of your datasets:
- Click the Group option.
- Drag columns to the group section just above the column headings. Multiple columns can be grouped simultaneously.
- Rearrange the order of grouped columns by dragging and dropping.
To Undo Grouping: Click the Group section to ungroup columns.
Note
Not all columns are eligible for grouping.
Sort By Column
Easily sort your data in ascending or descending order, making it simpler to organise your information.
- Sort Using Column Heading: Click the column heading to toggle between ascending, descending, or default.
- Sort Using More Options: Click the ellipsis icon and select your preferred sort option.
Pin Column
Keep important columns visible while scrolling through extensive datasets.
- Click the ellipsis icon.
- Select the Pin Options to pin a column to the left or right.
Auto Size & Resize Column
Automatically adjust column sizes for optimal readability or manually resize them as needed.
- Auto Size:
- Click the ellipsis icon and choose the Auto Size option.
- Select Autosize All Columns to adjust all columns at once.
- Manual Resize:
- Drag the edge of a column to your desired width.
Choose Columns to Display
Customise your view by selecting which columns to show, ensuring you see the most relevant data.
- Click the ellipsis icon.
- Navigate to the Choose Columns section and select the columns you want to display.
Column categories vary by application. In Style Search, columns are grouped under usual columns, Sales Data, eCommerce, and Critical Path. In Order Search, columns are grouped under Order Custom Fields, Order Dates, Order Details, Order Pricing, Style Custom Fields, Style Dates, Style Pricing, and Critical Path. See Style Search and Order Search for full column lists.
Style > Sales Data Columns
In Search > Style, add columns grouped under Sales Data in Choose Columns to display key sales metrics directly in your search results:
| Column | Description |
|---|---|
| Sales Trend | Direction and pattern of sales performance |
| Sell-through rate % | Percentage of stock sold within a given period |
| Stock on Hand | Current inventory levels for each style or variant |
| Weeks on Stock | Estimated weeks of inventory remaining at current sell-through |
| Total Sales | Aggregate sales figures for the style |
These columns are grouped under the Sales Data sub-menu in Choose Columns for quick access. The same sales data is consistently displayed in both Search > Styles and Planner > Styles, with calculations correctly applied across all view types.
How it works across views:
- Style View — Displays style-level totals, ignoring colour detail. Numbers are aggregated at the style level for a high-level overview of performance.
- Style by Colour View — Shows sales data broken down by colourway for detailed analysis per variant.
- Style by Colour by Size View — Provides the most granular view with sales data per colour-size combination.
Style > eCommerce Columns
In Search > Style, add columns grouped under eCommerce in Choose Columns to review eCommerce content and pricing:
| Column | Description |
|---|---|
| eCommerce Description | eCommerce product description |
| eCommerce Status | eCommerce availability status (e.g., Published, Draft) |
| Currencies | eCommerce sell price columns—one column per configured currency (e.g., AUD, USD). Most useful in the Style by Colour by Size view for size-level pricing. |
Style > Codes Columns
In Search > Style, you can add columns that mirror identifiers from Style > Codes > Unit Codes (barcodes, SKUs, keycodes, and TUNs per colourway) to display product identifiers directly in your search results:
| Column | Description |
|---|---|
| Barcodes | Displays barcode identifiers linked to styles for stock-keeping and scanning |
| SKU | Displays stock-keeping unit codes for product identification |
| Keycode | Displays internal or customer-defined product references |
| TUN | Displays Trade Unit Numbers for order traceability |
These columns surface Unit Codes data from Style › Codes without needing to open each style record—ideal for reporting, bulk updates, and quick lookups. Pack Barcodes (colour-pack level on the same tab) are managed on the style; see that page for pack grids and order associations.
Critical Path > Activities Columns
In Search > Style and Search > Order, add columns from the Critical Path category in Choose Columns to display Critical Path > Activities milestone status directly in your search results. Each configured activity appears as its own column so you can review progress and take action without opening each record.
| Action | Description |
|---|---|
| Add activity columns | Open Choose Columns, expand Critical Path, and select the activities you want to track. You can add up to 40 activity types as columns in a single search view. |
| Approve, reject, or comment | Click an activity cell to open the Activity Action pop-up when notes are configured for that activity. |
| Bulk approve or reject | Tick the column header checkbox, then approve or reject the selected activity for every checked style or order in the view. |
| Review column totals | Scan the totals row at the bottom of the grid for a count of records in each activity status. |
Activity column options depend on activities configured in Site Settings. Use the Activities toolbar filter to narrow results before working from the grid. See Style Search › Activities and Order Search › Activities for application-specific steps.
Order Search › Critical Path Activities 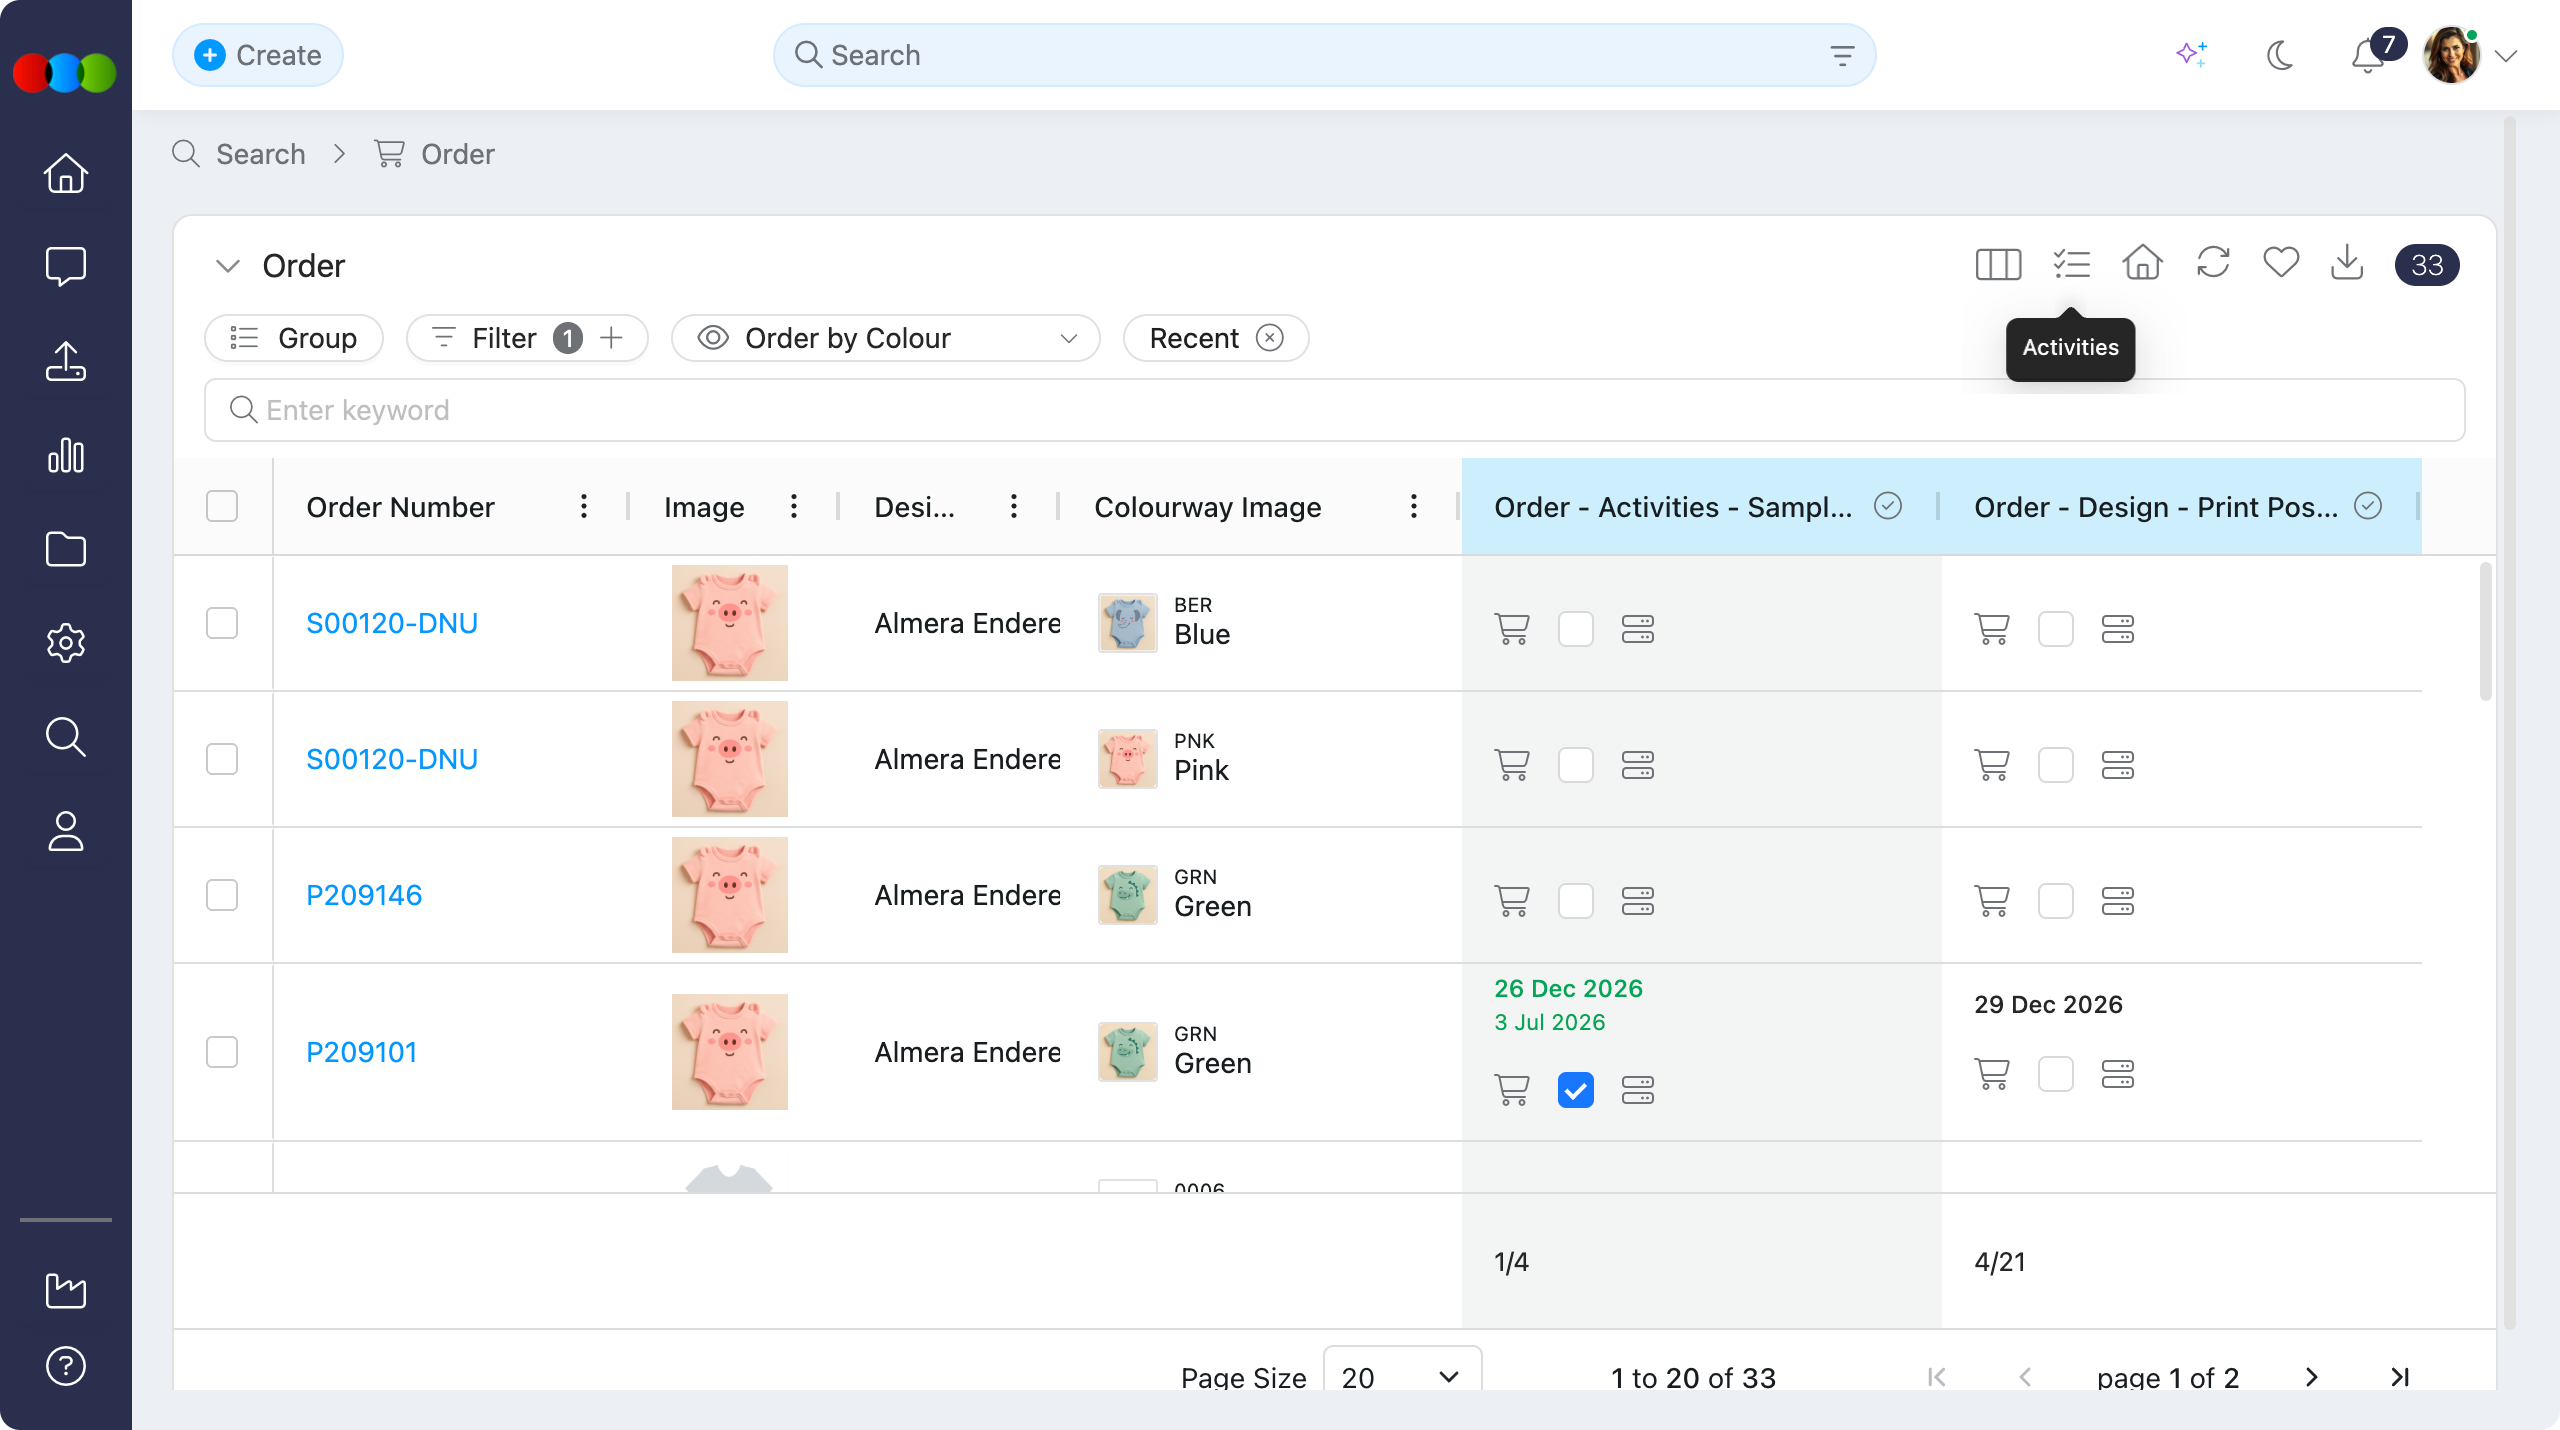
Search › Critical Path Activities action 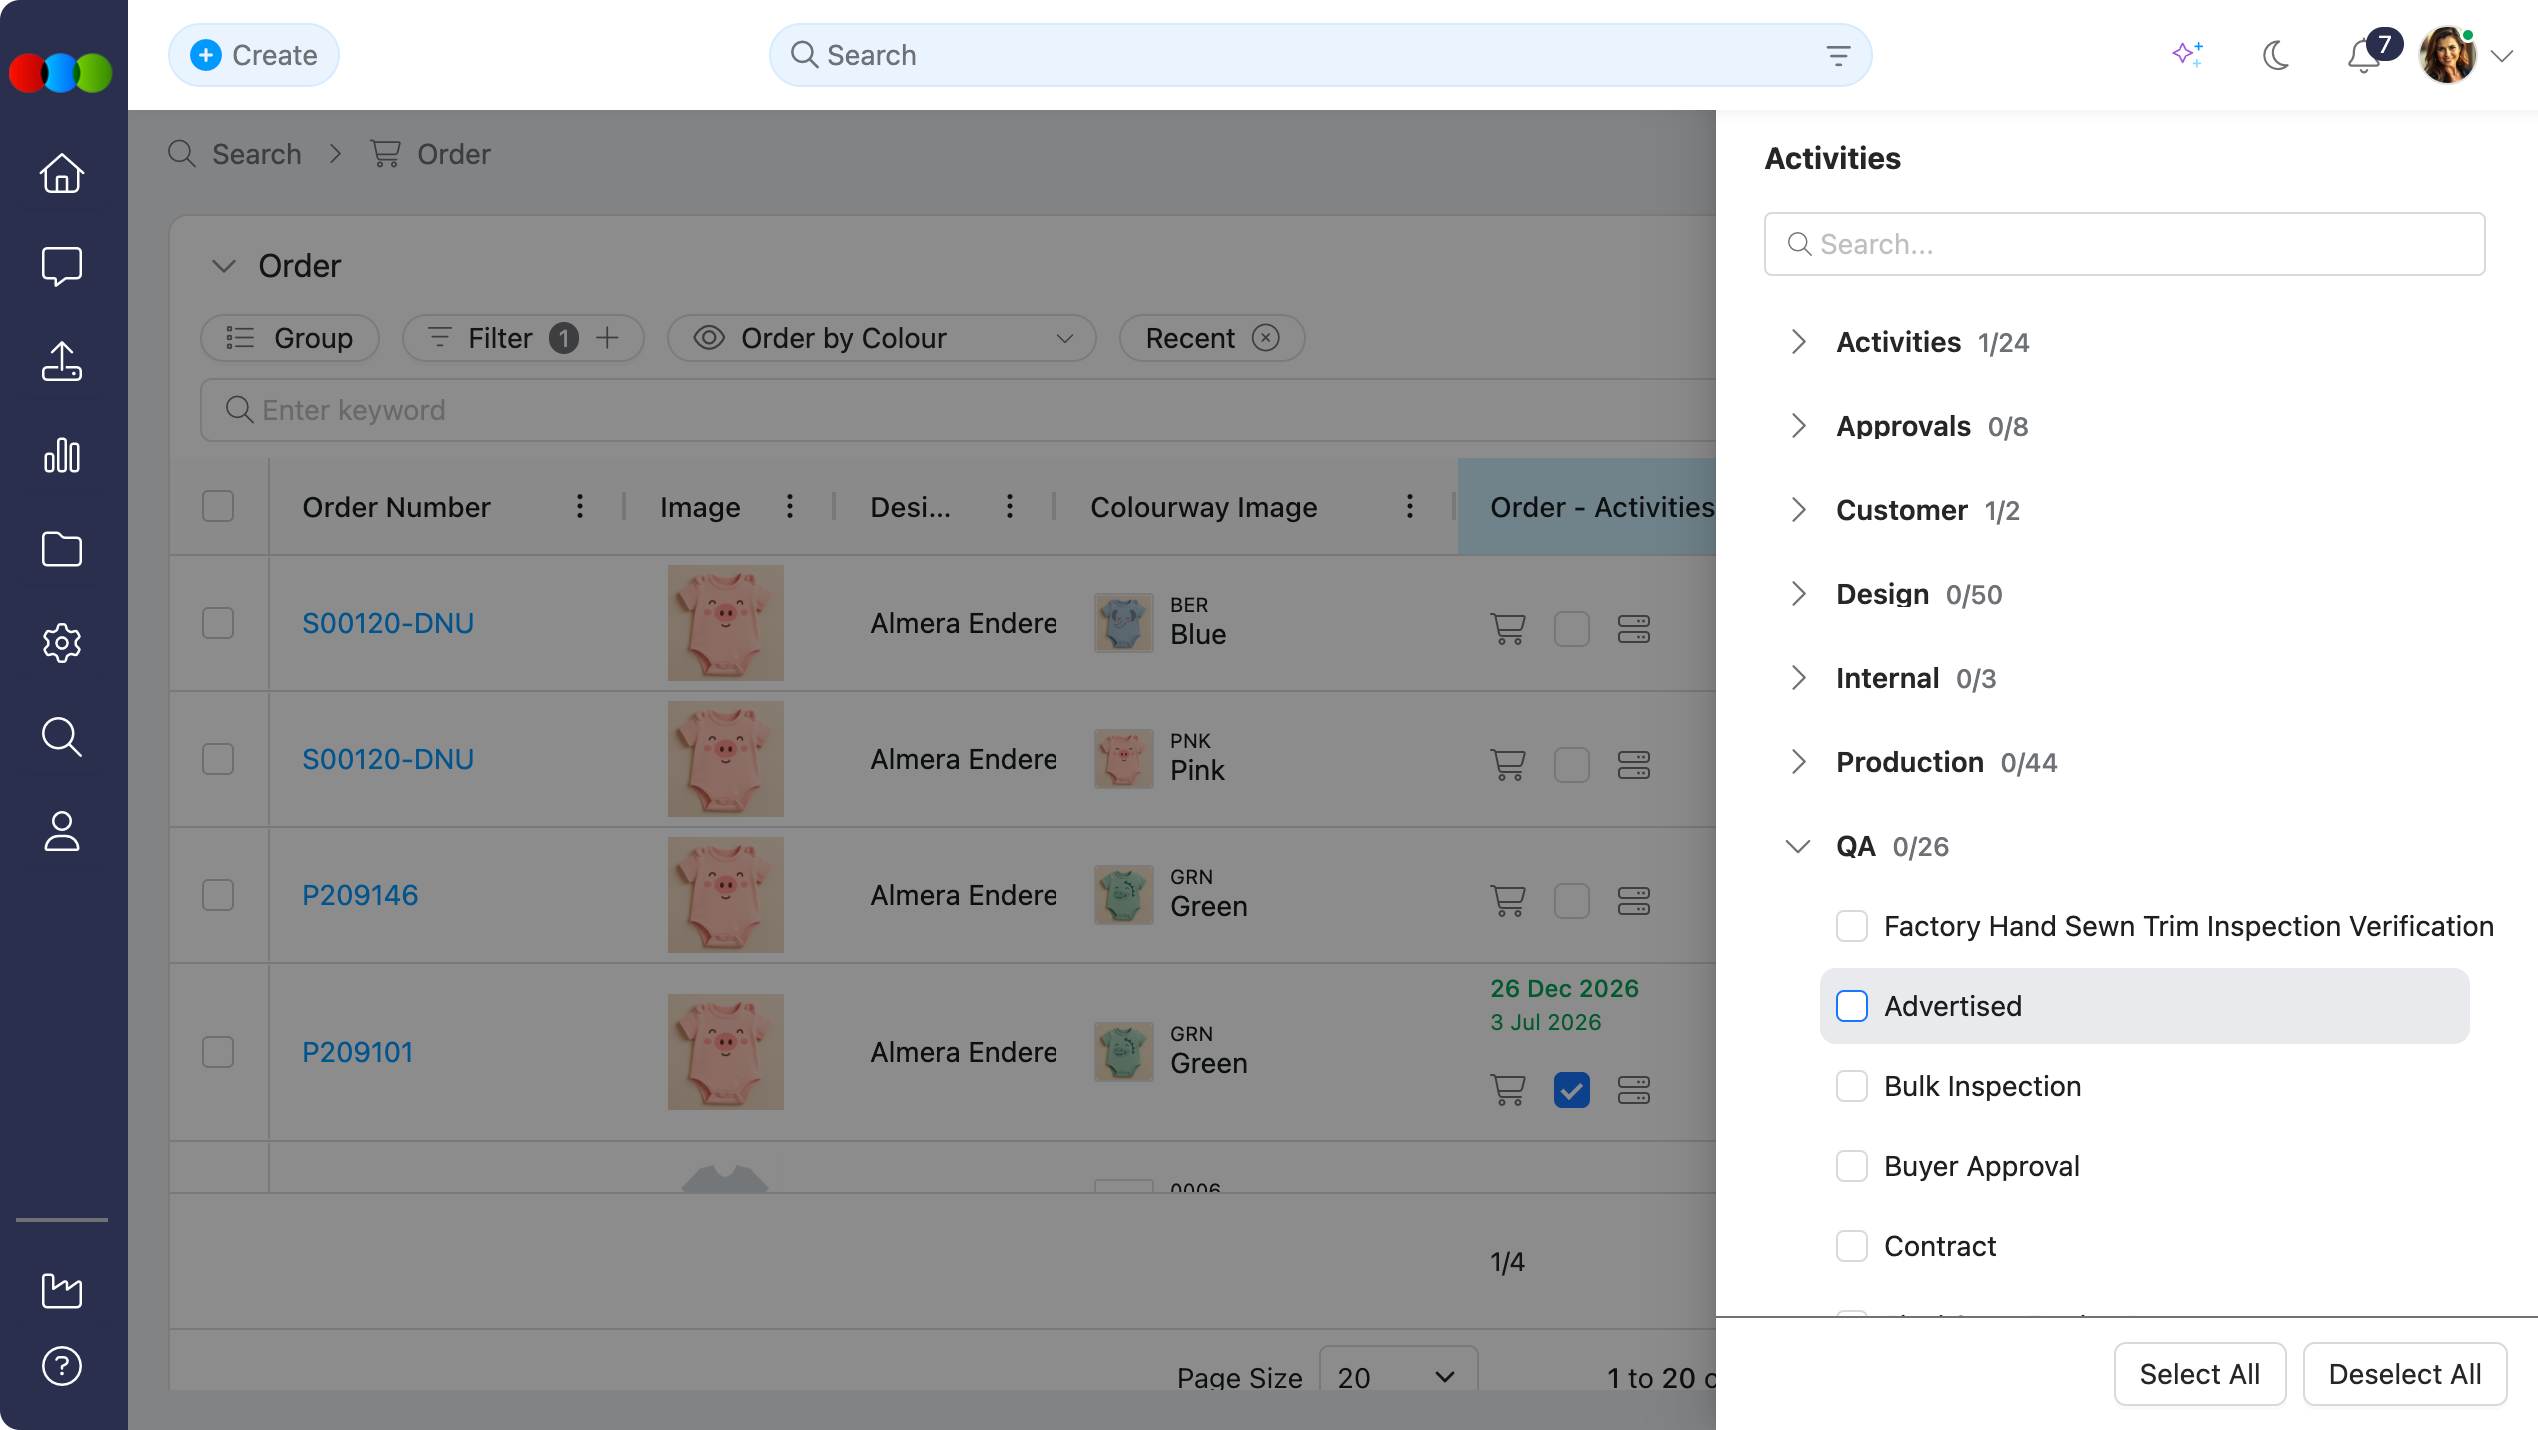
Order Search Views
Order Search offers multiple view options to organise your results:
- Order — Displays one row per order with order-level totals and details.
- Order by Colour — Groups and displays orders by individual colourway.
Style Search Views
Style Search offers multiple view options to organise your results:
- Style — Displays style-level totals with numbers aggregated at the style level for a high-level overview.
- Style by Colour — Displays styles per colourway with sales data broken down by variant.
- Style by Colour by Size — Displays styles broken down by colourway and size for a granular view of product variants. Use this view when you need to see or report on individual colour-size combinations, compare availability across variants, or manage codes and pricing at the most detailed level.
- Style by Colour by Market — Displays styles broken down by colourway and market for Forecast, Channel Projections, and market pricing analysis.
- Channel Readiness — Displays style-level readiness for a selected channel. Use this view to audit which styles still have open Readiness Fields before publishing; you can open it from Dashboard › Channel Readiness by clicking a channel.
Column Hierarchy in Order Search
In the Search > Order view, columns are organised under category headings in Choose Columns to help you navigate and locate columns more efficiently.
How it works:
-
When selecting columns to display in your Order search view, you'll see columns organised under category headings such as:
- Order Custom Fields
- Order Dates (e.g., ETA, Ex-Factory, In Store, Stopped)
- Order Details (e.g., Order Number, Status, Agent, Factory, Colourway Quantity)
- Order Pricing (e.g., Total Buy Value, Total Retail Value)
- Style Custom Fields
- Style Dates (e.g., ETD, Start)
- Style Pricing (e.g., Buy Price, Sell Price, RRP)
- Critical Path — activity columns from Critical Path > Activities for milestone status, approval, and bulk actions from the grid
-
Simply expand the relevant category heading to view and select the columns you need.
-
This hierarchical structure helps you quickly locate specific types of information without scrolling through a long list of columns.
Column Hierarchy
The column hierarchy feature is currently available for Style and Order columns in Search > Style and Search > Order. Other search views may display columns in a flat list format.
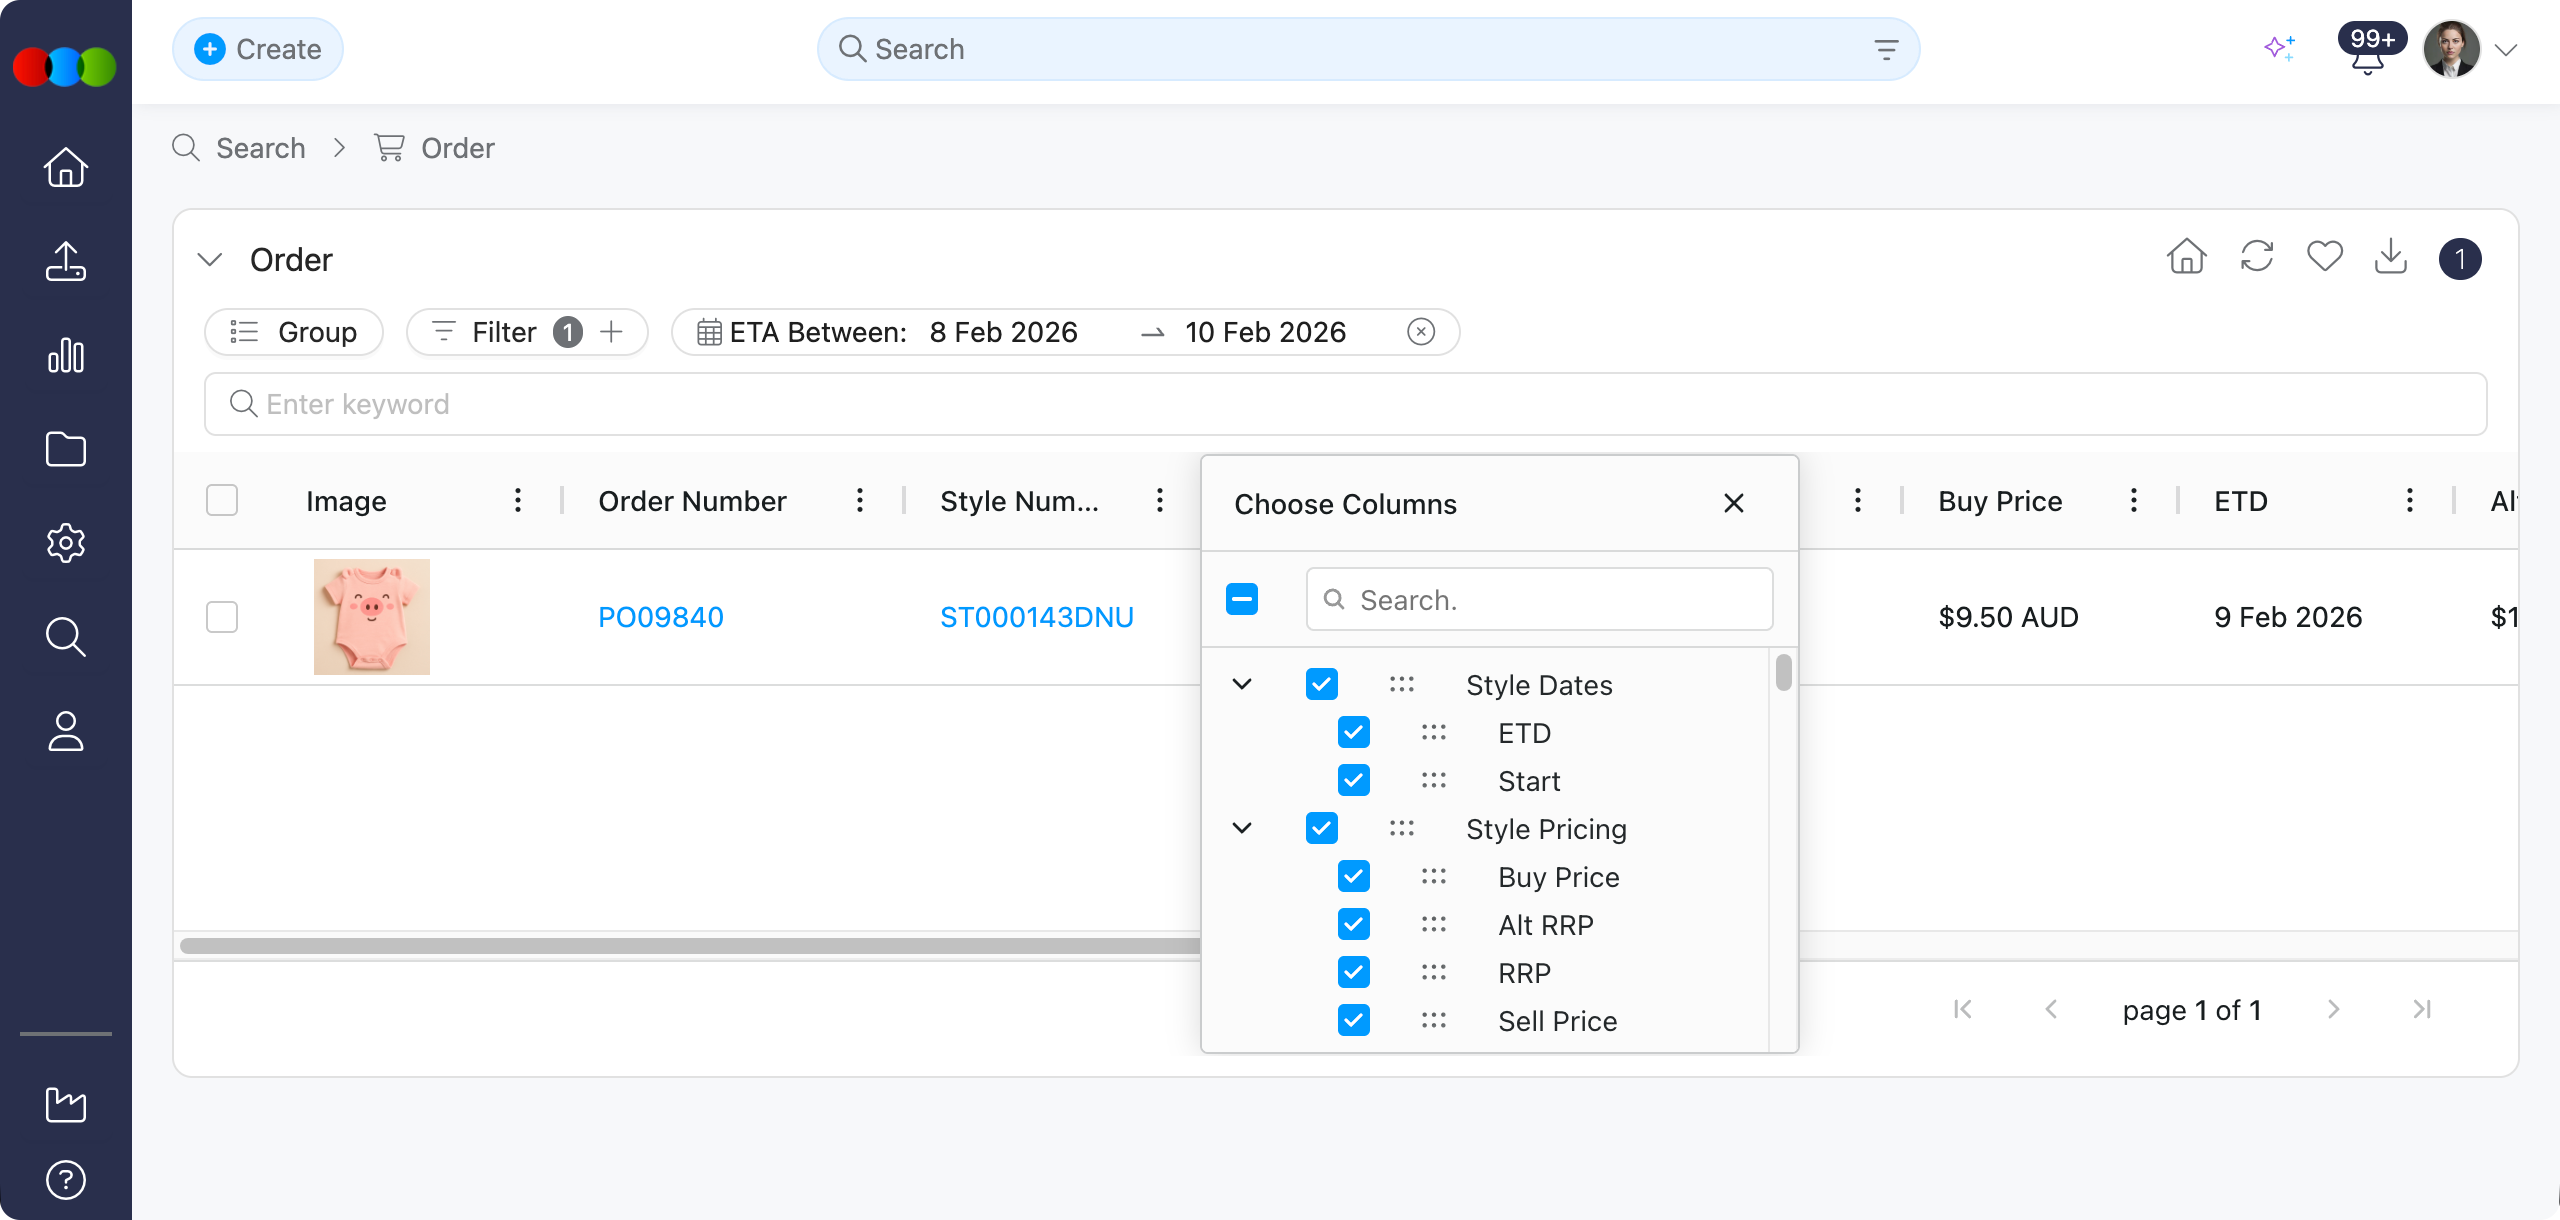
Reset Columns
Restore your column settings to the default view with a single click.
- Click the ellipsis icon.
- Select Reset Columns to undo all changes and revert to the original view.
Drag & Drop Column
Rearrange columns by simply dragging them to your preferred order, enhancing personalisation.
- Simply drag and drop columns to adjust their order as desired.
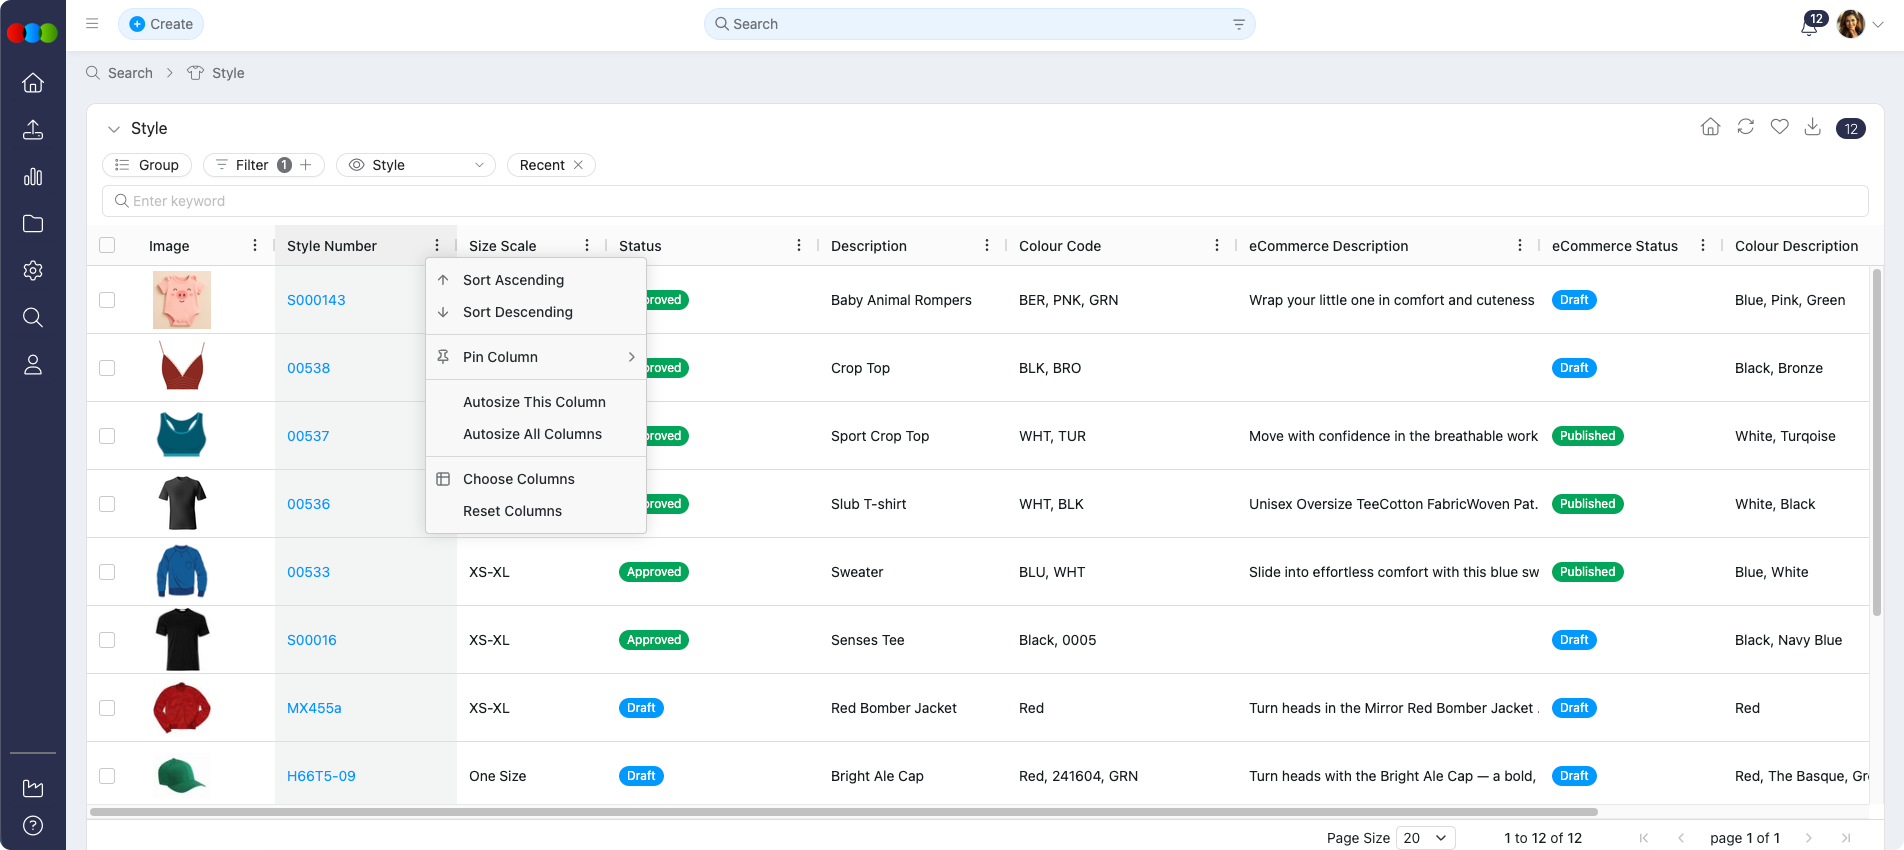
Edit Data within the Search View
Make changes directly in the search results, streamlining the editing process.
- Editable Fields are highlighted in blue when hovered over.
- Make Edits: Click the field, make your changes, and they will be automatically saved.
More Actions
This section in the Search view provides several convenient tools to enhance your search experience and data management. These actions include:
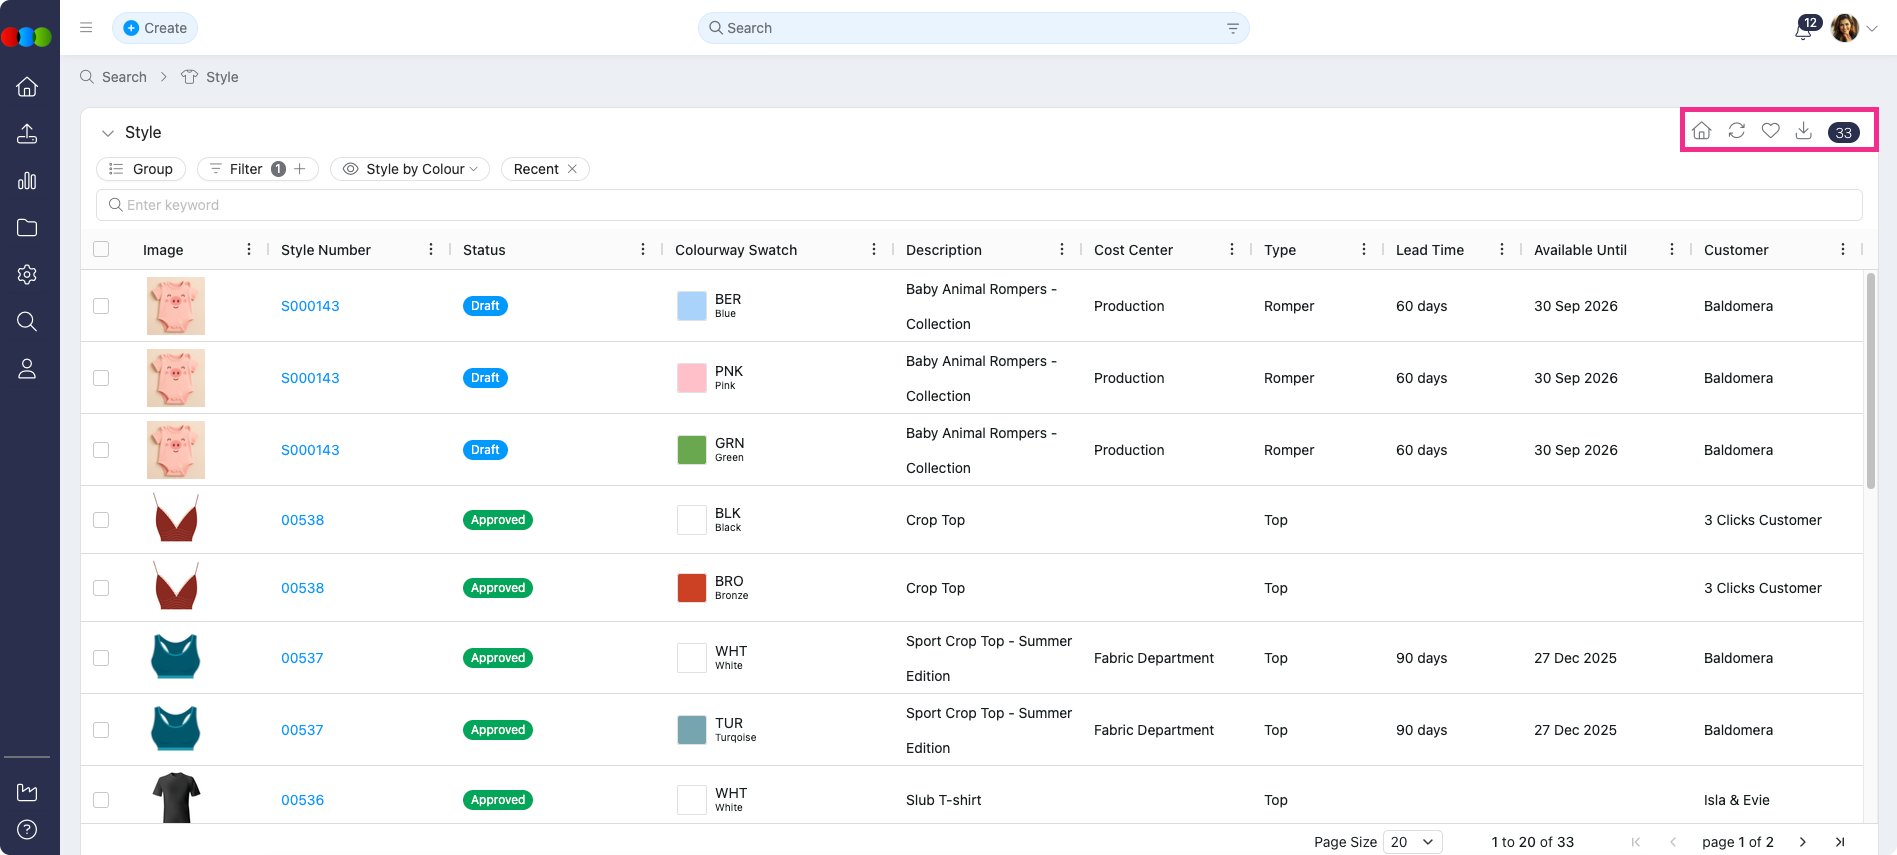
My Home
Clicking the Home icon will automatically save the current search view as your Home Favourite page. Once set, clicking the Home icon will redirect you to this saved search view.
Refresh
Refresh the search view to ensure the latest data is displayed. This is especially important if the system experiences a delay in retrieving the information you’re trying to access.
Favourite
Save your frequently used searches for quick access later, improving efficiency.
- Click the Love icon in the upper right corner.
- Name your favourite search in the pop-up and click Save.
- Access saved searches via the Favourites section.
Export
Export your search view in excel format for reporting and analysis.
Just click the Download icon in the upper right corner.
Activities
In Style Search and Order Search, use the Activities toolbar option to filter results by Critical Path > Activities. Select a critical path and one or more activities to show only records with matching activity data. Options depend on activities configured in Site Settings.
You can also add Critical Path activity columns through Choose Columns to display milestone status in the grid, approve or reject from activity cells, and bulk-update checked rows. See Critical Path > Activities Columns above and Style Search › Activities or Order Search › Activities.
Item Count
This shows the number of items in the selected search view. It is not editable.
Related Actions
Tip
- Leverage Bulk Actions Wisely: Before performing bulk actions, always double-check your selected records and the intended changes. Use filters to narrow down your selection to avoid unintended modifications.
- Customise Your View: Take advantage of column grouping, sorting, pinning, and resizing to tailor the search view to your specific needs. A well-organised view can significantly improve your efficiency in finding and managing data.
- Regularly Save Favourite Searches: If you frequently use specific search criteria, save them as favourites. This will save you time and effort in the long run by providing quick access to your commonly used searches.
Troubleshooting
Why is the bulk action I need missing from the menu?
Bulk actions depend on which records are selected and their current status; not every action is available for every selection.
Steps to resolve:
- Confirm you selected at least one row and that the records are in a state that allows the action.
- Expand or change filters so the intended records appear and are selected.
- If the action still does not appear, check whether your role permits that operation for the application.
Why can I not group or sort by a certain column?
Some columns are not eligible for grouping, and hierarchy or view type can limit what you see.
Steps to resolve:
- If grouping fails, try another column or refer to the note that not all columns support grouping.
- In Search > Order, use category headings under Choose Columns to find fields; other views may use a flat list.
- Use Reset Columns if the layout was customised in a way that hides the column you need.
Why do my inline edits not save or not appear for a field?
Only Editable Fields support inline changes; many columns are read-only or driven from other modules.
Steps to resolve:
- Hover the cell: editable fields are highlighted in blue when hovered.
- Click the field, make the change, and wait for automatic save; refresh the view if data looks stale.
- For values maintained elsewhere (e.g. style master data), update the source record in the relevant application.
Why does my export or favourite not match what I see on screen?
Favourites capture the current search view; exports reflect the visible result set and column layout at export time.
Steps to resolve:
- Click Refresh before exporting if others may have changed data.
- Reapply filters and Choose Columns so the grid matches what you need in the file.
- Save or update a Favourite after you finish adjusting the view.