Style Details
The Details section is where you store all the important information about your style. This information helps everyone in your company - from designers to production teams - understand and work with your style.
Quick Check - Before You Start
- Open the correct style record in Style and go to the Details section before editing fields.
- If a dropdown is missing the value you need, configure it in the linked Site Settings page for that field (for example Category, Collection, or Staff).
Available Fields
| Field | What to Enter |
|---|---|
| Style No. | A unique number or code for your style (e.g., "SS24-001"). |
| Description | A brief description of your style. |
| Composition | What materials the style is made from (e.g., "100% Cotton"). |
| Customer | The store or brand you're making this style for. |
| Critical Path | How long it takes to make this style (e.g., "90 Days"). The dropdown options for this can be configured in Site Settings > Style > Critical Path. |
| Category | The main type of product (e.g., "Top", "Dress"). The dropdown options for this can be configured in Site Settings > Style > Category. |
| Collection | Which collection this style belongs to. The dropdown options for this can be configured in Site Settings > Style > Collection. |
| Sub Category | More specific product type (e.g., "Baby", "Kids"). After you select a Category, the dropdown shows only sub categories linked to that category in Site Settings › Style › Category. |
| Cost Center | Which part of your business this style belongs to. The dropdown options for this can be configured in Site Settings > Company > Cost Center. |
| Type | The specific style type (e.g., "Baby Romper"). The dropdown options for this can be configured in Site Settings > Style > Type. |
| Department | Which department this style is for (e.g., "Baby", "Women"). The dropdown options for this can be configured in Site Settings > Order > Department. |
| Sub Type | More specific style details (e.g., "Linen", "Knit"). The dropdown options for this can be configured in Site Settings > Style > Type. |
| Designer | Who designed this style. The dropdown options for this can be configured in Site Settings > Company > Staff. |
| Brand | Which brand this style is for (e.g., "Disney"). The dropdown options for this can be configured in Site Settings > Style > Brand. |
| Gender | Who the style is for (e.g., "Girl", "Boy", "Unisex"). The dropdown options for this can be configured in Site Settings > Style > Gender. |
| Story | The theme or story behind the style (e.g., "European Vacation"). The dropdown options for this can be configured in Site Settings > Style > Story. |
| Season | When the style will be sold (e.g., "Spring 2024"). The dropdown options for this can be configured in Site Settings > Style > Season. |
| License | Any licenses needed for the style. The dropdown options for this can be configured in Site Settings > Style > License. |
| Tariff | The customs code for this style. The dropdown options for this can be configured in Site Settings > Style > Tariff. |
| License Sub No. | Additional license information if needed. |
| Size Scale | What sizes you're making (e.g., "XS–XL"). The options for this can be configured in Site Settings > Style > Size Scale. |
| Design Number | Your internal design reference number. |
| Sizes | The specific sizes for the style. The display for this can be configured in Site Settings > Style > Size Scale. |
| Agent | Who is helping you make this style. The dropdown for this can be configured in Site Settings > Company > Supplier List. |
| Factory | Where the style will be made. The dropdown for this can be configured in Site Settings > Company > Supplier List. |
| Additional Markets | Allows you to select a country from the dropdown list. The list is system generated. You can also edit this field directly from Search > Style view for quick updates across multiple styles. When you create an order, Additional Markets is copied to Order > Style Details > Additional Markets as the starting list for that order. You can then add or remove countries on the order without changing this style record. |
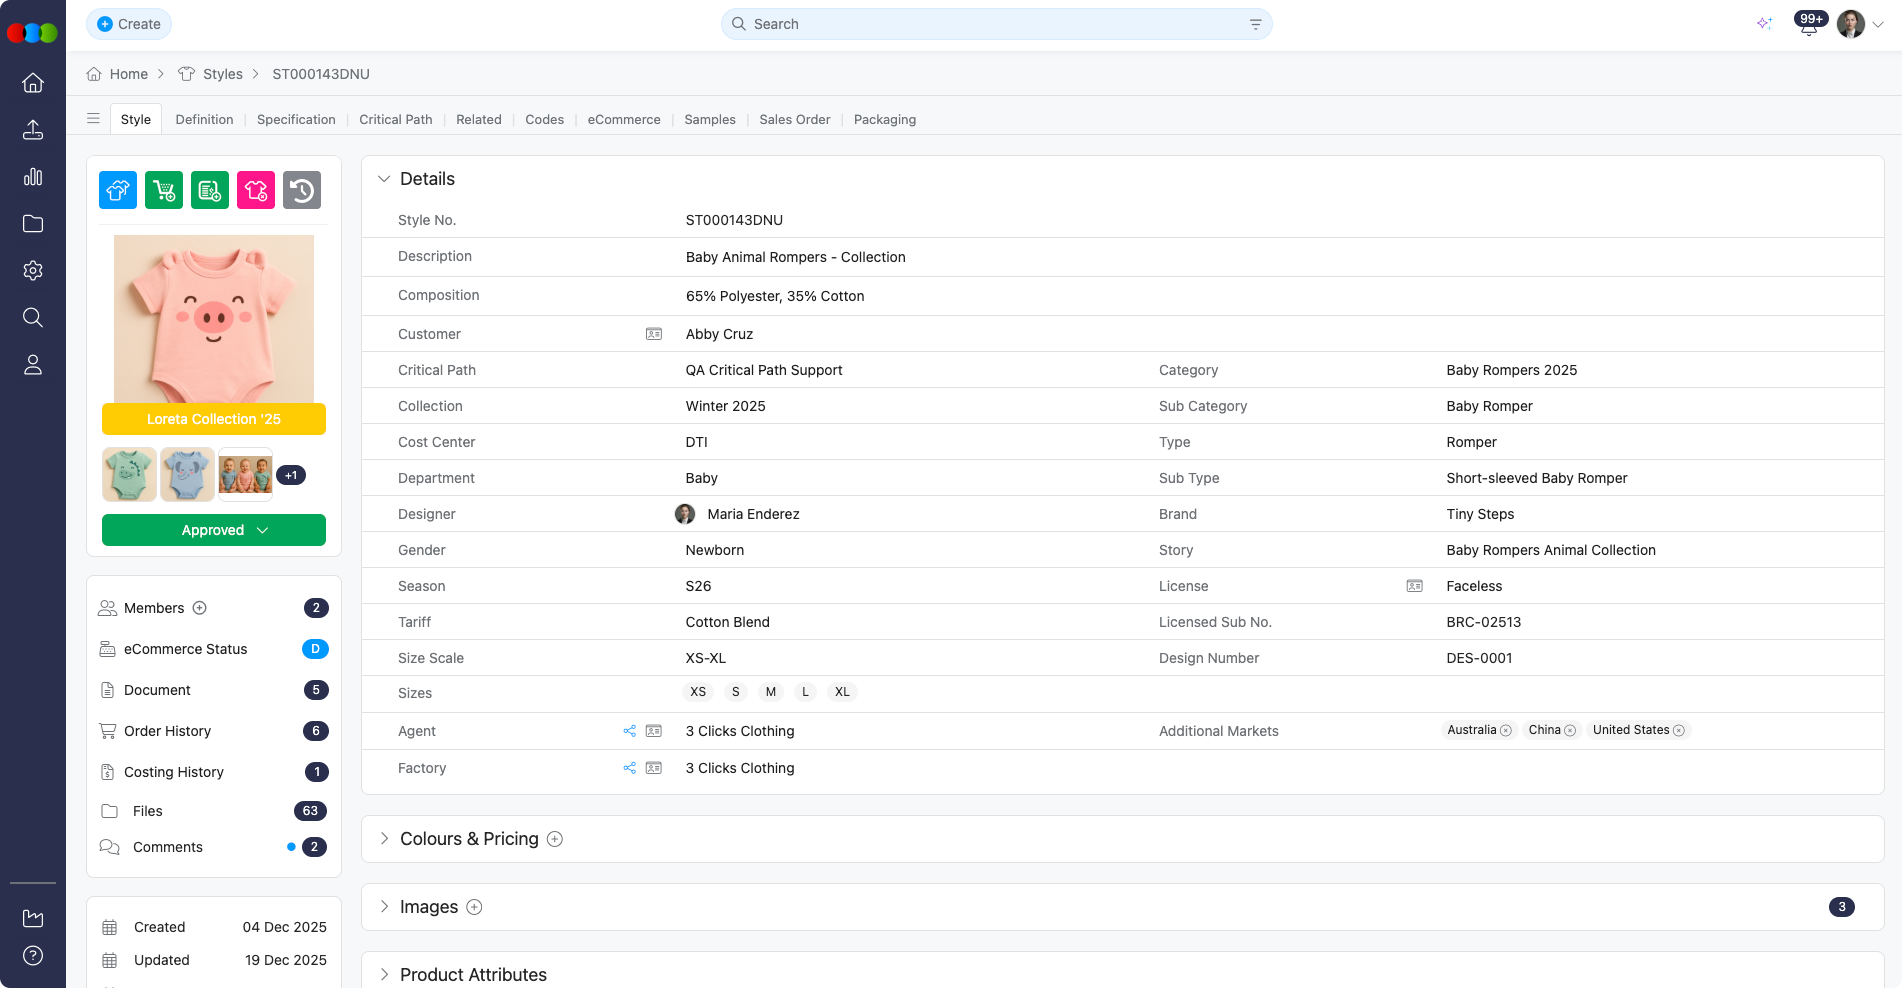
What You Can Do
- Add or change any of the information above
- Link your style to customers, licenses, and factories
- Organise your style by category, type, and department
Important Tips
- Use a consistent format for your Style Numbers to make them easier to find
- Make sure to set the right Size Scale and Category for your style
- Add the Designer and License information early to help with marketing and legal work
Next Steps
Troubleshooting
A dropdown is empty or missing the option I need—what should I check?
Dropdown lists for fields such as Category, Collection, Critical Path, Brand, and Department are maintained in Site Settings, not on the style record itself.
Steps to resolve:
- Note which field is missing a value.
- Open the Site Settings article linked in the Details field table for that column (for example Style > Category or Order > Department).
- Add or enable the required entry there, then return to the style and select it from the dropdown.
Why is the Sub Category dropdown empty?
The Sub Category list depends on the selected Category. Only sub categories linked to that category in Site Settings › Style › Category appear in the dropdown—not the full sub category list.
Steps to resolve:
- Confirm the correct Category is selected on the style.
- Open Site Settings › Style › Category and link the required sub categories to that category.
- Return to the style and select Sub Category from the updated list.
Why can I not find a style by its number in search?
Inconsistent Style No. formatting makes records harder to locate and can break expectations in reports or imports.
Steps to resolve:
- Agree on a single format for style numbers (prefixes, season codes, padding).
- Update the Style No. on the Details tab to match that format.
- Use the same format when creating new styles.
Where do I update Additional Markets for many styles at once?
Additional Markets can be edited on each style’s Details tab, but bulk updates are supported from search.
Steps to resolve:
- Go to Search > Style.
- Find the styles you need and use the view that supports editing Additional Markets as described on this page.
- Apply changes there for quicker updates across multiple styles.