Style eCommerce
Style > eCommerce is where your team shapes what buyers see: copy, tags, colourways, prices, and channel-specific readiness—before anything goes live. The workspace is organised for clearer navigation between Details, Images, Tags, Colours & Pricing, Channels, Markets, and Similar Styles.
Use this tab to keep descriptions, images, pricing, tags, and availability aligned with your B2B Store and other sales routes. This tab also supports Channels (configured in Site Settings > Style > Channels), richer AI assistance where your site enables it, and versioned publishing so you can snapshot what you are about to release, compare changes over time, and roll back safely when you need to restore a known-good configuration.
Quick Check - Before You Start
- Additional Markets on Style > Details drive which countries appear under eCommerce > Markets for regional copy and custom fields.
- Site Settings > Company > Roles & Permissions enable AI > Create on the relevant Production Portal role where your organisation uses AI-generated descriptions.
- Before publishing, confirm eCommerce Status (side widget), Available Until, Sell Prices, required fields (images and Colours & Pricing), Channels readiness, and B2B-facing tags are configured.
- After a publish, use eCommerce Status > Version History to audit who published which version and when; confirm the correct snapshot before Rollback or Publish Version, especially when several people edit the same style.
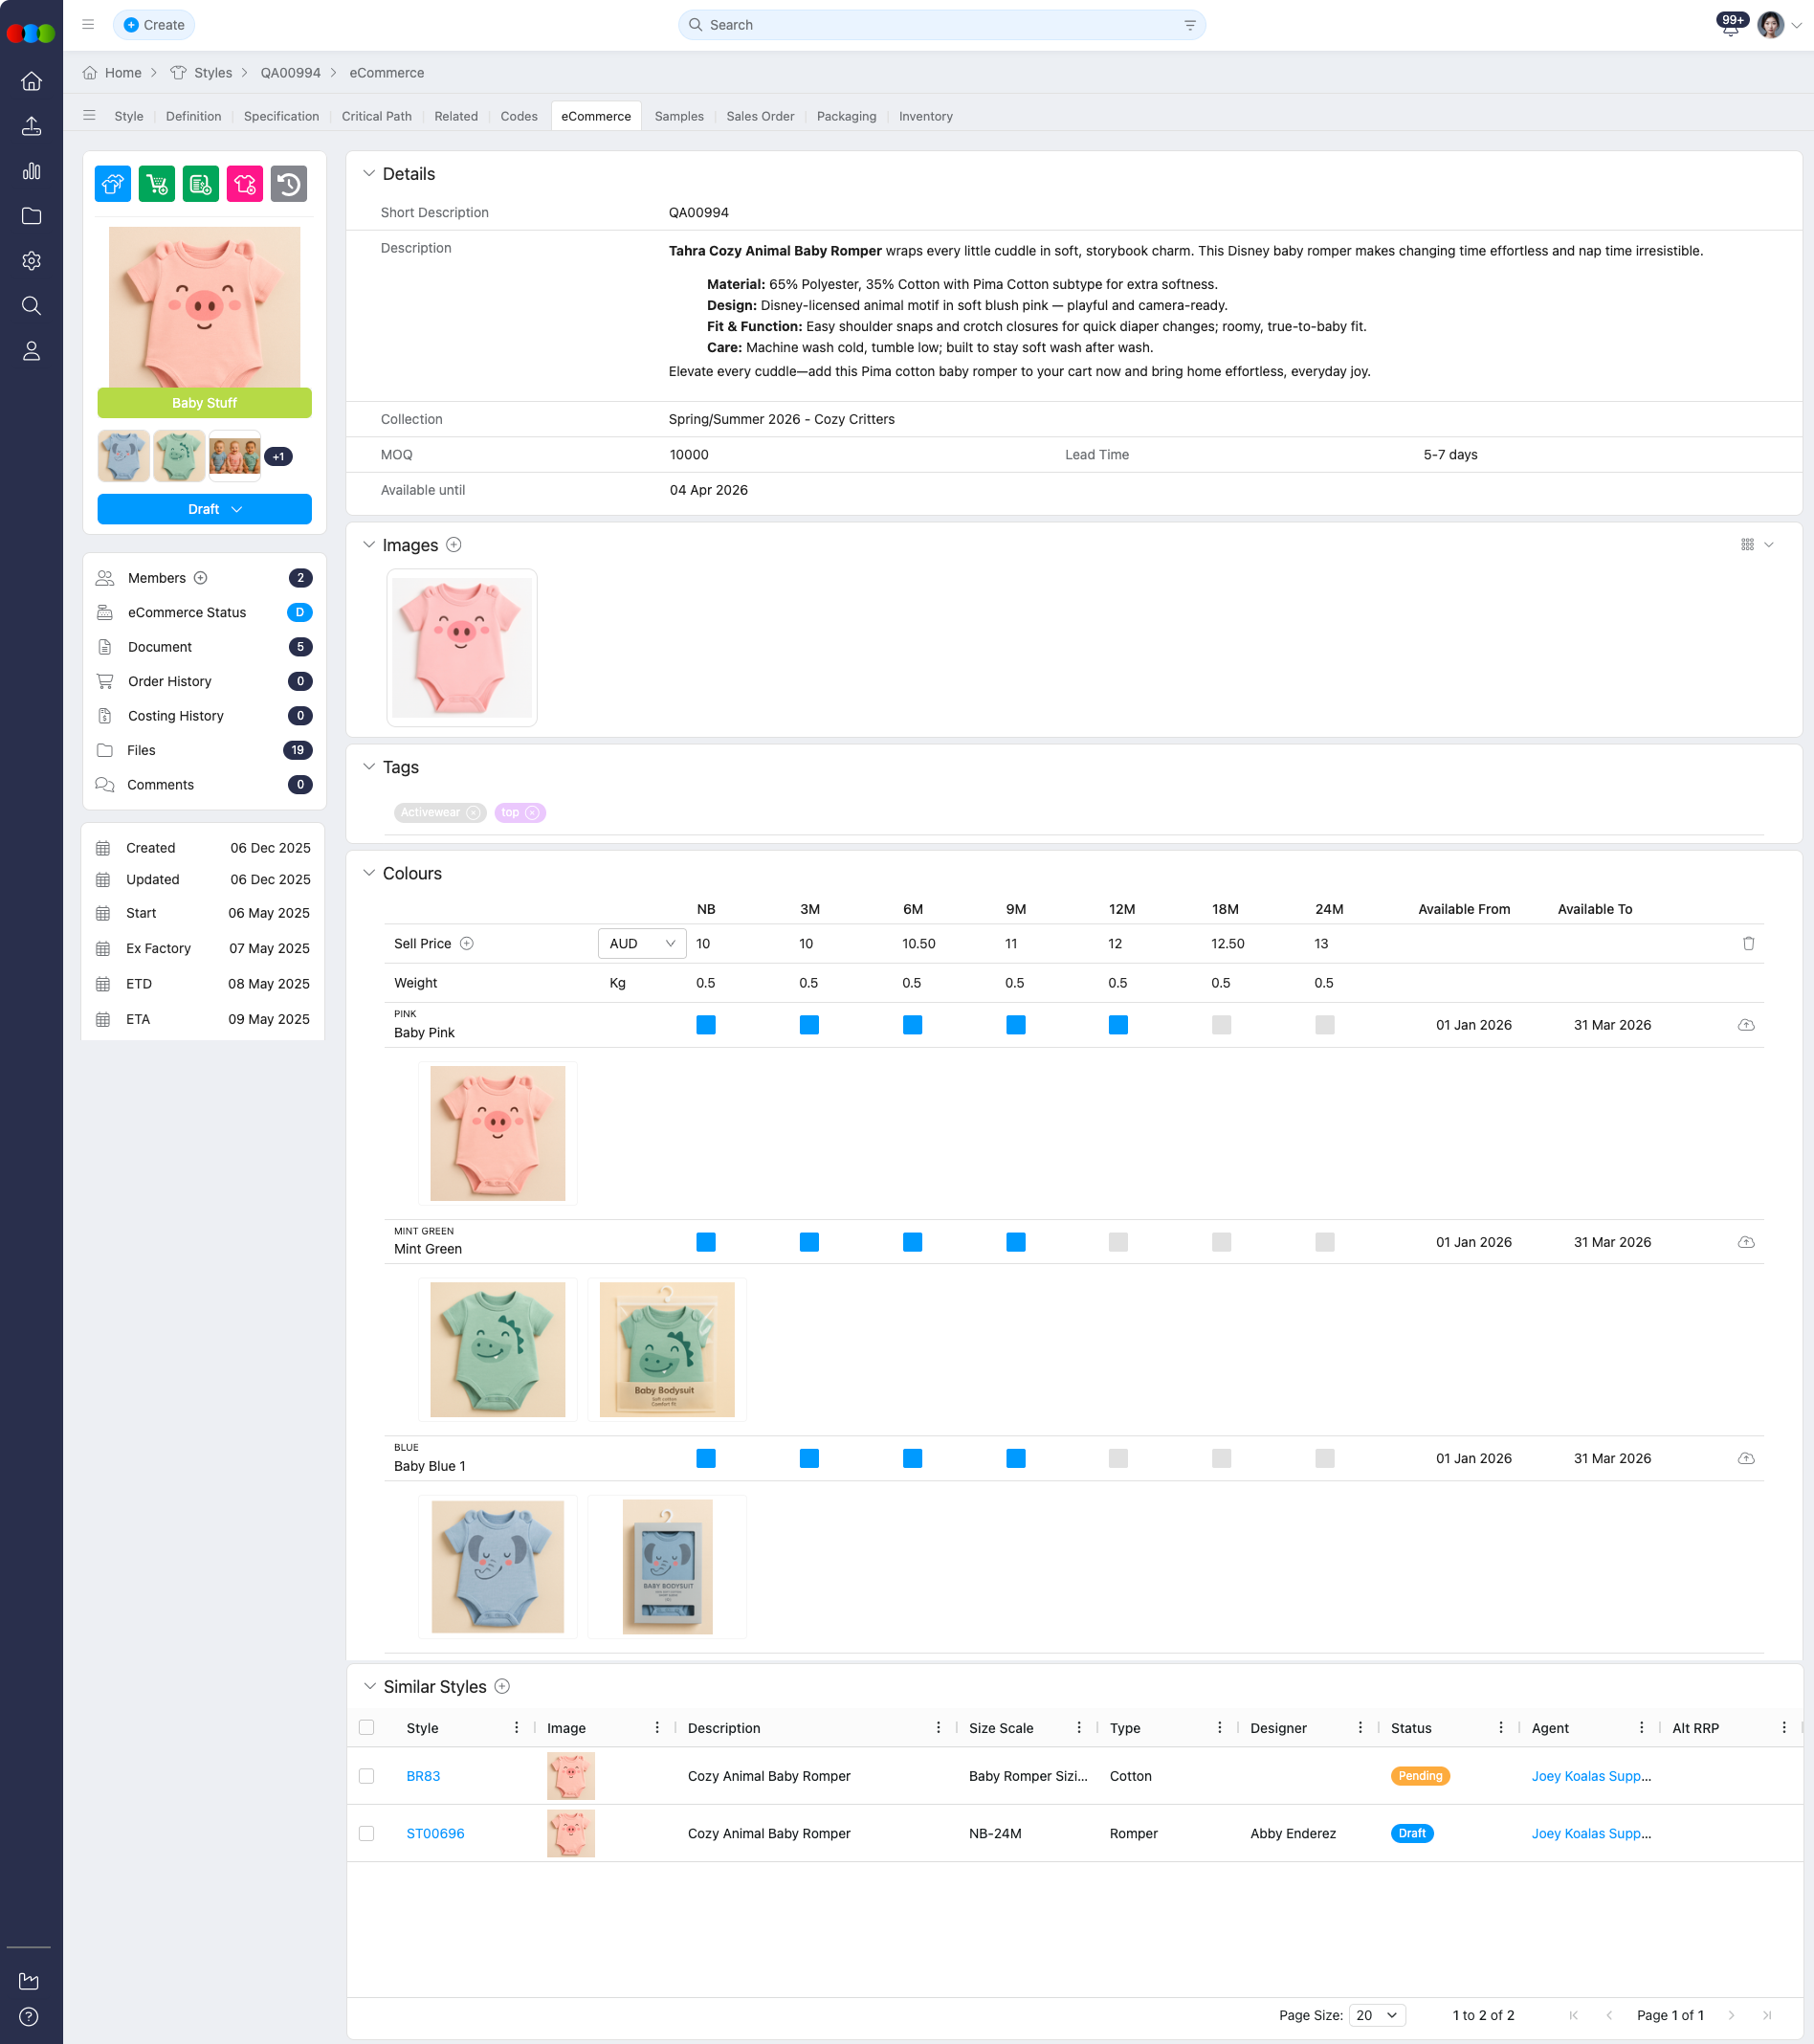
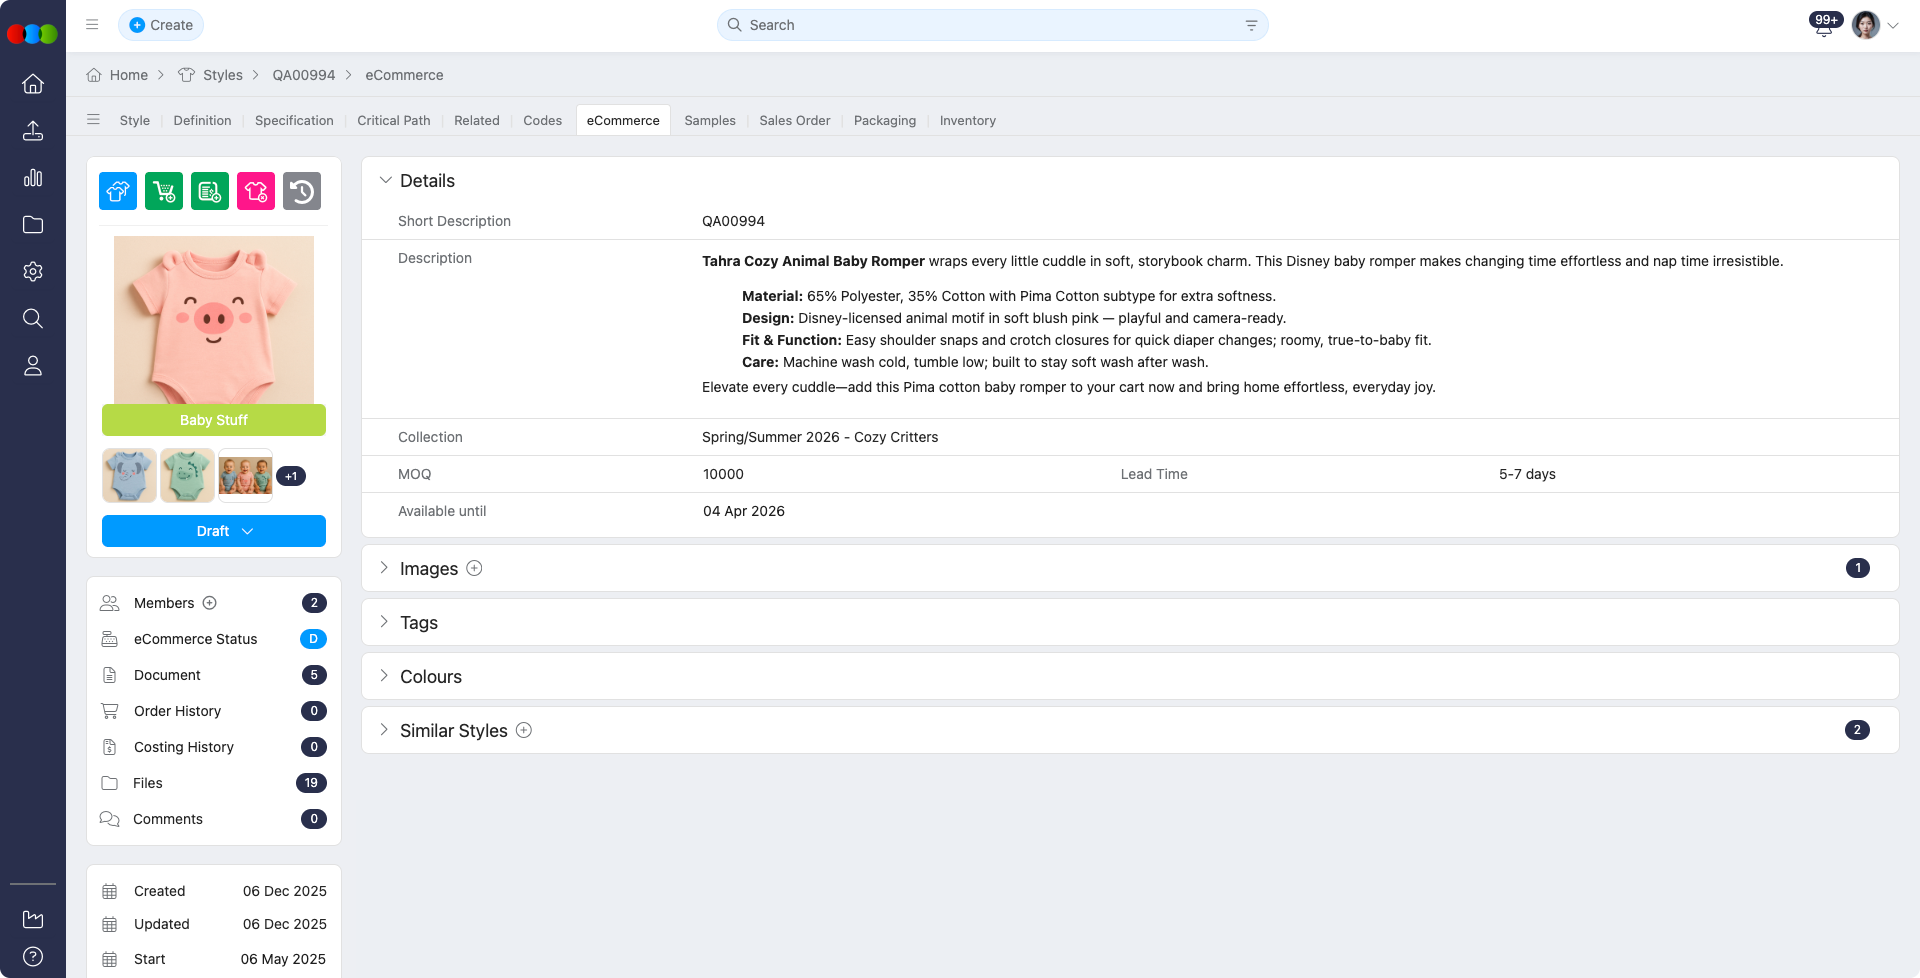
Details
Manage descriptive and commercial details for the style:
| Field | Description |
|---|---|
| Short Description | The main title or display name for the style, used in listings, reports, and customer-facing views. You can enter text manually or generate it with AI. |
| Description | A comprehensive product description. You can write it manually or generate it with AI. |
| Collection | Identifies the product collection or range the style belongs to, aiding categorisation and filtering. |
| MOQ | Minimum Order Quantity required for production or purchase, ensuring compliance with supplier or factory thresholds. |
| Available Until | The final date the style is available for ordering, supporting lifecycle management and product phase-out planning. This field must be configured before publishing to the Customer Portal. |
| Lead Time | The estimated time from order placement to delivery, helping teams plan production timelines and manage expectations. |
| Publish | Opens Publish eCommerce Data. This creates a new version snapshot of the current eCommerce record. Add an optional description so the audit trail stays meaningful. 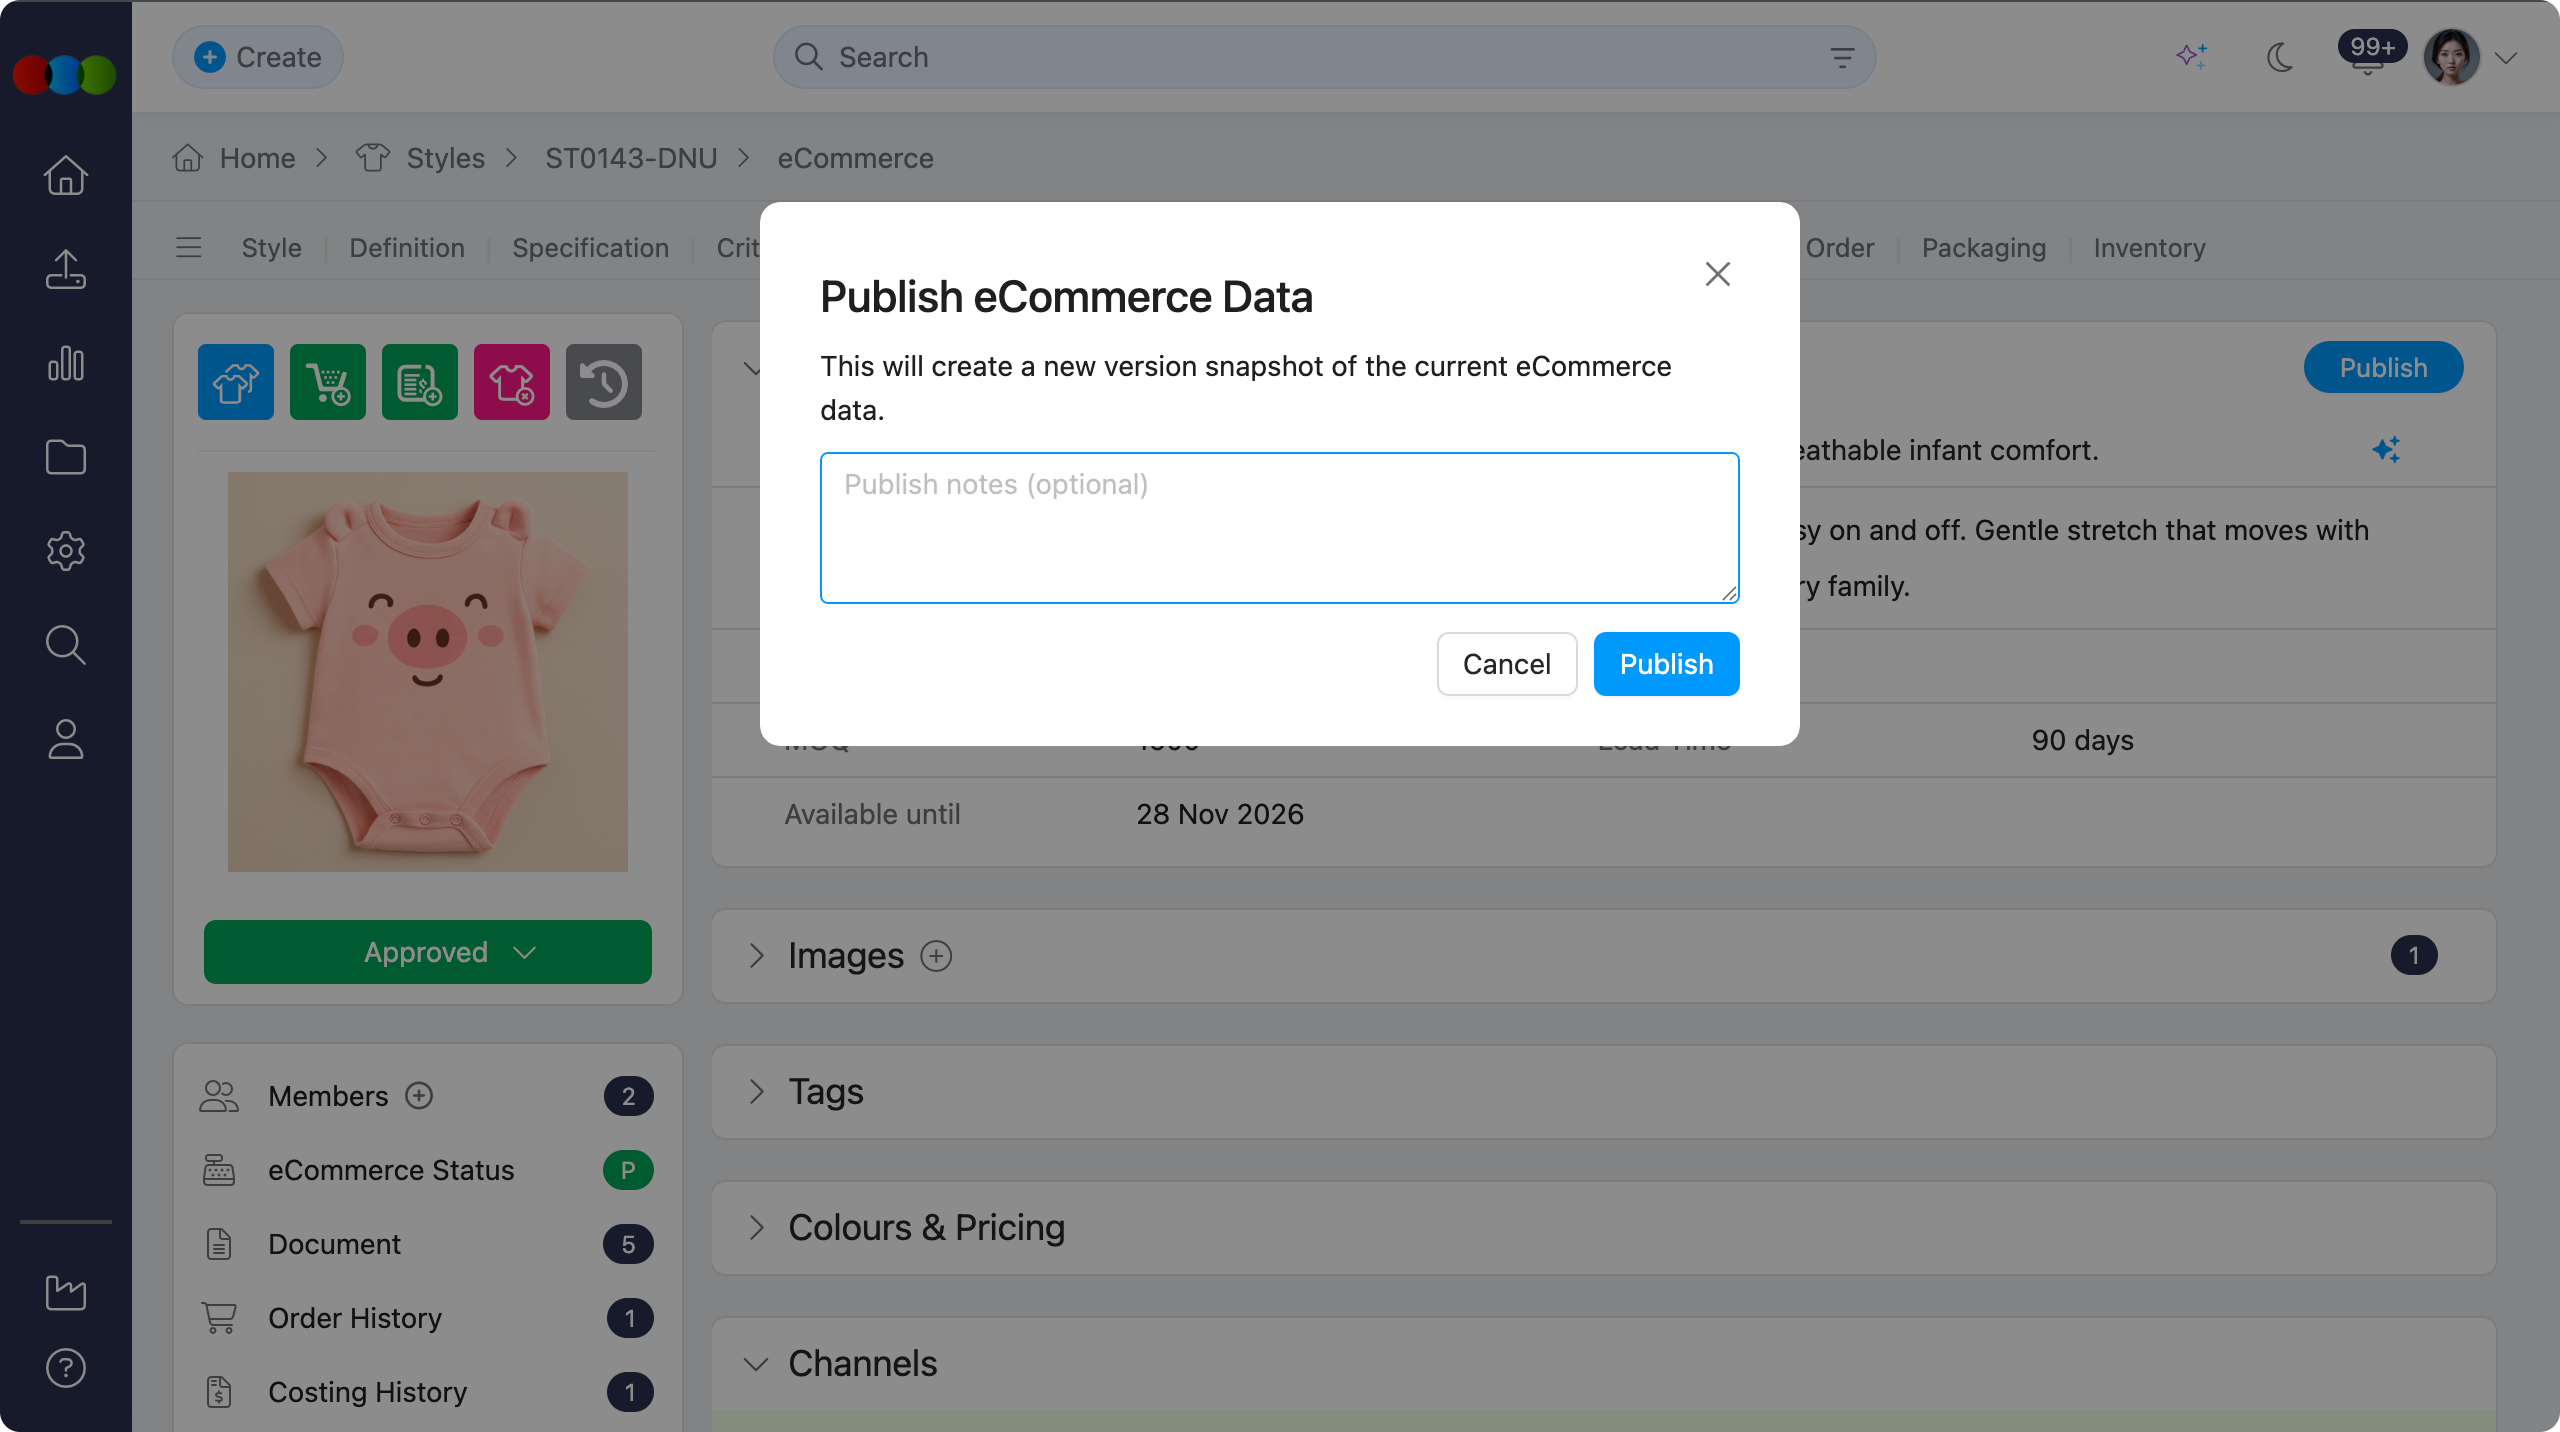 |
Publish and version history
Use Publish in the Details section table above to create a new version snapshot of the current eCommerce record.
After each publish, open Style > eCommerce > Side Widgets > eCommerce Status and use Version History to see which version went out, which staff member published it, and the date and time.
From there you can view a snapshot, compare with current or previous versions (General, Markets, Colours, Sell Prices, Channels), rollback (overwriting current unpublished edits while recording a new auditable version), or republish an older snapshot via Publish Version. Full descriptions of each action are on the eCommerce Status page.
Unpublished changes
When opening Style > eCommerce, you may see Warning: Unpublished changes. if the current eCommerce data has been edited since the last published version. Review Version History in the eCommerce Status side widget to compare the current data with a published snapshot before deciding what to do next.
If the unpublished changes should not be kept, use Rollback from Version History to restore a selected published version. Rollback replaces current unpublished edits and records a new auditable version so the change remains traceable.
Note
Rollback and Publish Version replace in-progress (unpublished) eCommerce edits with the data from the selected snapshot. Confirm the correct version before you proceed, especially on styles with concurrent editors.
AI-Generated Description
In generating AI eCommerce description, there are two ways to do this. You must first ensure that at least one of the following fields must contain the Style information: Description, Category, Sub Category, Type, Sub Type, Brand, License, Season, or Preview Image.
Individual Description Generation
To generate AI eCommerce text for a single style (Short Description or Description):
- Navigate to Style > eCommerce > Details and open Short Description or Description.
- Tap the Beautify icon located at the top-left corner.

- Optionally, add special instructions to guide AI.
- Click Generate to create the description.
- Once generated, you may choose to keep the result or regenerate for a new version.
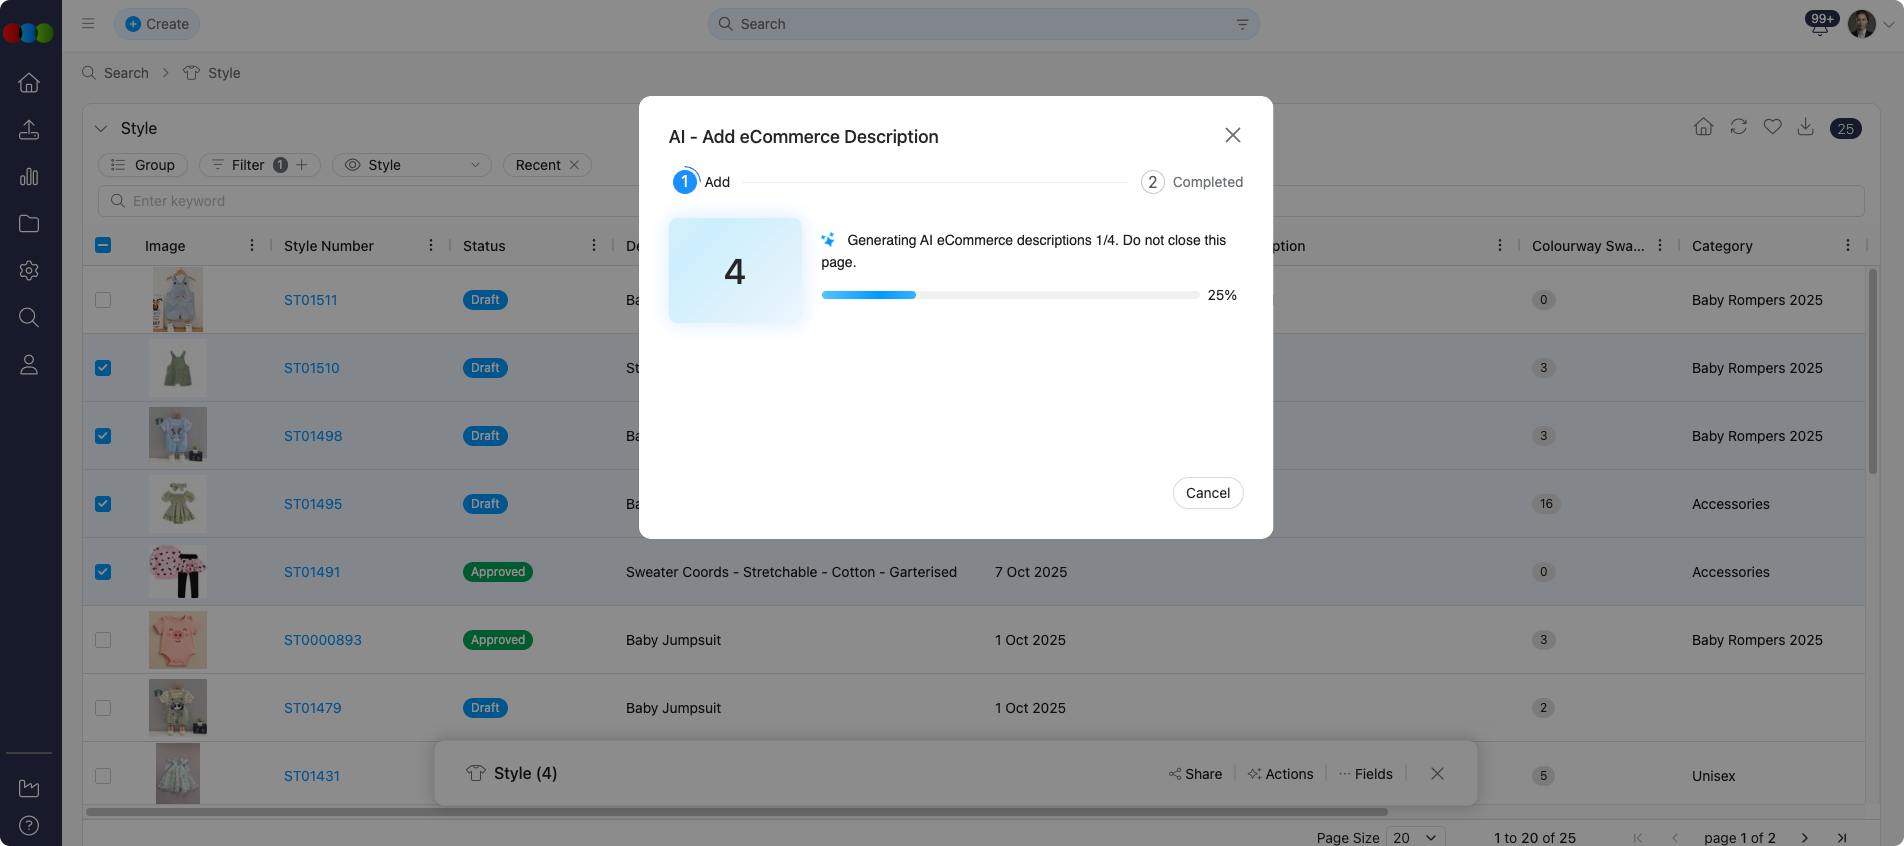
Bulk Description Generation
To generate AI-generated eCommerce descriptions for multiple styles simultaneously:
- Go to Style Search > Bulk Actions, and select the desired styles.
- Click Actions, then choose "AI - Add eCommerce Description".
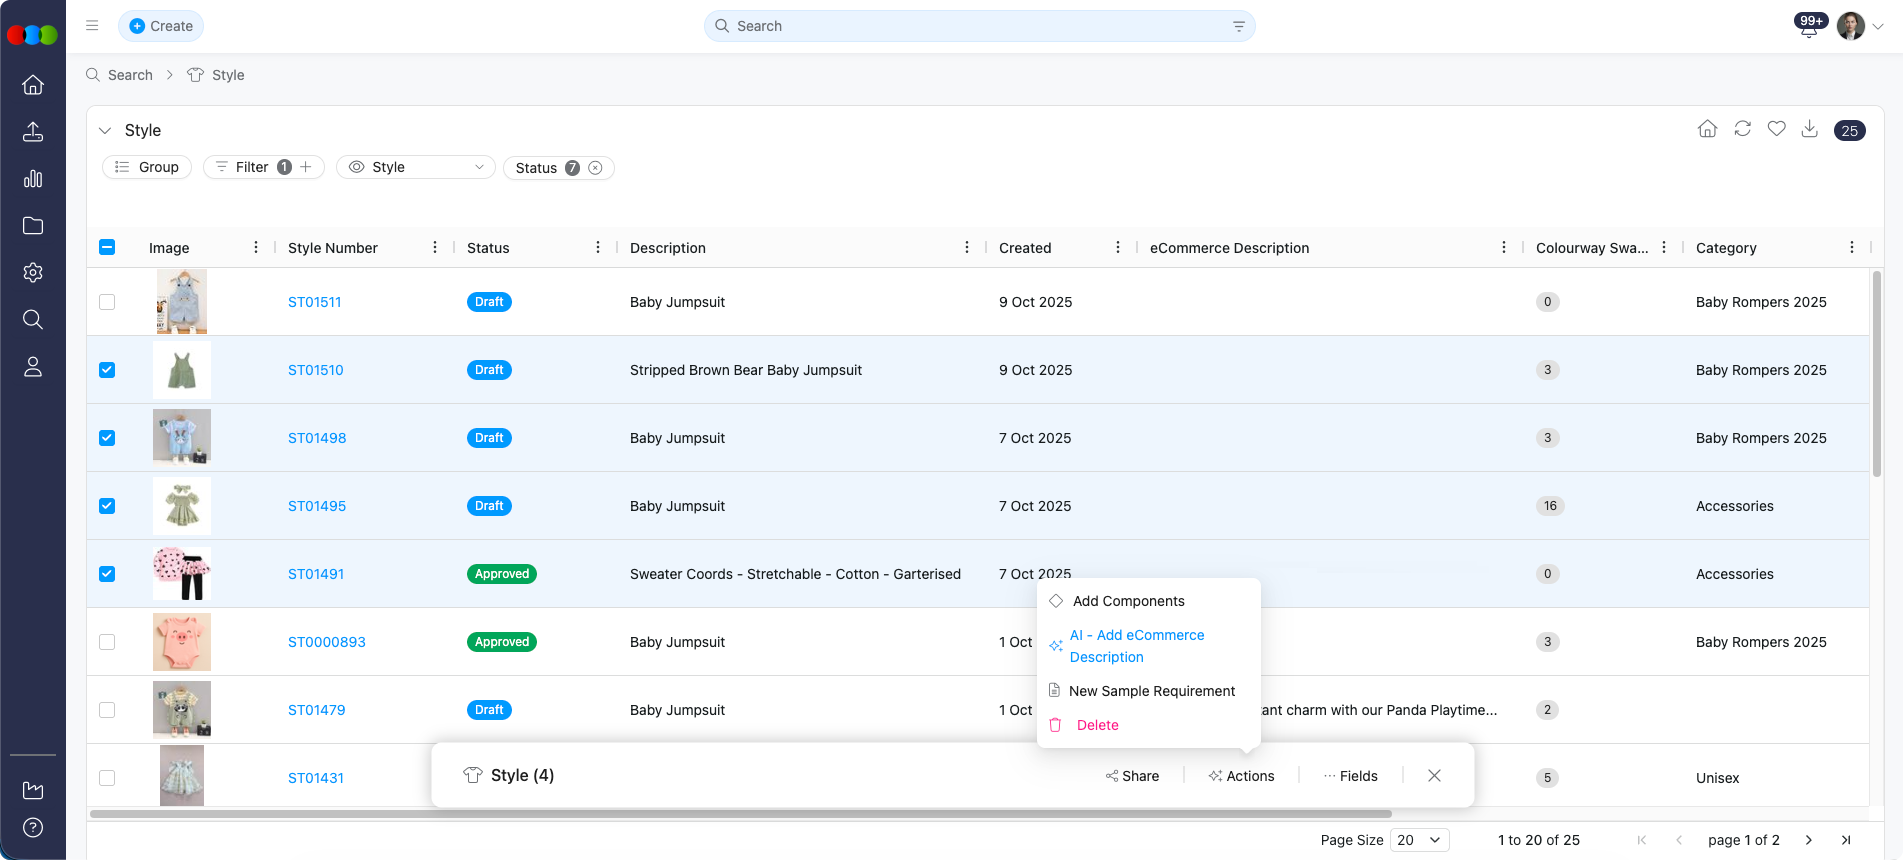 3. In the confirmation pop-up, click Yes to proceed or No to cancel.
Note
For both ways in adding, an alert will confirm whether the generation was successful or if any issues occurred.
Warning
Ensure your Production Portal role in Site Settings > Company > Roles & Permissions grants AI > Create (and any required Advanced options) before using AI eCommerce features.
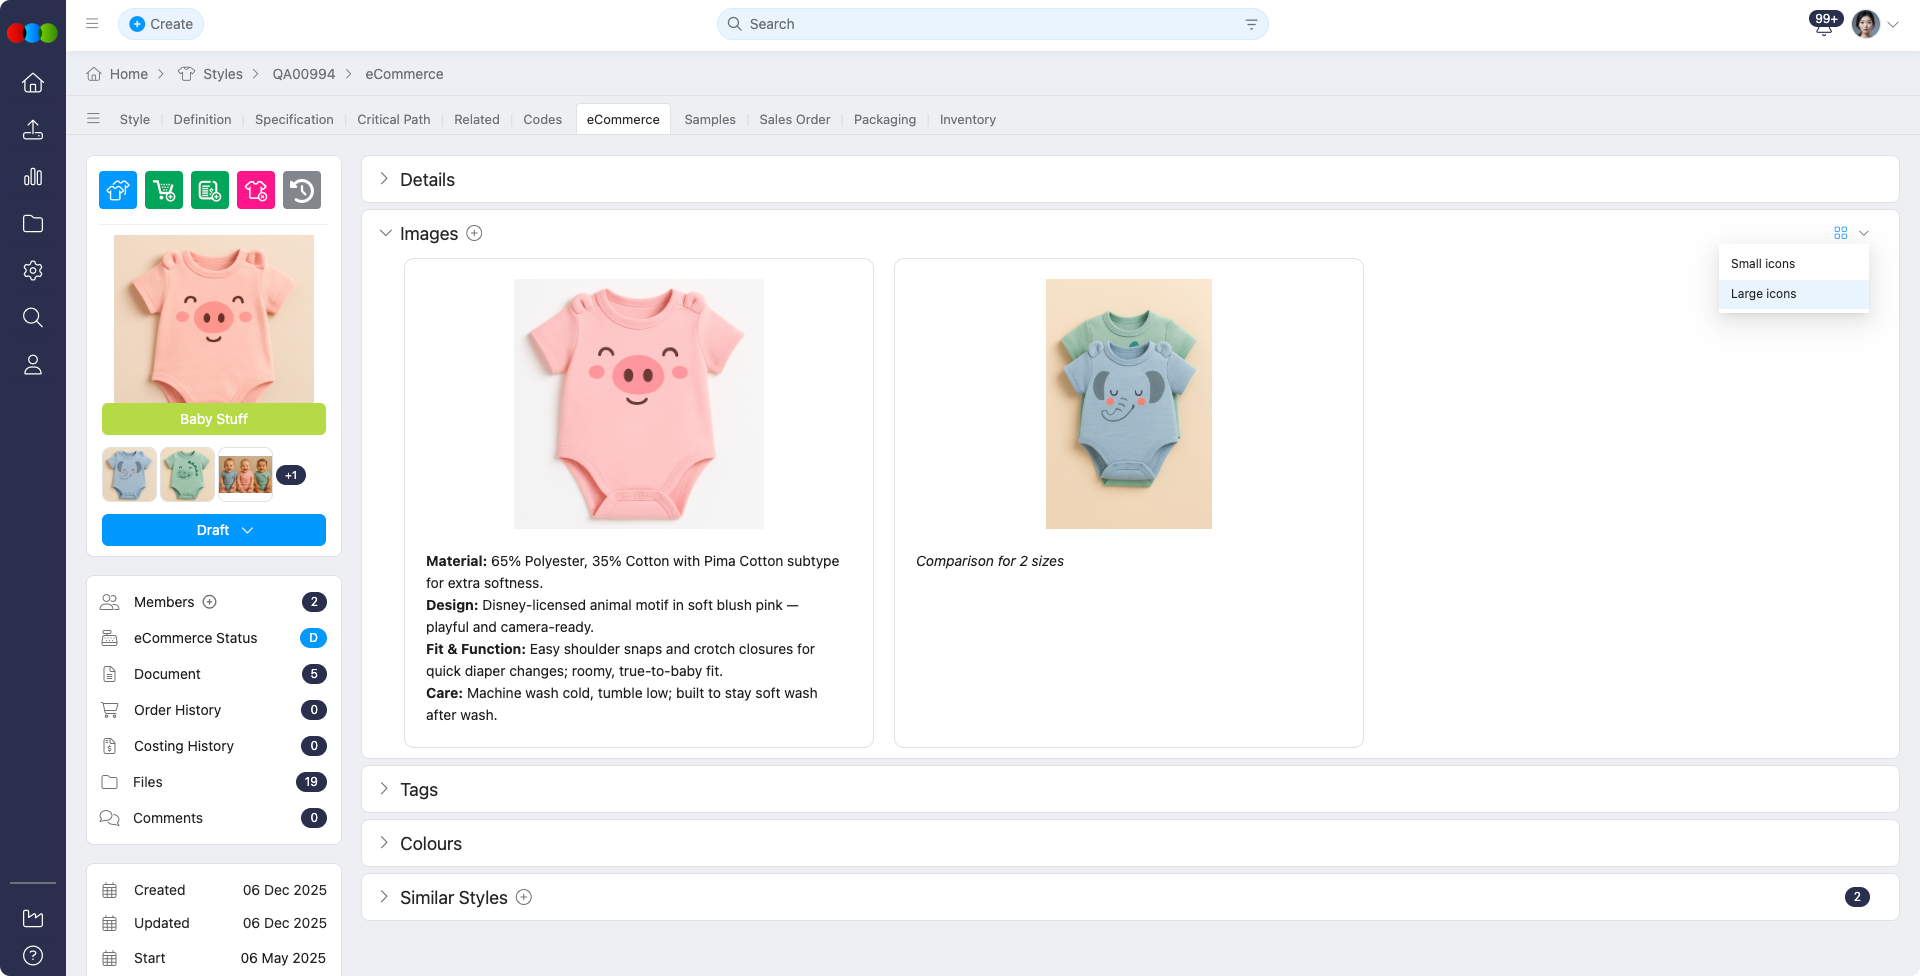
Images
The Images section allows you to upload, organise, and manage product images to ensure accurate and visually appealing representation of each style.
| Feature | Description |
|---|---|
| Upload Images | Add one or multiple product images to support visual reference and enhance product detail accuracy. |
| View Options | Switch between small or large icon views to browse images in the layout that best suits your workflow. Your preferred display setting is remembered across all applications. |
| Image Description | Add descriptive text to each image to improve searchability, clarity, and internal reference. |
| Image Editor | Use the built-in editor to mark up images, highlight details, or make simple adjustments before saving. |
| Delete Images | Remove outdated or incorrect images to keep the style’s gallery clean and current. |
| Drag & Drop Reordering | Rearrange images visually by dragging and dropping them into the desired order. This order determines how images appear in galleries or export views. |
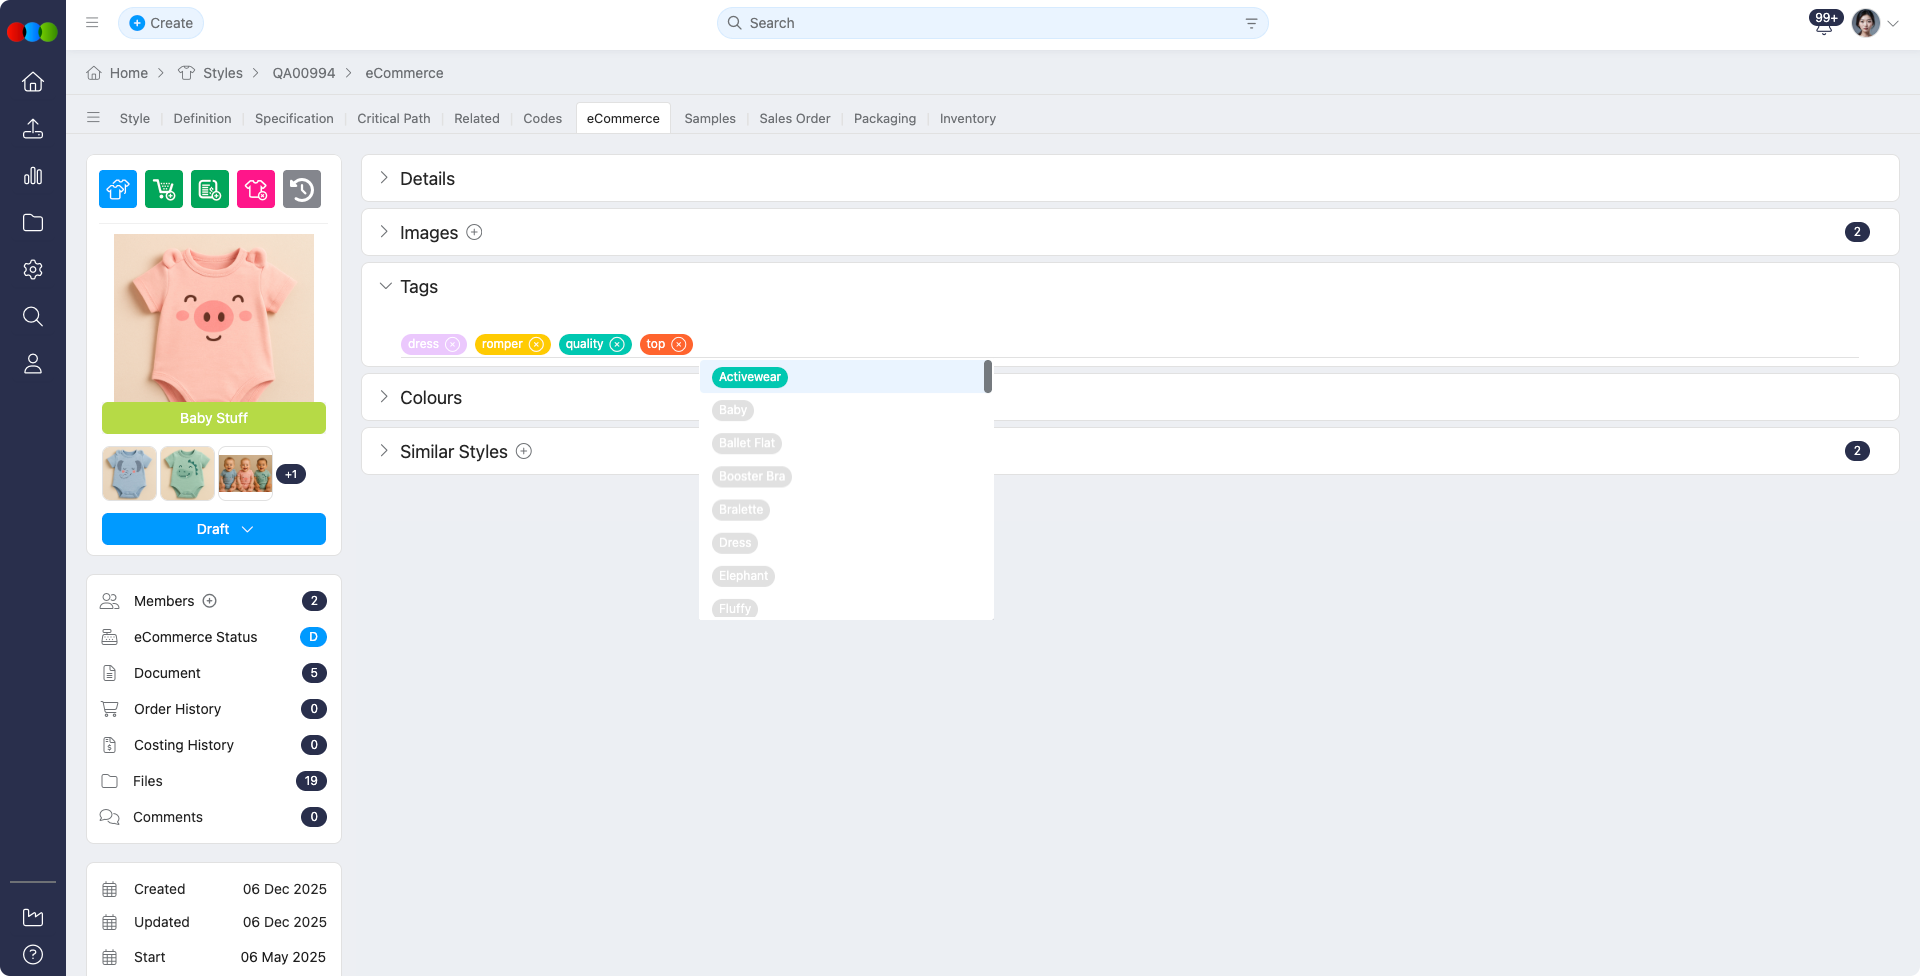
Tags Section
The Tags section lets you assign product tags that improve filtering, categorisation, and search performance in the B2B store. The experience surfaces currently assigned tags alongside a prompt text box so you can ask AI to suggest tags that fit the style—speeding up consistent merchandising and reducing manual drift from the vocabulary configured under Site Settings.
You can:
- Add meaningful tags manually or pick from predefined options in Site Settings.
- Use AI-suggested tags where your organisation enables AI, guided by your prompt and existing assignments.
Note
Manually added tags will not be saved in the Site Settings tag list.
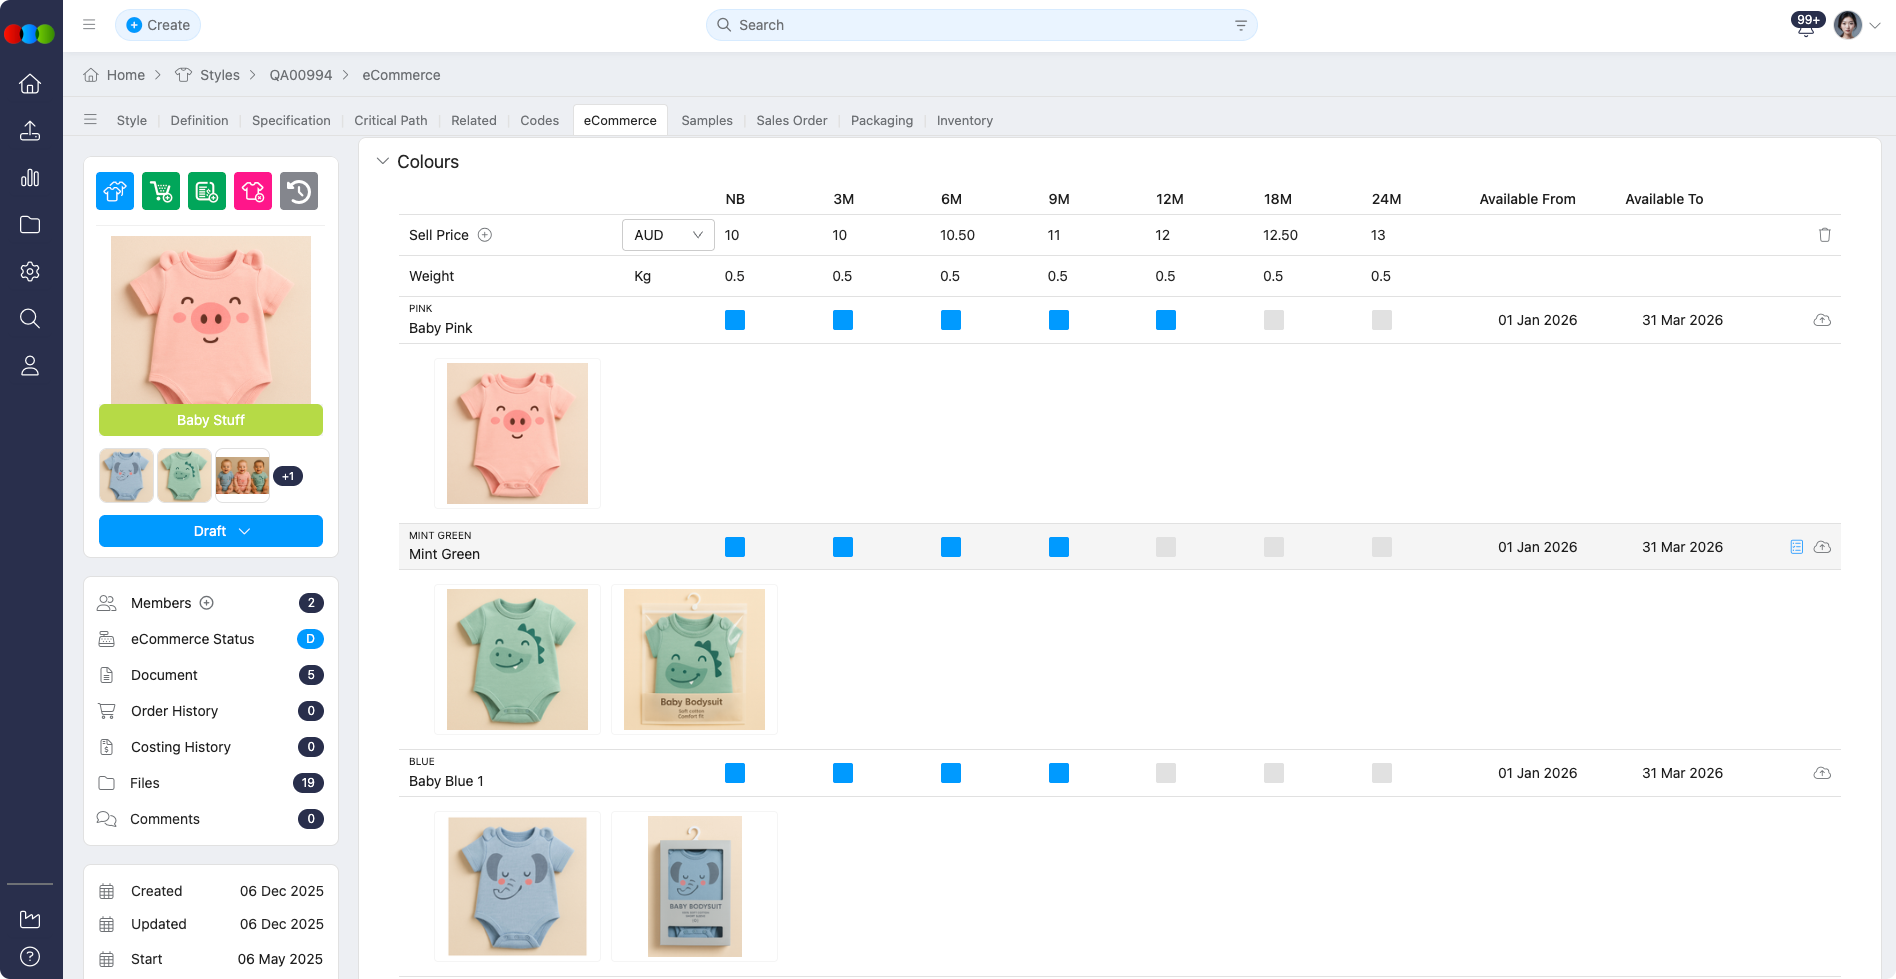
Colours & Pricing Section
Colours & Pricing is where you configure which colours and their corresponding sizes are available for sale. This ensures customers only see valid, purchasable combinations in the store. Pricing, availability, and images can be managed at a colour and size level for complete control over product presentation.
In this section:
- Switch between Collapse Sizes and Expand Sizes for faster scanning of large size grids.
- Set or remove sell prices for each size, including channel columns your administrator configured; enable those columns here to set prices per channel from the grid.
- Add multiple sell prices when required (e.g., tiered pricing).
- Toggle the availability of specific colours and sizes to control what appears in the B2B store.
- Use the select all sizes control to tick every size for a colourway in one action.
- Use the upload control to add images against colourways in this section, keeping imagery aligned with availability and pricing.
- Where your site enables AI, the Marketing colour column can show AI-generated descriptions for colourways.
- Input values for customised columns for their configured types: Text, Tags, Date, or Rich Text.
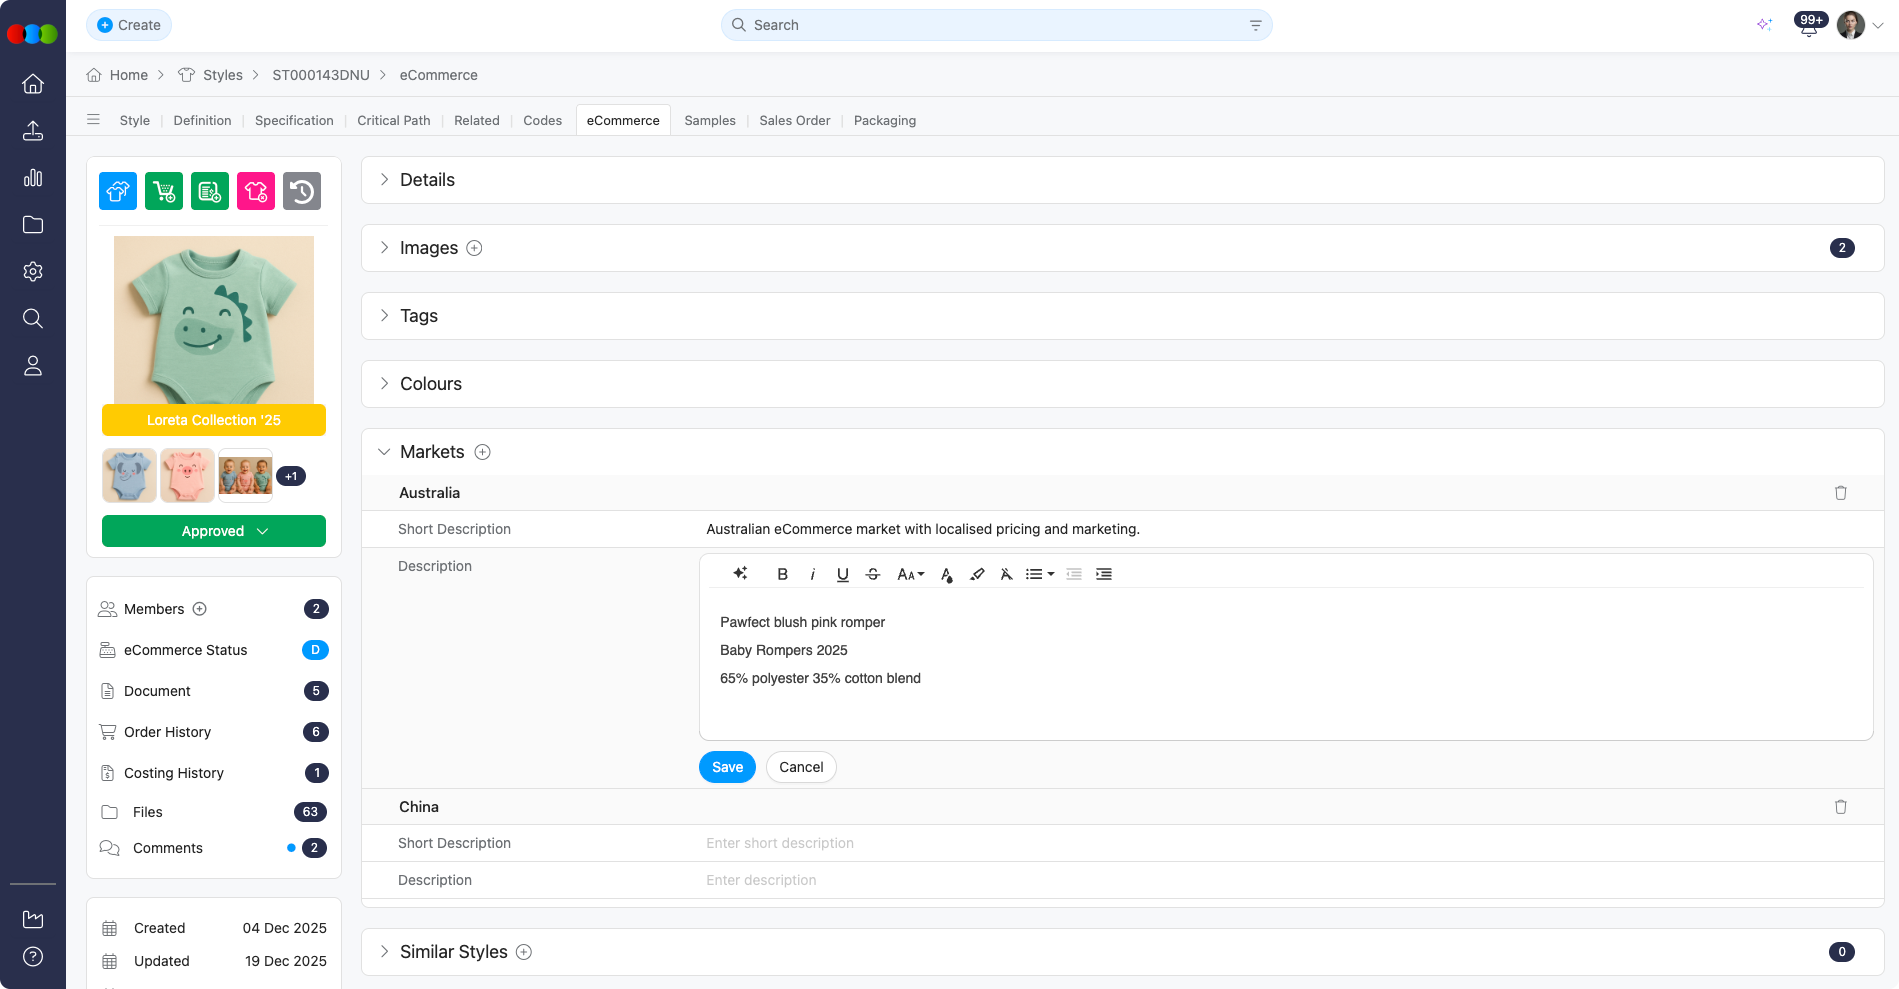
Rich Text
When your administrator adds a Rich Text column in Site Settings > Style > General Settings > eCommerce, that column appears as a per-colourway field in this section. If AI is enabled for the column in Site Settings, you can:
- Click Enter on the cell to open the pop-up.
- Use the rich text controls to edit the colourway description manually or generate content with AI.
- Optionally add additional context in the pop-up so generated text matches your intended tone and detail.
The exact wording the AI uses is driven by the Generate AI eCommerce colourway description prompt in Site Settings > Company > AI Prompts.
History
Saves and AI-assisted updates to Rich Text colourway fields are recorded in Style > History, giving you an audit trail alongside other style changes.
Configure Customised Columns
To configure the customised columns, go to: Site Settings > Style > General Settings > eCommerce.
Actions
| Action | Description |
|---|---|
| Add Vendor Code | Enter a supplier or vendor reference code to support internal tracking. |
| Select Available Date From/To | Define the date range during which the colourway is available for ordering. |
| Select all sizes / bulk select | Select every size for the chosen colourway in one click (same control as Bulk Select Sizes in bulk workflows). |
| Upload Image per Colour | Attach images per colourway from this section so galleries stay aligned before you publish. |
Channels Section
Administrators configure which channels appear, how they are described, and what counts as "ready" under Site Settings > Style > Channels (each channel’s Name, Description, and Readiness Fields).
For a library-wide summary, open Dashboard > Channel Readiness to see aggregate readiness per channel and drill into Style Search for styles that still need work.
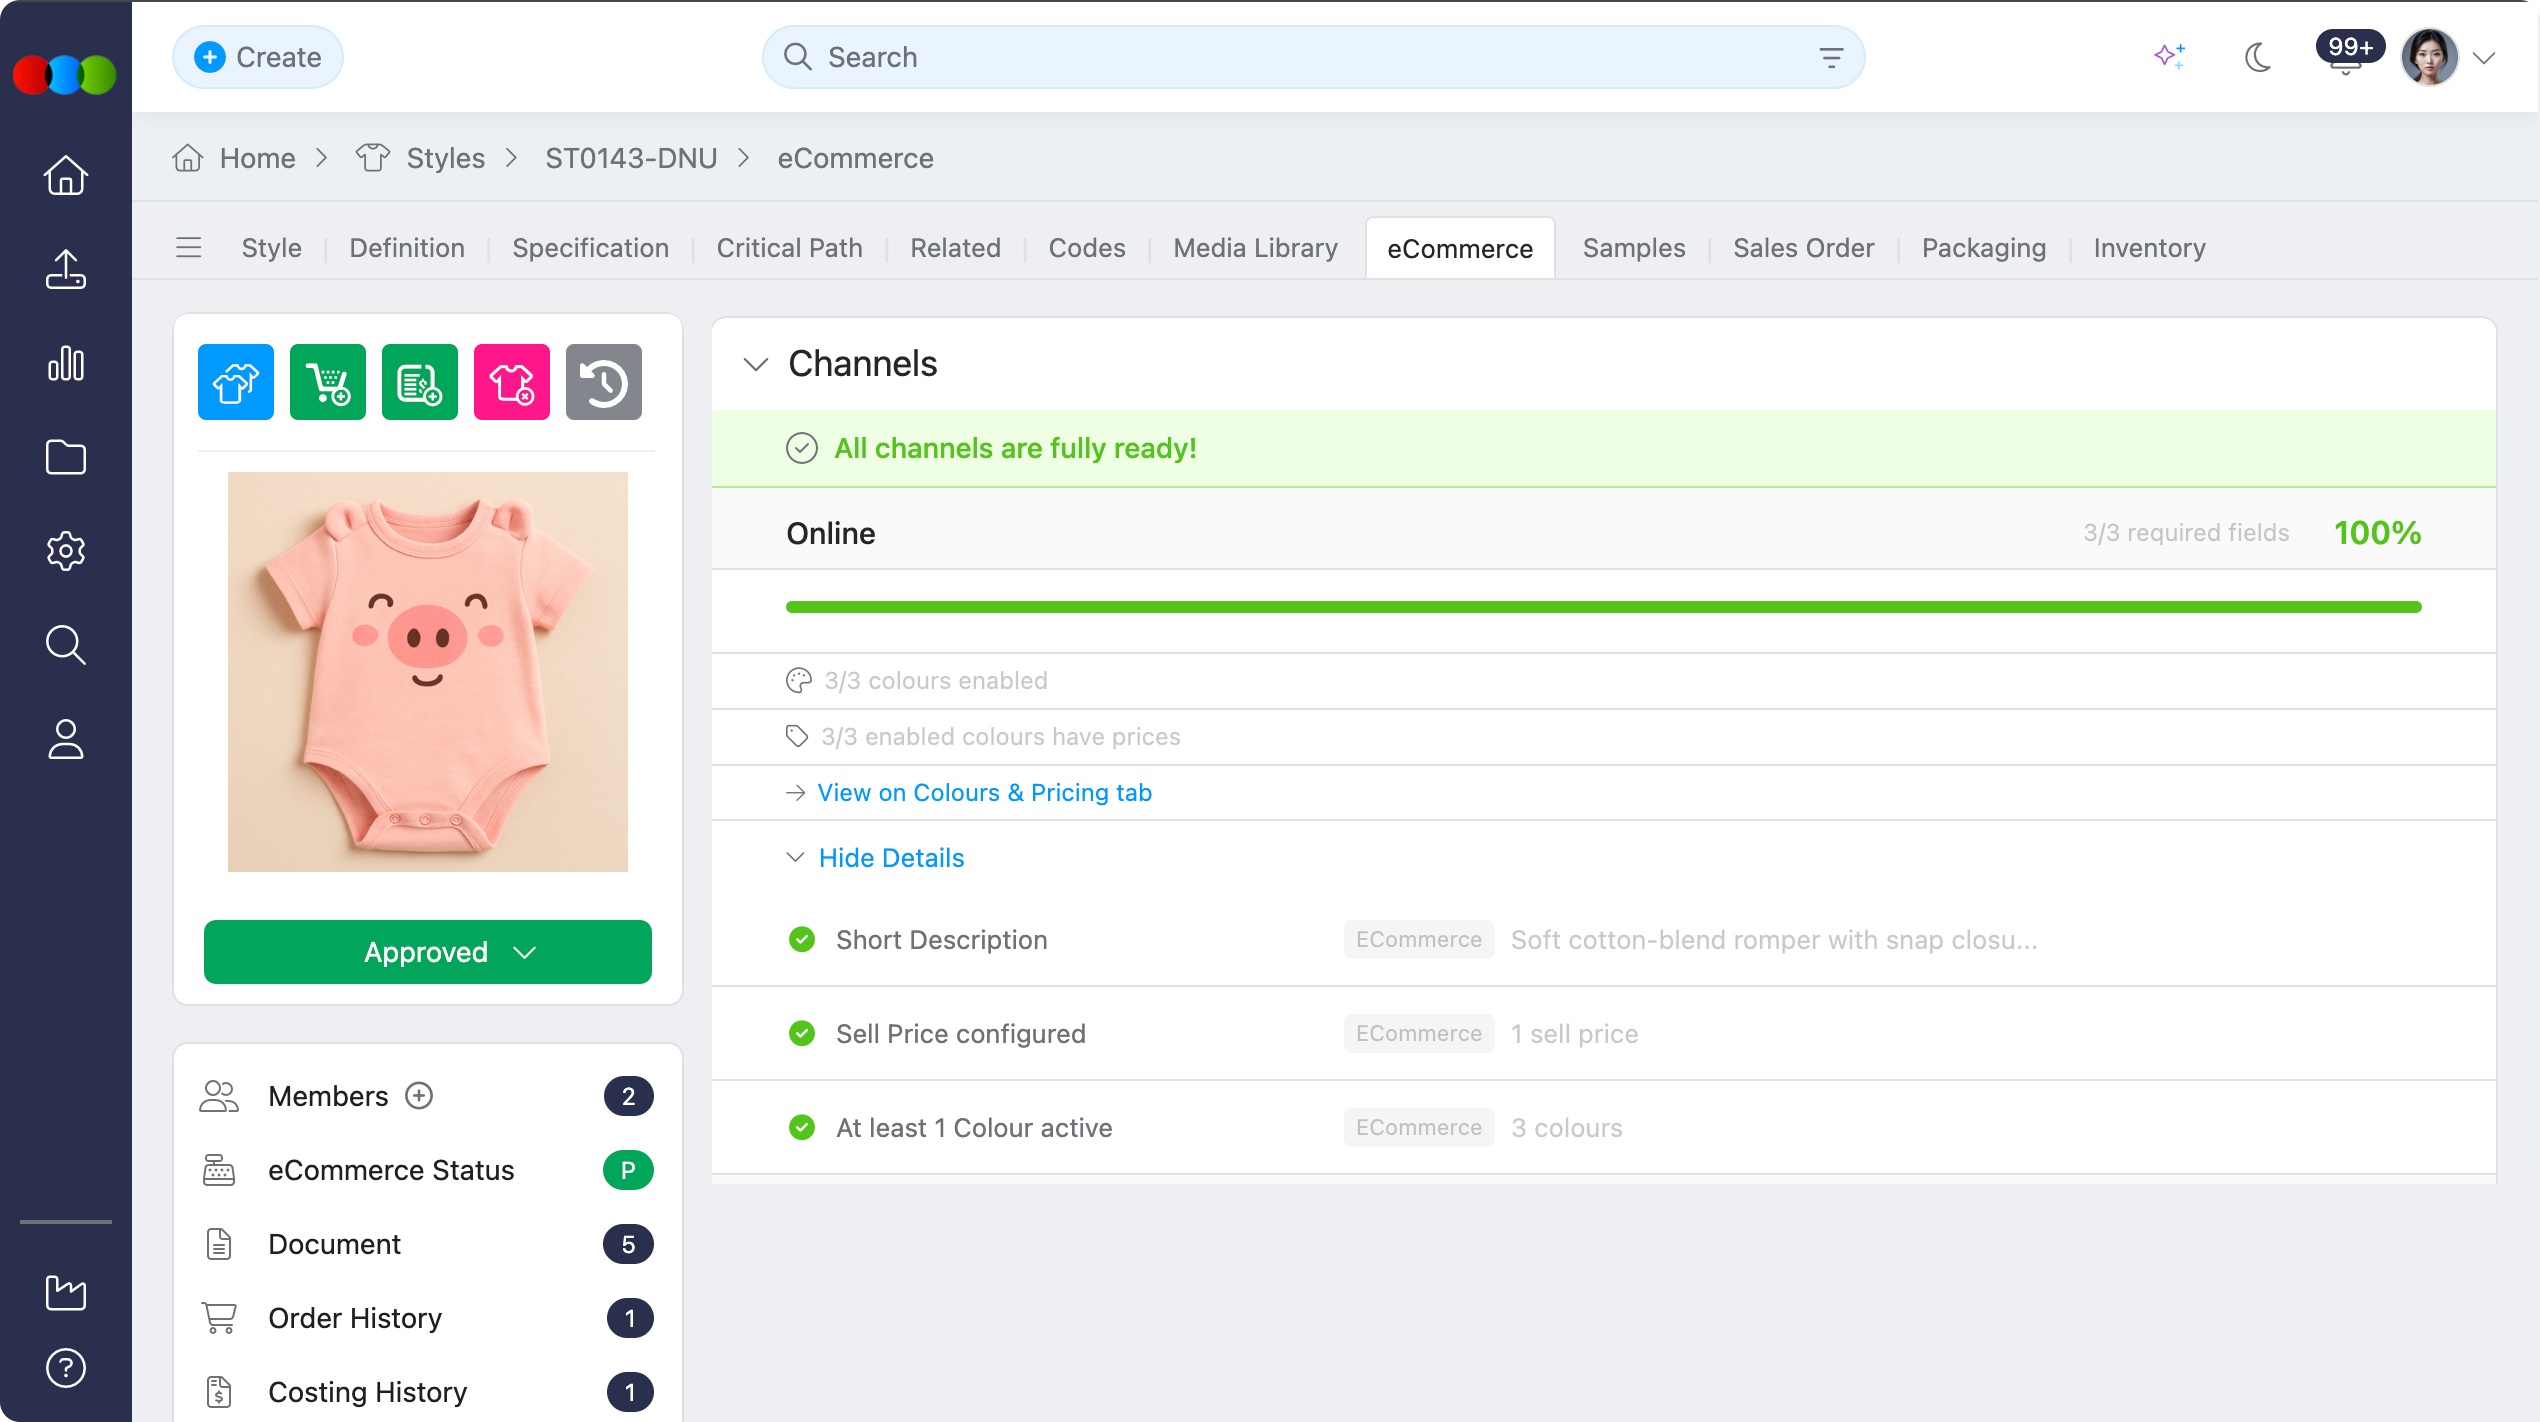
On Style > eCommerce > Channels, each channel shows its name, how many colours are enabled, and how many of those enabled colours have prices. Open Colours & Pricing for the fine-grained colour and size work.
When a channel is linked to a Shopify store connection, the channel row can also show Shopify sync information such as Sync Status, Last Sync, View on Shopify, and Sync Now. Administrators manage these connections in Site Settings > Integrations > Shopify.
How styles and colours appear in Shopify
One style becomes one Shopify product. Each enabled colour and size becomes a variant on that product — not a separate product. Use Channels > Colours & Pricing to control which colours sync to each Shopify store and to set channel-specific prices or barcodes. See Site Settings > Integrations > Shopify for the full mapping, worked example, and FAQs.
For each channel you can:
- Open the channel’s Details (from the Channels list—not the main eCommerce > Details tab) to see the Readiness Fields chosen in Site Settings. Each field shows its value and completed state, with an overall readiness percentage from 0% to 100%—so commercial and operations teams can see, at a glance, which routes are safe to publish.
- Open the Colours & Pricing view for that channel and manage colour/size availability and pricing in context.
- Review Shopify sync status and run Sync Now where the channel is connected to Shopify.
Together, these views help merchandising and sales teams finish configuration per channel before publishing.
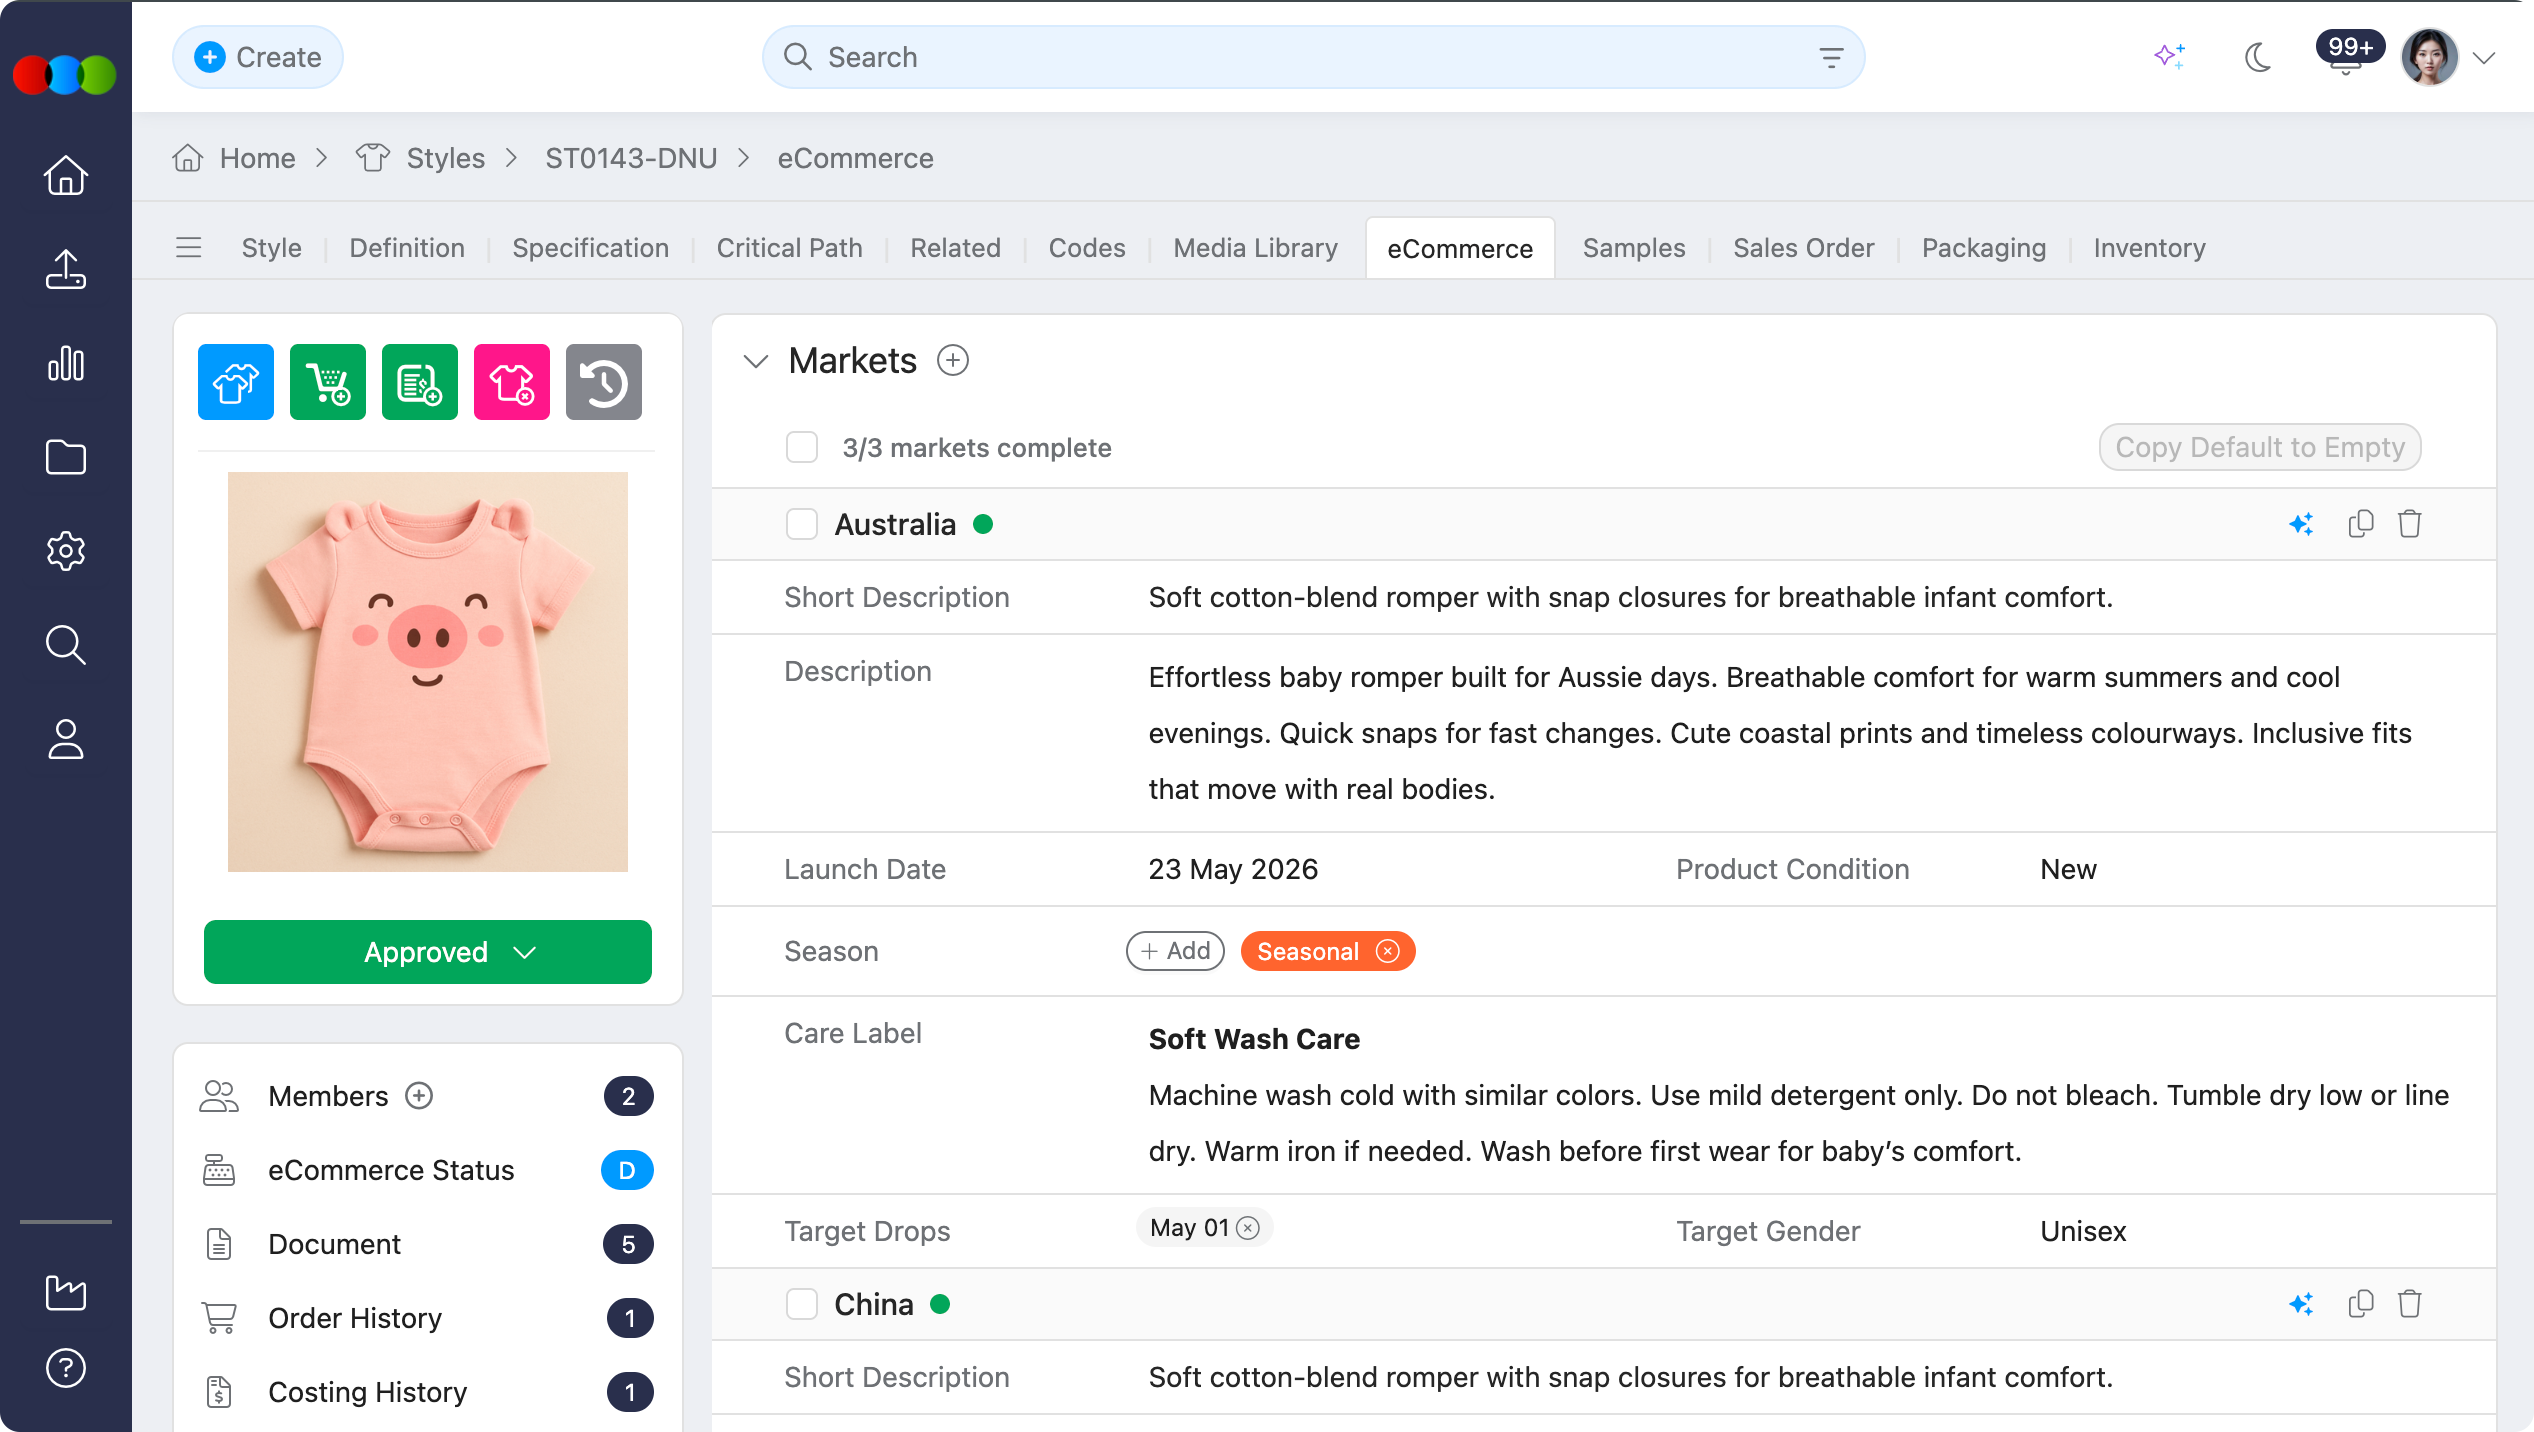
Markets Section
The Markets section lists the countries you selected under Style > Details > Additional Markets on the style. You maintain Short Description, Description, and Market Custom Fields here. Use AI to draft Short Description and Description per market where your site enables AI. Market Custom Fields are the fields administrators defined under Site Settings > Style > Market Custom Fields; supported types include Rich Text, Date, Dropdown, Tags, and Multiselect dropdown.
- Copy Default to Empty copies default values into empty market fields.
- Use the checkbox column to bulk delete rows or run bulk copy default to empty in one action—useful when you onboard new markets or reset regional copy with campaign changes.
Working with markets
- Add or change which countries apply to the style in Style > Details > Additional Markets; save the style so eCommerce > Markets reflects the list.
- Open Style > eCommerce > Markets and select a market in the list.
- Edit Short Description, Description, and Market Custom Fields as required.
Note
If a country is missing from Markets, add it under Style > Details > Additional Markets first, then return to eCommerce > Markets.
Best Practices
- Keep short descriptions focused on each market’s selling points.
- Use the main Description for compliance, tone, and detail that differ by region.
- Review market fields when seasons or regional campaigns change.
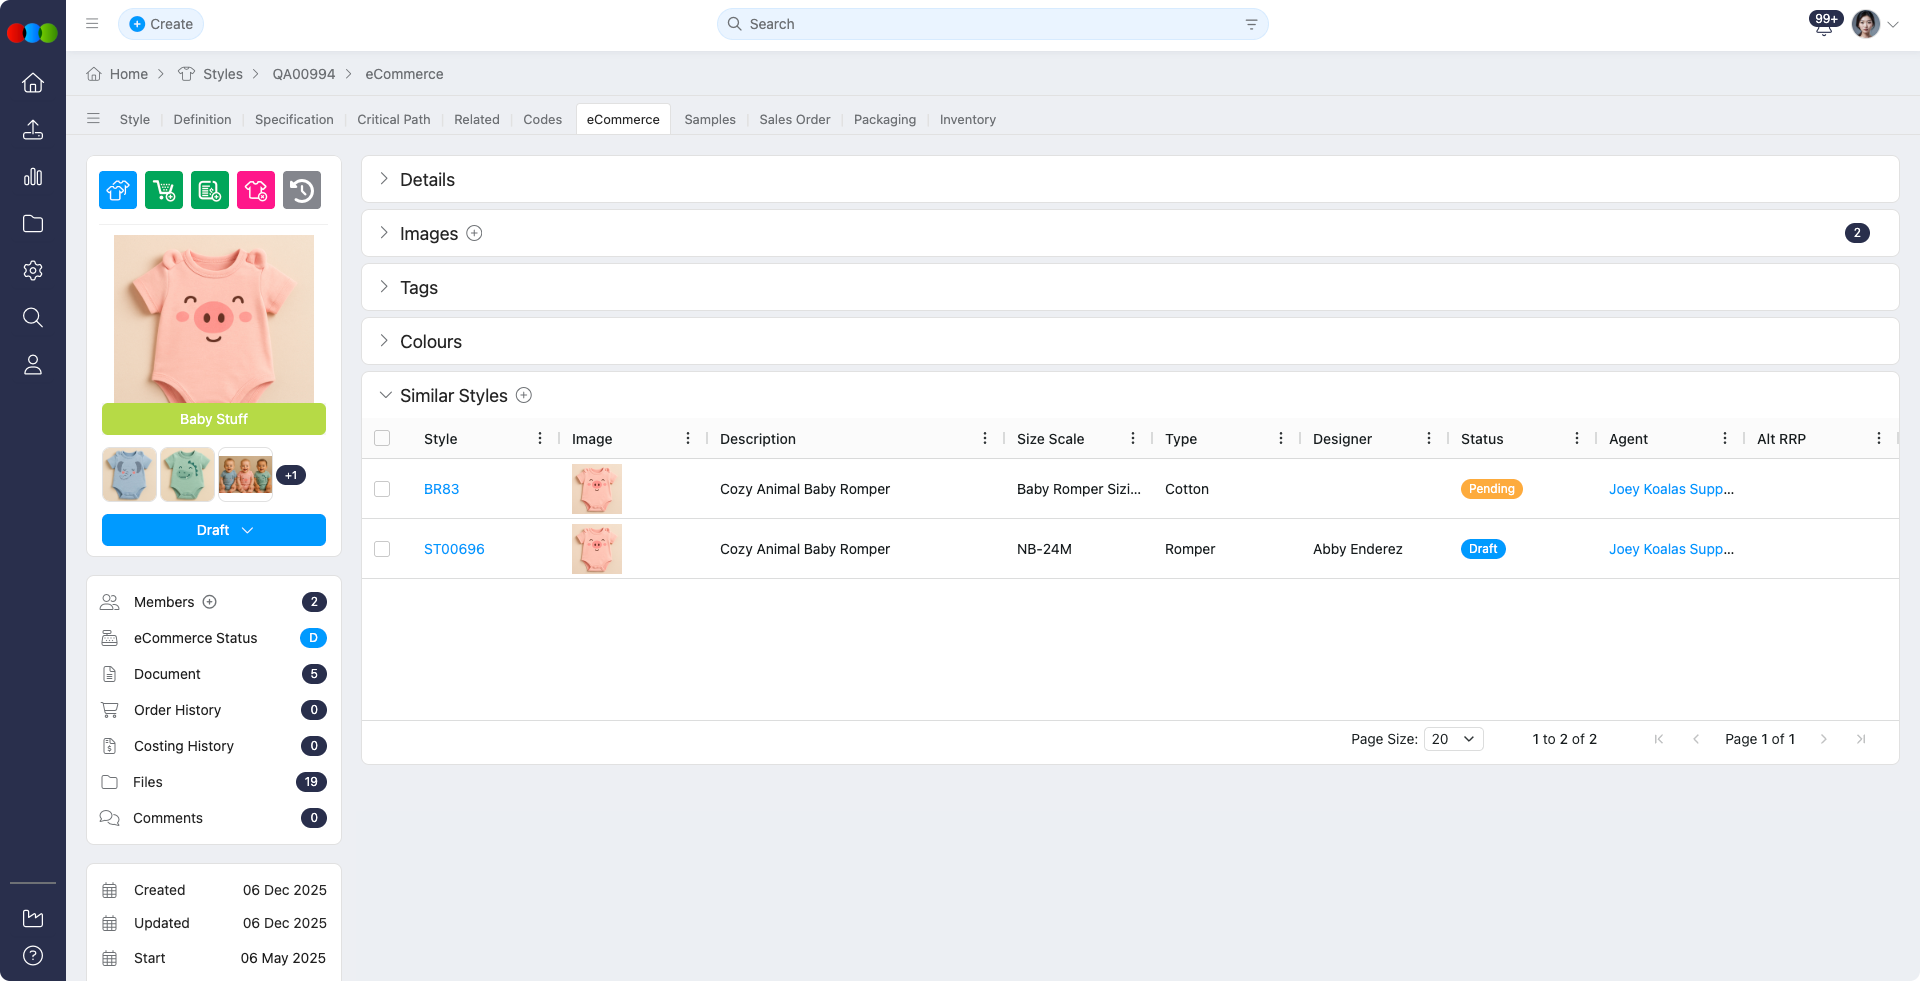
Similar Styles
You can link other styles as Similar Styles to improve browsing and merchandising in the B2B experience.
Columns
The grid can include the following columns for each linked style (availability may depend on your configuration):
| Column | Description |
|---|---|
| Style Number | The linked style’s identifier. |
| Image | Preview image for quick visual reference. |
| Description | Product description from the linked style. |
| Size Scale | Size scale associated with the linked style. |
| Type | Style type classification. |
| Designer | Designer assigned or attributed on the linked style. |
| Status | Workflow or lifecycle status of the linked style. |
| Agent | Agent associated with the linked style. |
| Alt RRP | Alternate recommended retail price. |
| Buy Price | Buy or cost reference for the linked style. |
| Brand | Brand on the linked style. |
| Category | Merchandising category. |
| Collection | Collection or range the linked style belongs to. |
| Composition | Material or fabric composition. |
Column configuration
Administrators can control which columns appear for Similar Styles in Site Settings > Style > General Settings > eCommerce.
How to Add Similar Styles
- Click the plus (+) icon.
- In the pop-up, use search or filters to locate styles. Users can either:
• Search by Style number
• Search by Component (shows result of styles that has this component) - Select styles and click Add to link them together and save your changes.
Use bulk editing to delete styles that don’t belong to the Similar Styles.
Similar Styles
You cannot edit any of the similar style details from this section. This is a view-only reference.
eCommerce Visibility Requirement
To make a style visible in the B2B Store:
- Go to the eCommerce Status in the Style > Side Widget > eCommerce Status.
- Change the status from Draft to Published.
Publishing Warning
When publishing the Style eCommerce record, ensure Available Until and Sell Prices are configured. If either field is missing, the style will not display in the Customer Portal even if it is marked as Published.
B2B store checklist
- Use consistent tags and product names for better filtering in the B2B store.
- Always double-check Colours & Pricing, channel readiness, and available dates before publishing.
- Annotate key product images using the image editor to assist buyers.
Sample Scenarios
Refer to these scenarios to understand how Style > eCommerce supports different teams when managing colour availability, pricing, channel readiness, and market-specific content. Each scenario links to related documentation found in this portal.
Scenario 1: Designer preparing colourways for online presentation
A designer uses Style > eCommerce to make sure the style's colourways, images, tags, and customer-facing descriptions are ready before the product is published.
| Step | What to do | Related documentation |
|---|---|---|
| 1 | Confirm the style's core information, including Short Description, Description, Collection, MOQ, Lead Time, and Available Until, is accurate for the product story. | Details |
| 2 | Upload and arrange product images so buyers can clearly review the style before they select a colourway. | Images |
| 3 | Add merchandising tags manually or use AI-suggested tags where your organisation enables AI. | Tags Section, Site Settings > Company > Tags |
| 4 | Review each eCommerce colourway, enable the colours and sizes that should be visible, add colourway images, and complete any rich text colour descriptions. | Colours & Pricing Section, Rich Text |
| 5 | Publish a version snapshot after reviewing eCommerce Status so the team can audit or roll back the approved presentation if needed. | Publish and version history, Style > eCommerce Status |
Scenario 2: Supplier confirming availability and sales readiness
A supplier or production user uses Style > eCommerce to confirm which colours, sizes, dates, vendor codes, and prices are ready for ordering through the B2B store.
| Step | What to do | Related documentation |
|---|---|---|
| 1 | Check the style's MOQ, Lead Time, and Available Until fields so commercial teams publish realistic ordering information. | Details |
| 2 | Confirm the source colourways, size availability, order pricing, tags, drops, and colourway images are already maintained on the main style record. | Style > Colours & Pricing |
| 3 | In eCommerce > Colours & Pricing, enter supplier or vendor references, available date ranges, sell prices, channel prices, and colour/size availability. | Colours & Pricing Section, Actions |
| 4 | Review channel readiness so sales teams know which eCommerce routes have enough completed data to publish. | Channels Section, Dashboard > Channel Readiness, Site Settings > Style > Channels |
| 5 | If orders are raised from the style, review the copied colourways, quantities, market pricing, style tags, and pack details in Order > Colour Quantity & Pricing. | Order > Colour Quantity & Pricing |
Scenario 3: Apparel business launching a market range
An apparel business uses Style > eCommerce to coordinate product copy, market-specific content, channel readiness, colour/size availability, pricing, and related style recommendations across a launch range.
| Step | What to do | Related documentation |
|---|---|---|
| 1 | Configure eCommerce columns, channel rules, market custom fields, AI permissions, and tag lists before teams start preparing the launch range. | Site Settings > Style > General Settings > eCommerce, Site Settings > Style > Channels, Company AI Settings |
| 2 | Add the correct Additional Markets on Style > Details, then maintain regional descriptions and market custom fields in eCommerce > Markets. | Style > Details, Markets Section, Site Settings > Style > Market Custom Fields |
| 3 | Use Colours & Pricing to control visible colours, size availability, sell prices, channel prices, available dates, and customised columns before publishing. | Colours & Pricing Section, Channels Section |
| 4 | Link Similar Styles so buyers can browse related options and merchandising teams can strengthen range navigation. | Similar Styles |
| 5 | Review required fields, publish the eCommerce status, and use version history to compare or roll back launch data after updates. | eCommerce Visibility Requirement, Style > eCommerce Status |
Related Actions
- Dashboard > Channel Readiness
- Company AI Settings
- Configure Tags in Site Settings
- Site Settings > Style > Channels
- Site Settings > Integrations > Shopify
- Site Settings > Style > Market Custom Fields
- Update eCommerce Status
Troubleshooting
Why is a country missing from eCommerce Markets?
Markets only lists countries you added under Style > Details > Additional Markets. If that list is empty or the style was not saved after editing Details, the market will not appear under eCommerce > Markets.
Steps to resolve:
- Open Style > Details, add the required regions under Additional Markets, then save the style.
- Return to Style > eCommerce > Markets and select the market from the list.
- If the market still does not appear, confirm you are editing the correct style record and that your user can edit Details.
Why does my style not show in the B2B Store after I set it to Published?
Publishing alone does not override incomplete eCommerce data. Required content such as Available Until, Sell Prices, images, and colour/size availability may still block Customer Portal visibility.
Steps to resolve:
- Review eCommerce for missing Available Until, Sell Prices, images, and Colours & Pricing entries. Confirm Channels readiness where your process uses it.
- Confirm eCommerce Status in the side widget is Published (see Update eCommerce Status).
- If you use Shopify or other integrations, confirm downstream sync rules (for example Published status and enabled variants) still match this style’s data.
Why is AI description generation blocked or failing?
AI features depend on AI permissions on your Production Portal role and on having enough style context for the model to work from.
Steps to resolve:
- Ask an administrator to enable AI > Create (and any required Advanced options) on your Production Portal role in Site Settings > Company > Roles & Permissions.
- Ensure at least one of Description, Category, Sub Category, Type, Sub Type, Brand, License, Season, or Preview Image is populated before running Beautify or bulk AI - Add eCommerce Description.
- If the UI reports an error, retry after a short wait; persistent failures may need review of Company AI Settings.