Adding a Supplier
The Add Supplier function is a critical component of the 3 Clicks Cloud platform that enables organisations to establish and manage their supplier network. This feature is essential for:
- Streamlining procurement processes by connecting your organisation with verified supplier partners
- Enabling seamless collaboration between your company and suppliers for orders, quotes, and project management
- Maintaining a centralised supplier database that supports efficient sourcing and vendor management
- Facilitating automated workflows that require supplier accounts to be properly registered and linked
Without properly registered suppliers, organisations cannot utilise key features such as order management, quote requests, or supplier collaboration tools. The supplier registration process ensures that all parties are authenticated and properly integrated into your company's supply chain ecosystem.
Quick Check - Before You Start
- Confirm you can access Site Settings > Company > External Connections or the Invite Business icon from the main navigation
- Have the supplier’s business name and correct, active email address ready for invitations, or their registered name/email when linking an existing portal business
- Decide whether the supplier is new to the platform (invitation via Invite Business) or already registered (link via External Connections or manual add from Site Settings > Company > Suppliers)
Importance of Supplier Registration
Supplier registration is fundamental to the platform's functionality because:
- Access Control: Only registered suppliers can access your organisation's orders, quotes, and project information
- Data Integrity: Registration ensures supplier information is accurate and up-to-date in your system
- Workflow Automation: Registered suppliers enable automated notifications, order processing, and communication workflows
- Compliance: Proper registration maintains audit trails and compliance requirements for supplier relationships
- Collaboration: Registered suppliers can actively participate in the platform's collaborative features
Methods to Add a Supplier
The platform provides two distinct methods for adding suppliers, each serving different use cases:
Method 1: Invitation-Based Registration
This method is recommended for new suppliers who have not yet registered on the 3 Clicks Cloud platform. It provides a streamlined onboarding process through the same guided workflow used in Site Settings > Company > External Connections.
Invite Business
When you add a supplier through the Invite Business icon, you complete the Connect external business pop-up — the same process for entering connection details as Site Settings > Company > External Connections > Connect business.
| Step | Action |
|---|---|
| 1 | Click the Invite Business icon in the lower-left corner of the page. 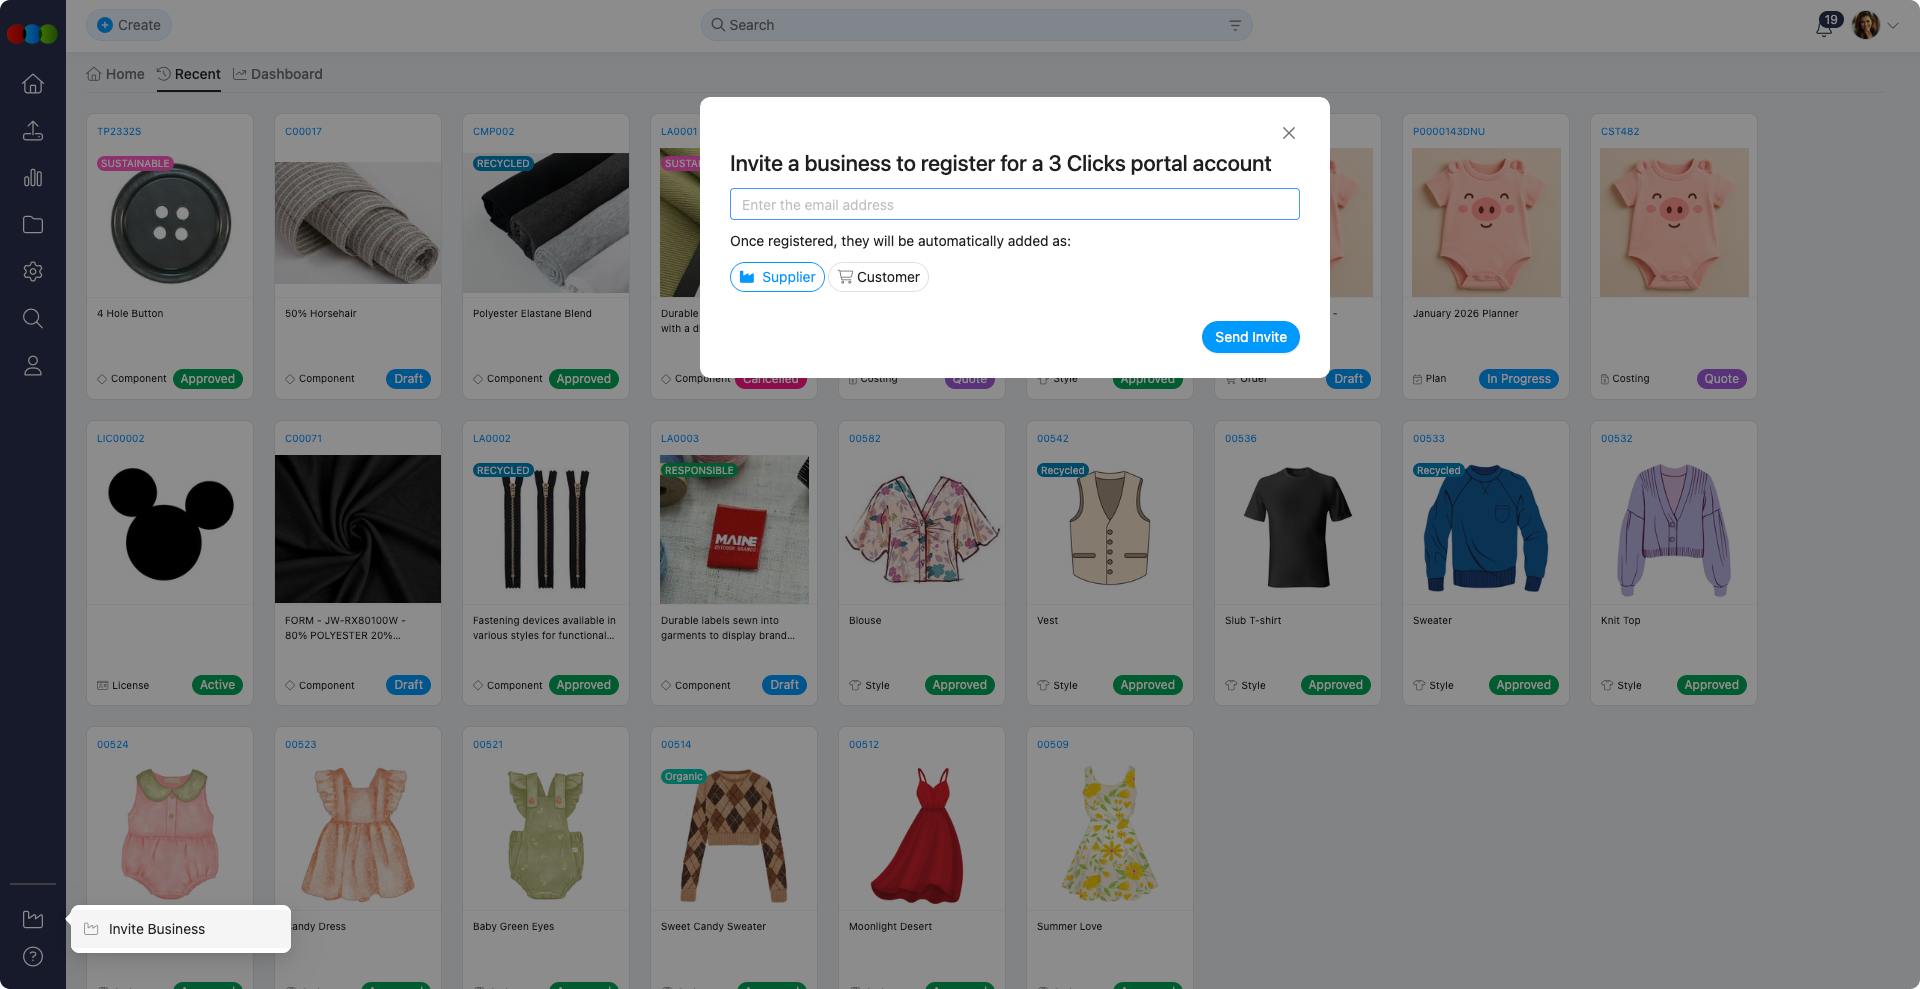 |
| 2 | On Type, choose Supplier as the connection type, select Create new or Link existing, and enter the Business name. See Connection type. |
| 3 | On Portal access, choose Invite by email, Link existing portal business, or PLM only as required. See Portal access. |
| 4 | If portal access applies, choose a Profile template (for example Standard Supplier) or tick Use custom role instead. See Profile templates. |
| 5 | On Review, confirm the summary, optionally tick Enable immediately, then confirm to create the connection and send the invitation where applicable. |
Same workflow as External Connections
The Invite Business icon and Site Settings > Company > External Connections > Connect business open the same Connect external business workflow. For field definitions, profile templates, connection statuses, and administrator actions such as Resend invite, see Site Settings > Company > External Connections.
Email Delivery
When you select Invite by email on the Portal access step, ensure the supplier's email address is correct and active. The registration link is sent to that address, and the supplier must use it to complete their registration.
Supplier Registration Process
Once the invitation is sent, the supplier receives an email with a registration link. The supplier must complete the following steps:
| Step | Action |
|---|---|
| 1 | The supplier receives an email containing a registration link. 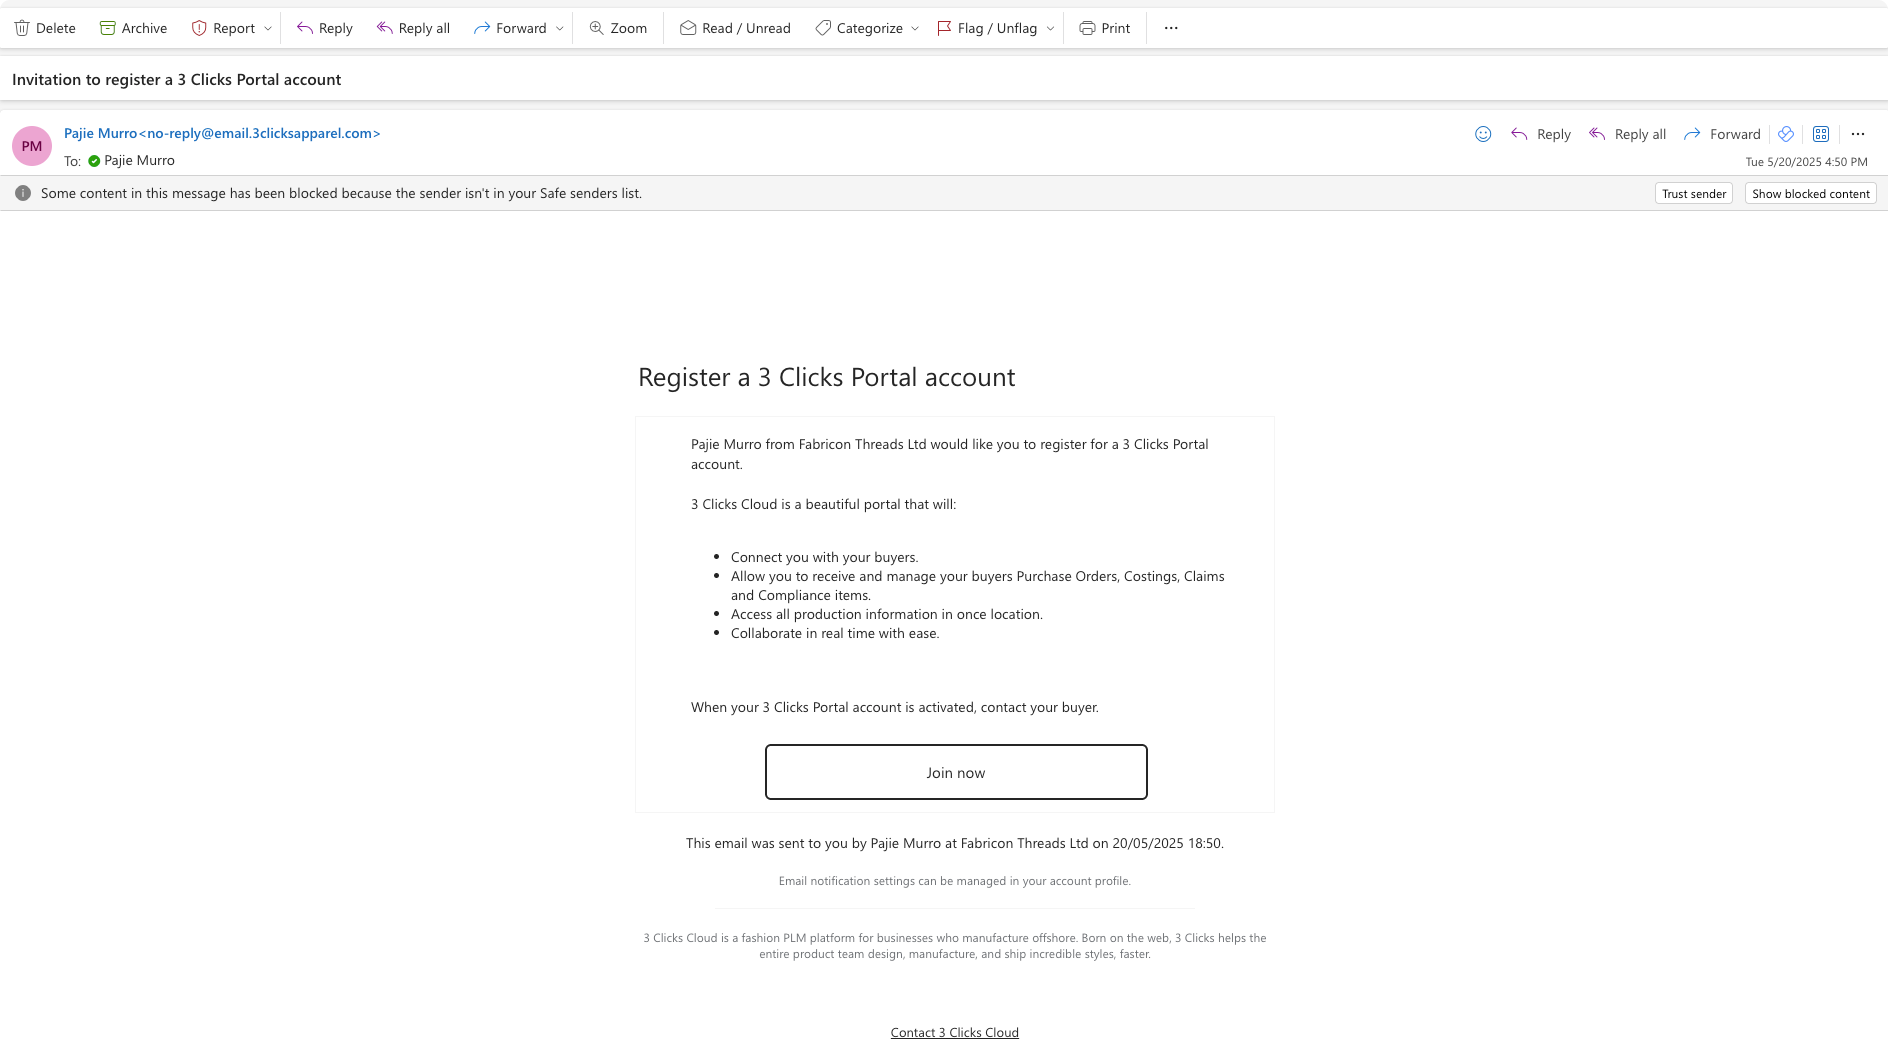 |
| 2 | The supplier clicks the link to access the registration form. 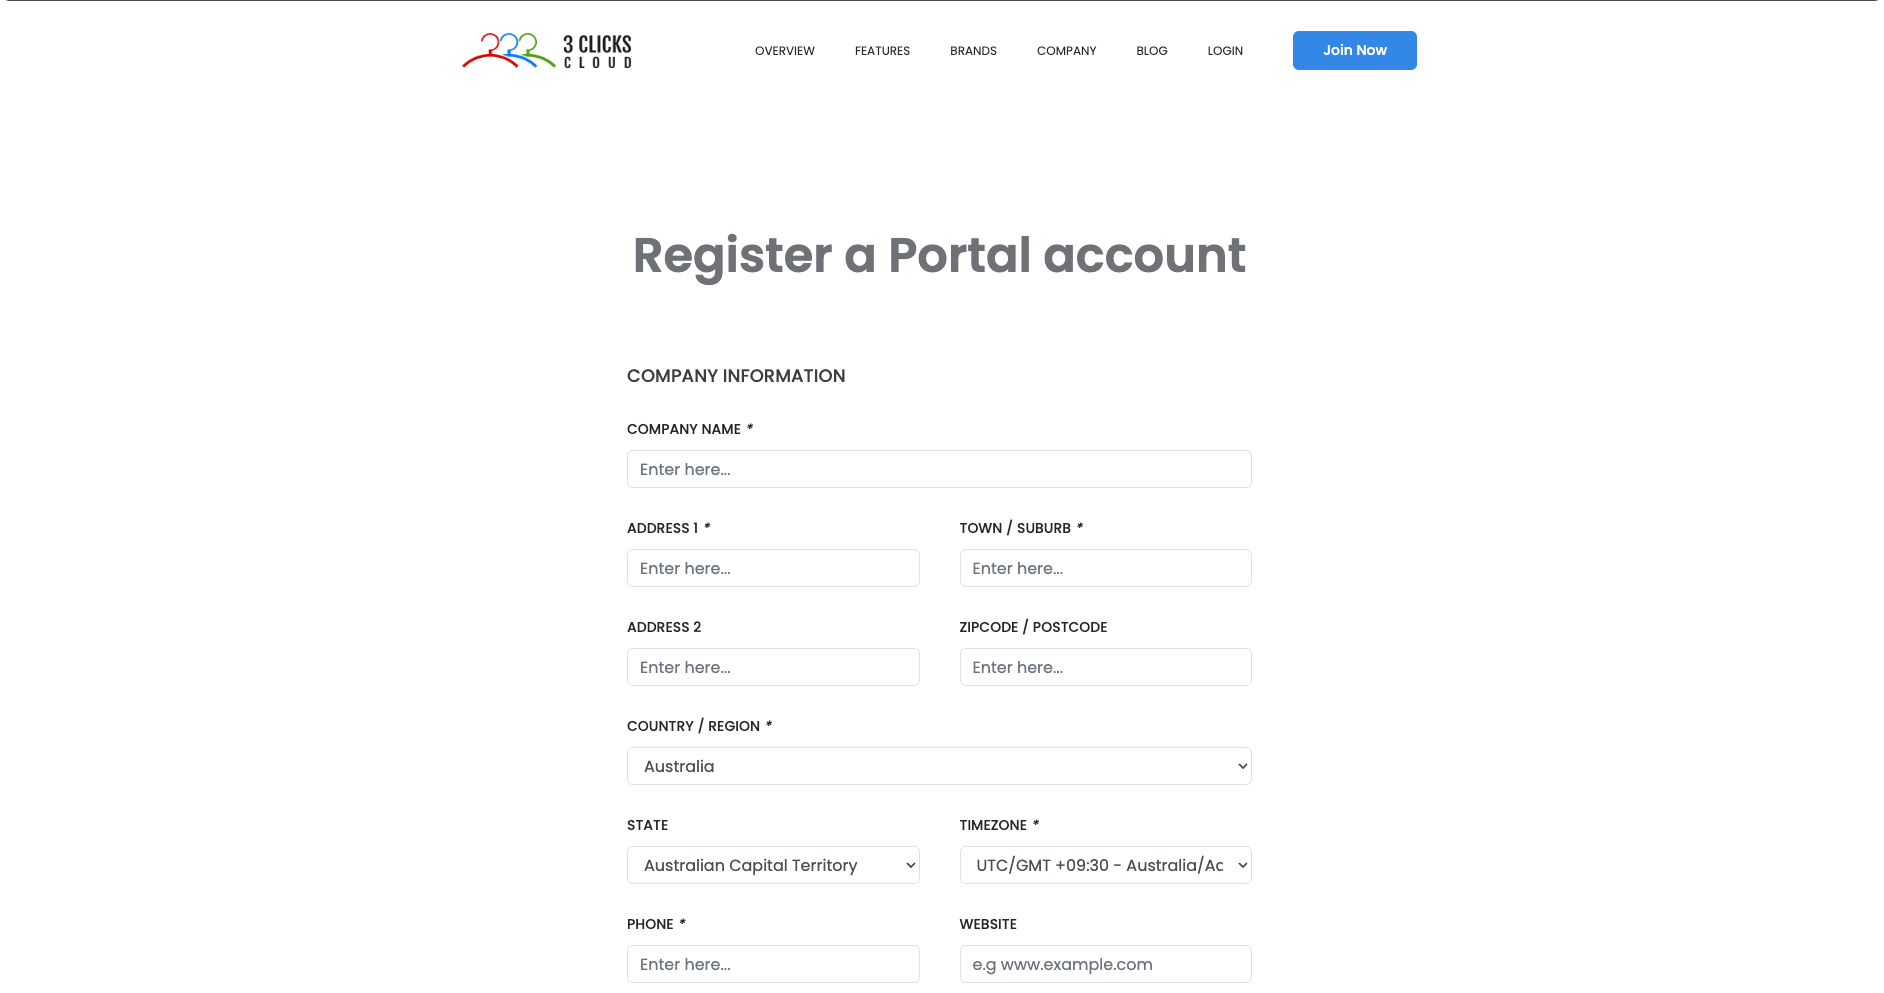 |
| 3 | The supplier fills out all required details including company information and user credentials. |
| 4 | Upon submission, the supplier is automatically registered and linked to your company/organisation. |
Automatic Linking
Once the supplier creates and enables their portal account through the invitation link, they are automatically linked to your organisation and added to Site Settings > Company > Suppliers. No additional manual steps are required from your end.
Method 2: Manual Addition After Registration
This method is used when a supplier has already registered on the 3 Clicks Cloud platform independently, but has not yet been linked to your organisation.
Supplier's Registration
The supplier must first register their account directly on the 3 Clicks Cloud platform:
| Step | Action |
|---|---|
| 1 | Navigate to the Registration Page |
| 2 | Fill out all required registration fields. |
| 3 | Complete any verification steps required by the platform. |
Company's Manual Addition
After the supplier has successfully registered their account, you can manually add them to your company's supplier list:
| Step | Action |
|---|---|
| 1 | Access the Site Settings menu from the main page. |
| 2 | Go to Company > Suppliers from the Site Settings. 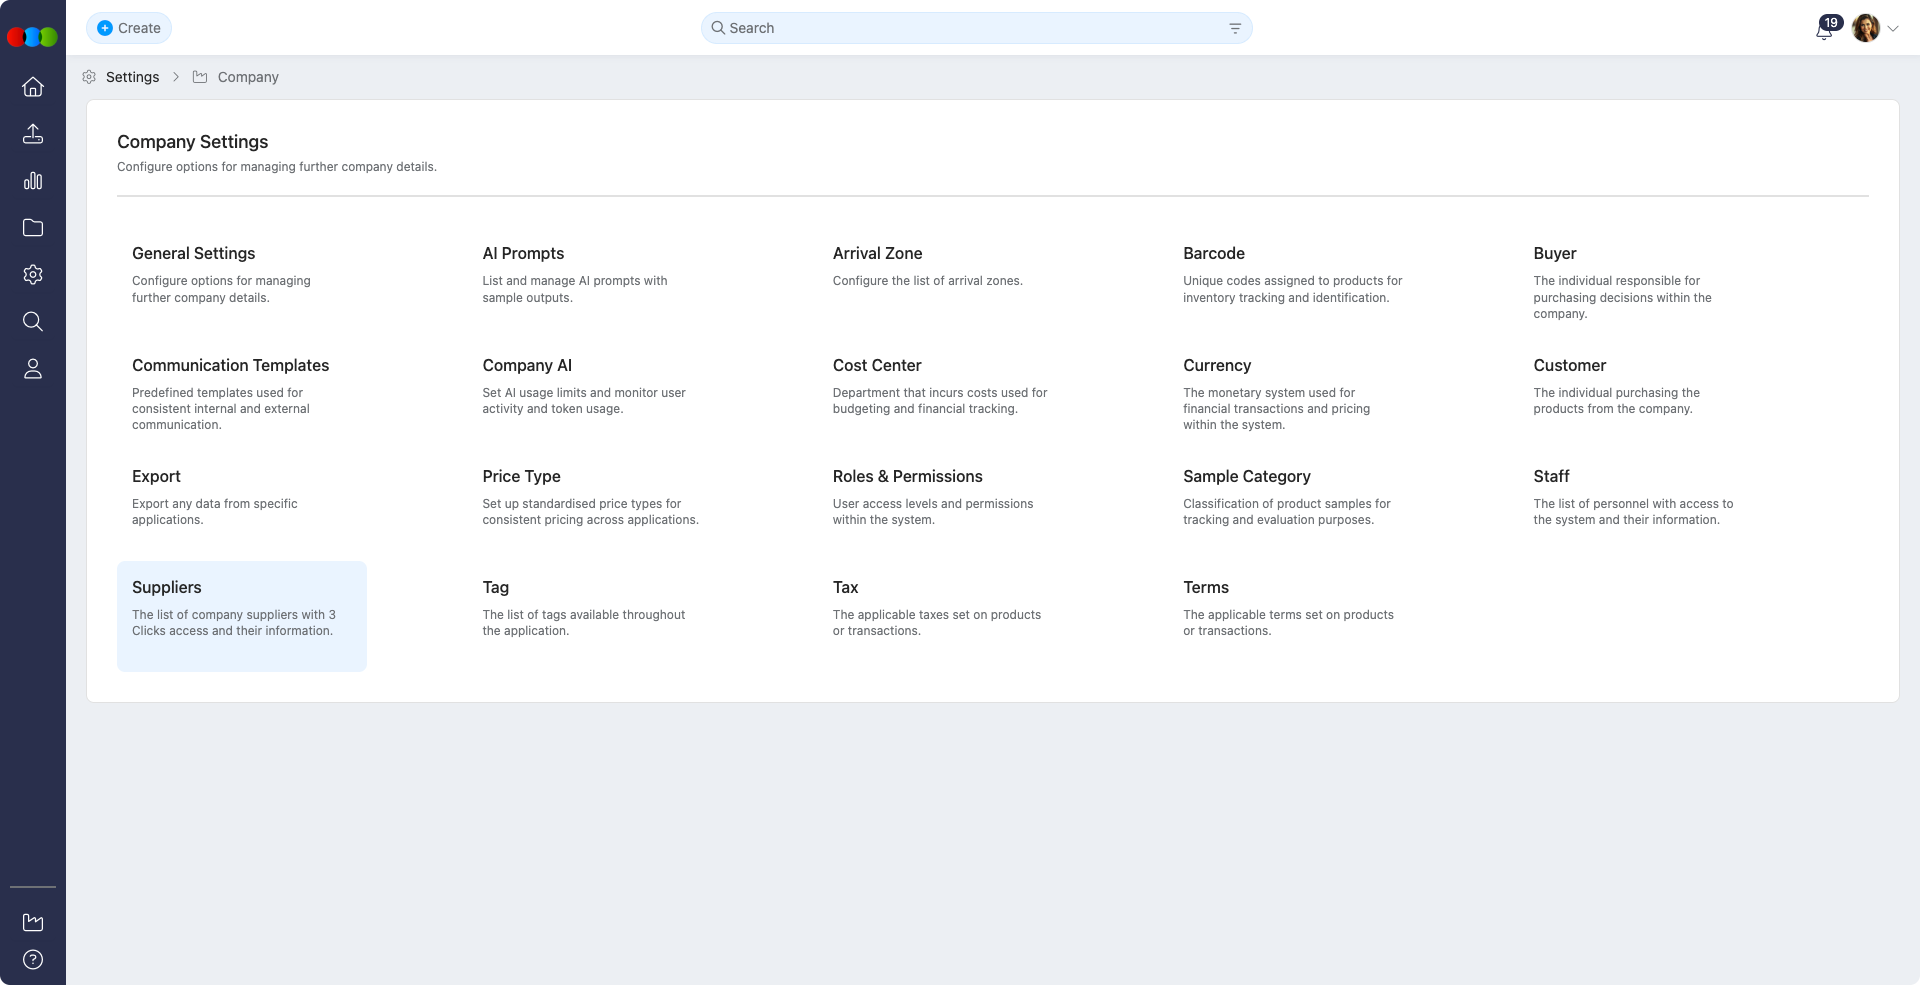 |
| 3 | Click the + (plus) icon next to the Supplier section. 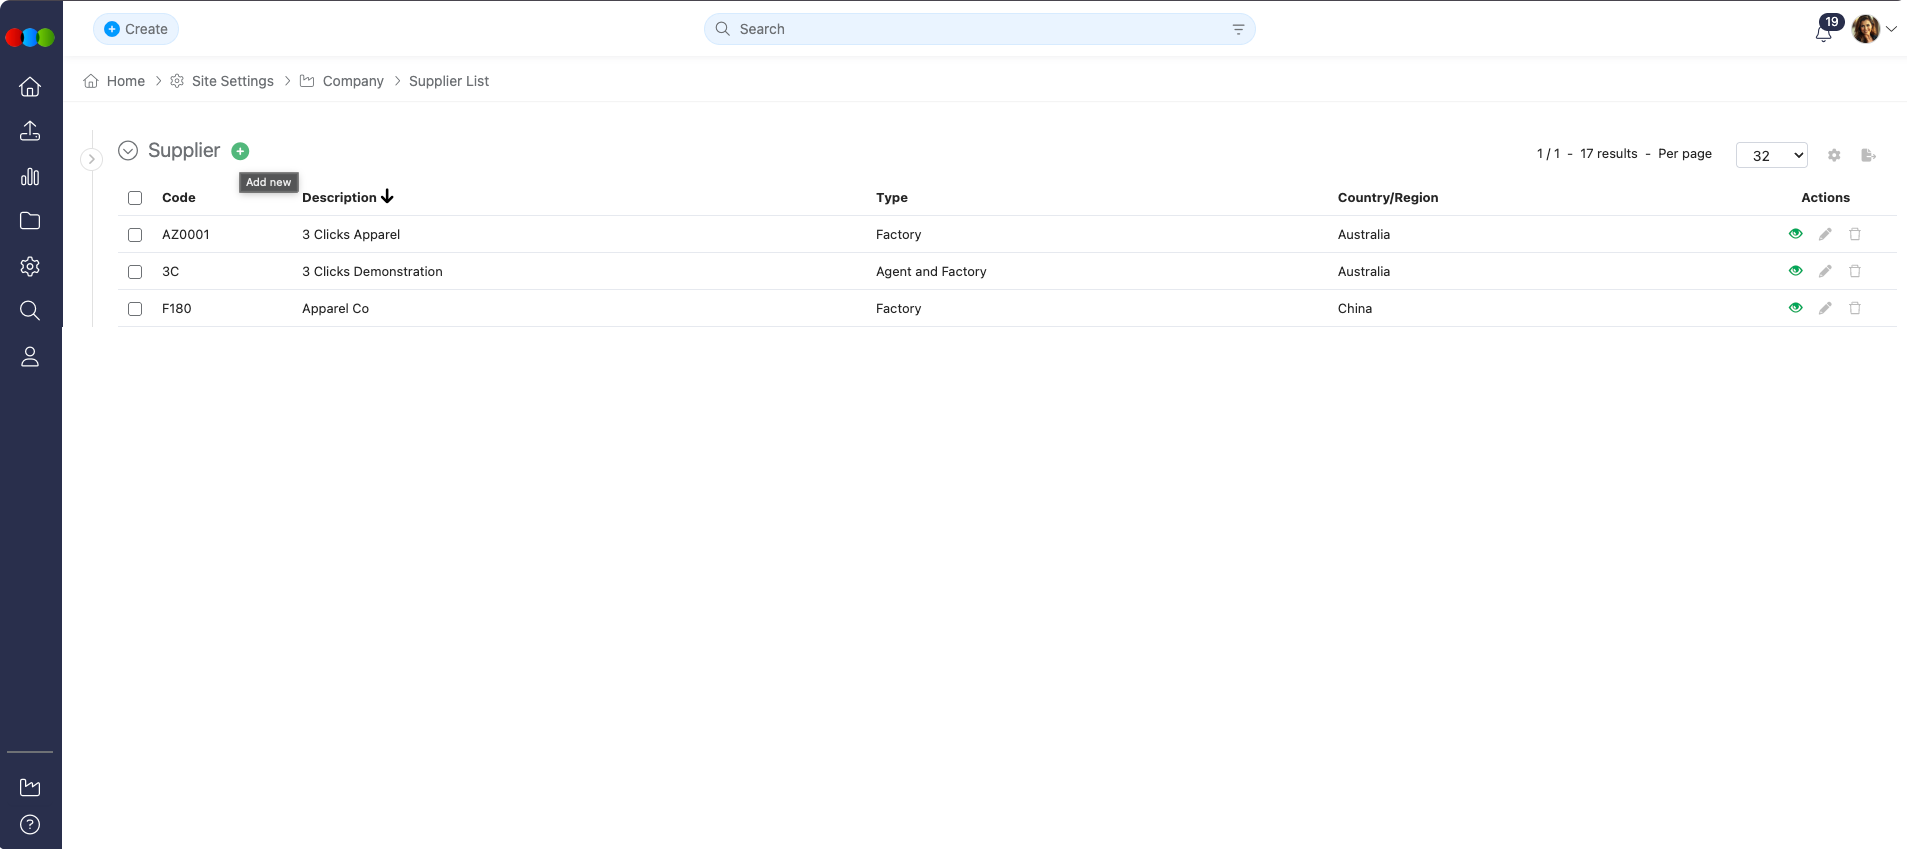 |
| 4 | Use the search bar to locate the supplier by name or email. 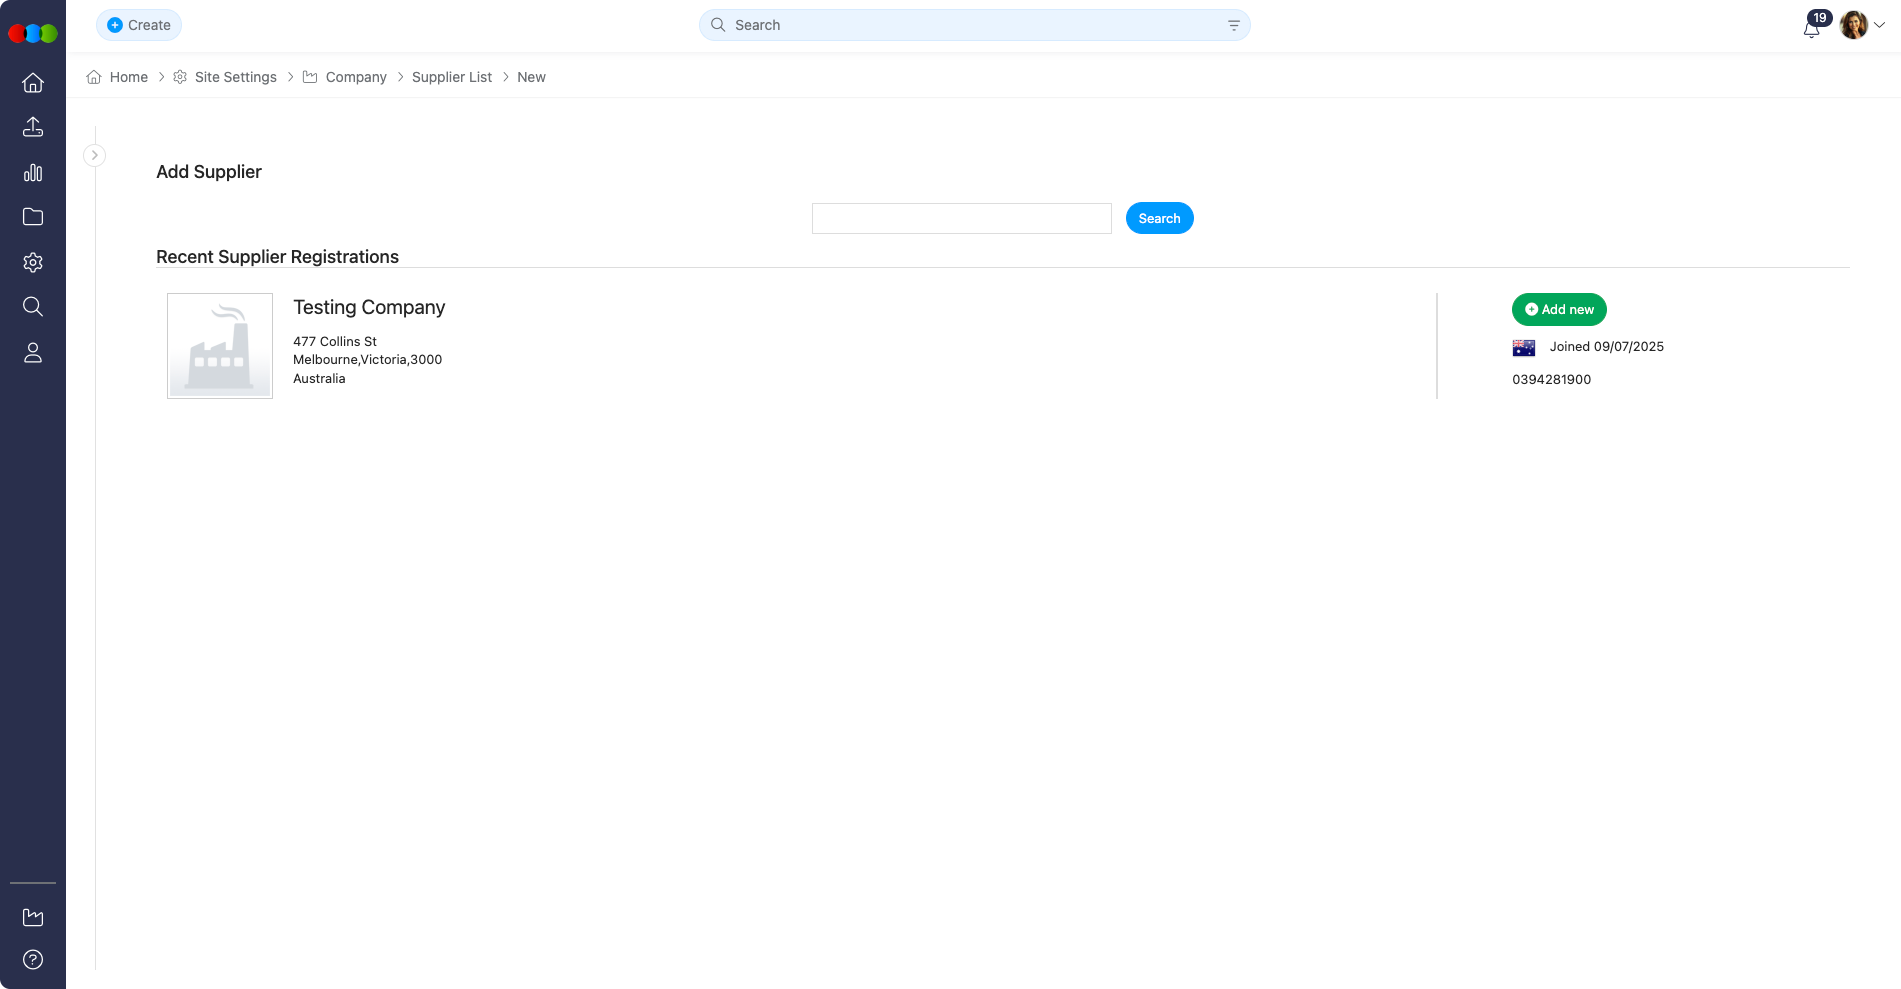 |
| 5 | Once the supplier is located, click Add New to add them as your supplier, and then confirm. 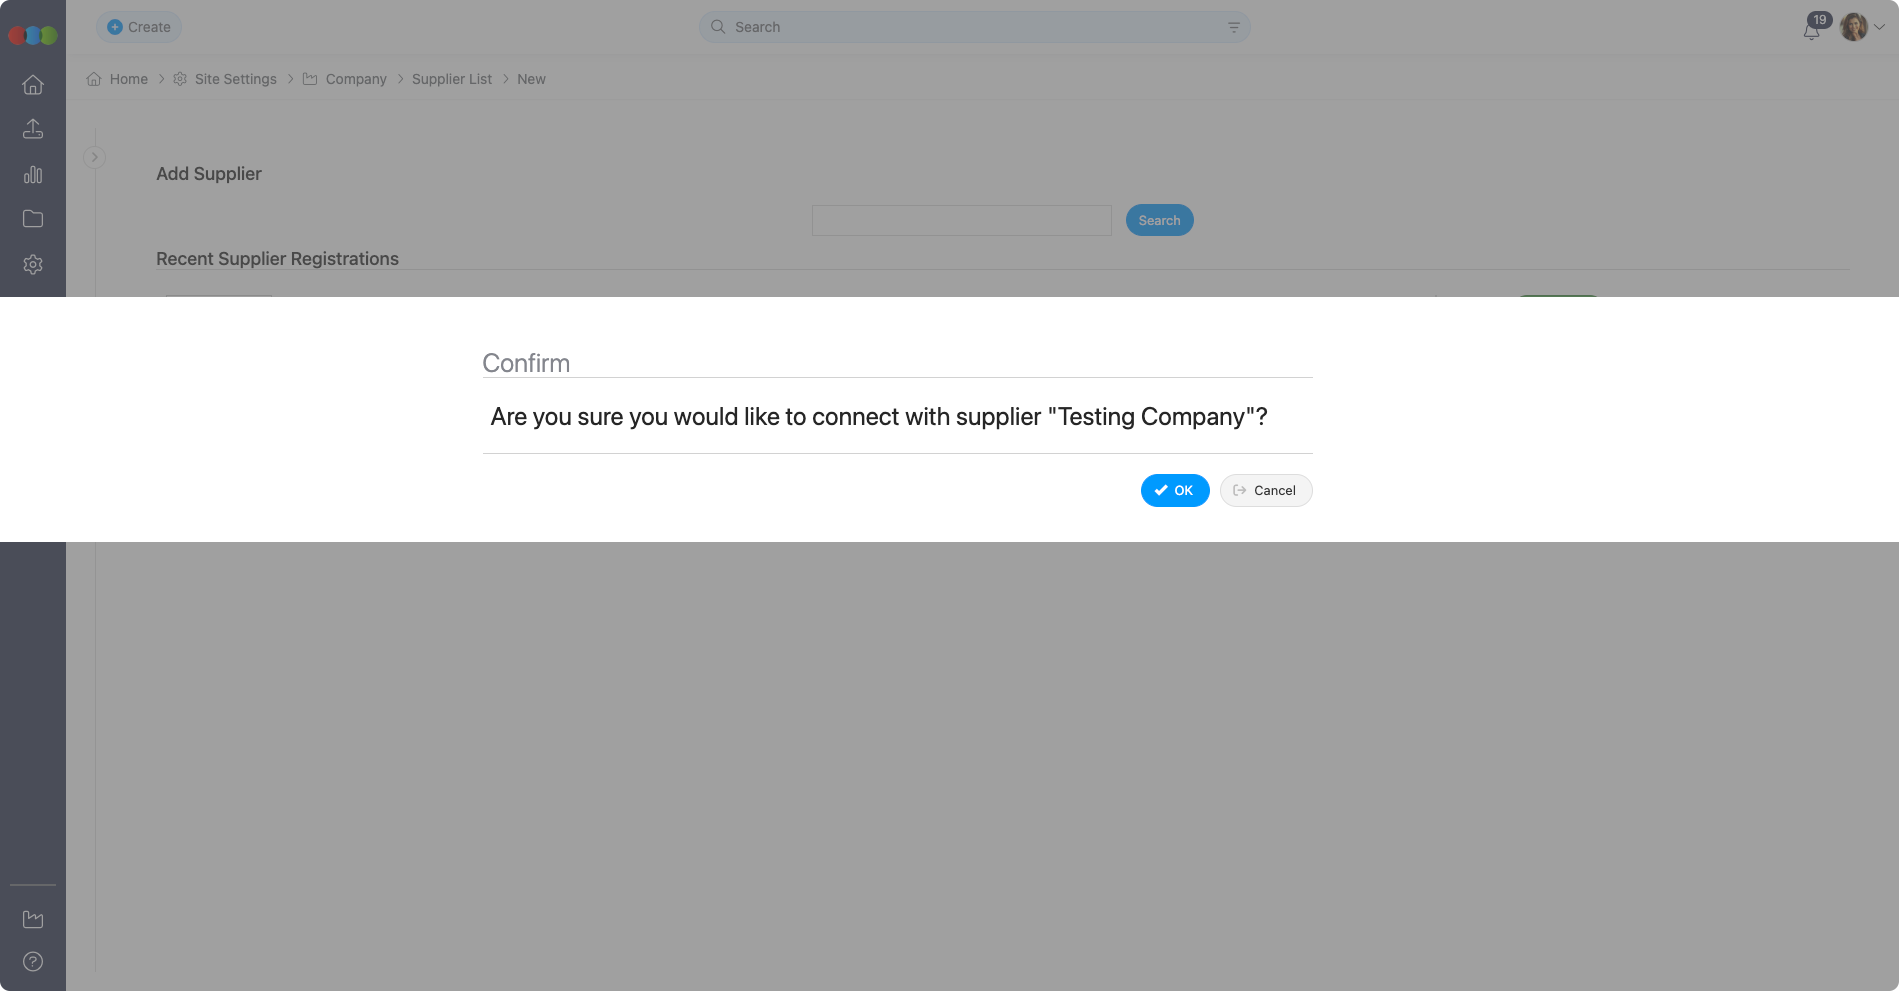 |
Editing Supplier Details
After adding a supplier, you can edit their details at any time by clicking the pencil icon next to their entry in the supplier list.
Best Practices
- Verify Email Addresses: Always confirm supplier email addresses before sending invitations to avoid delivery failures.
- Maintain Supplier Information: Regularly review and update supplier details to ensure accuracy.
- Use Invite Business for new suppliers: Prefer the Invite Business icon or Site Settings > Company > External Connections for new suppliers so connection type, portal access, and profile are configured in one guided workflow.
Related Actions
- Site Settings > Company > External Connections
- Site Settings > Company > Suppliers
- Add Staff Members
- Manage Staff Account
- Supplier Monthly Capacity
Troubleshooting
Why didn’t the supplier receive the invitation email?
The message may have been blocked, sent to junk mail, or the address may have been mistyped.
Steps to resolve:
- Confirm the email address matches what the supplier uses day to day
- Ask the supplier to check Spam or Junk folders
- Resend the invitation from Site Settings > Company > External Connections (Resend invite) or send a new connection from the Invite Business icon if the address was wrong or the message never arrived
The supplier says the registration link does not work—what should we do?
Links can expire or be opened from the wrong message; the supplier may need a fresh invitation or an alternative linking path.
Steps to resolve:
- Confirm they are using the link from the latest invitation email only
- If the link has expired, use Resend invite in Site Settings > Company > External Connections or create a new supplier connection to send a new invitation
- If registration via link is no longer possible, have them complete signup at the platform registration page, then use Site Settings > Company > Suppliers to search and Add New (Method 2), or link them via External Connections > Link existing portal business
The supplier already registered on their own but does not appear in our supplier list—how do we link them?
Invitation-based onboarding links the supplier automatically; independent registration requires a manual add from your company’s supplier list.
Steps to resolve:
- Go to Site Settings > Company > Suppliers
- Click + and search by name or email as they used when registering
- Select Add New and confirm; if they still do not appear, verify spelling and email with the supplier or contact support